Payments & Billing
Wallet and billing
Fund your wallet, save cards or bank accounts, read your transaction history, print receipts, and download CSV exports for taxes, all from the Billing tab.
The Billing tab is where money lives in Printonic. It holds your wallet balance, your saved payment methods, your full transaction history with receipts, CSV exports for taxes, and your subscription plan. Keeping a payment method on file and a little balance in your wallet means order checkout takes seconds instead of a form-filling detour.
- 1
Dashboard > Billing
Open the Billing tab
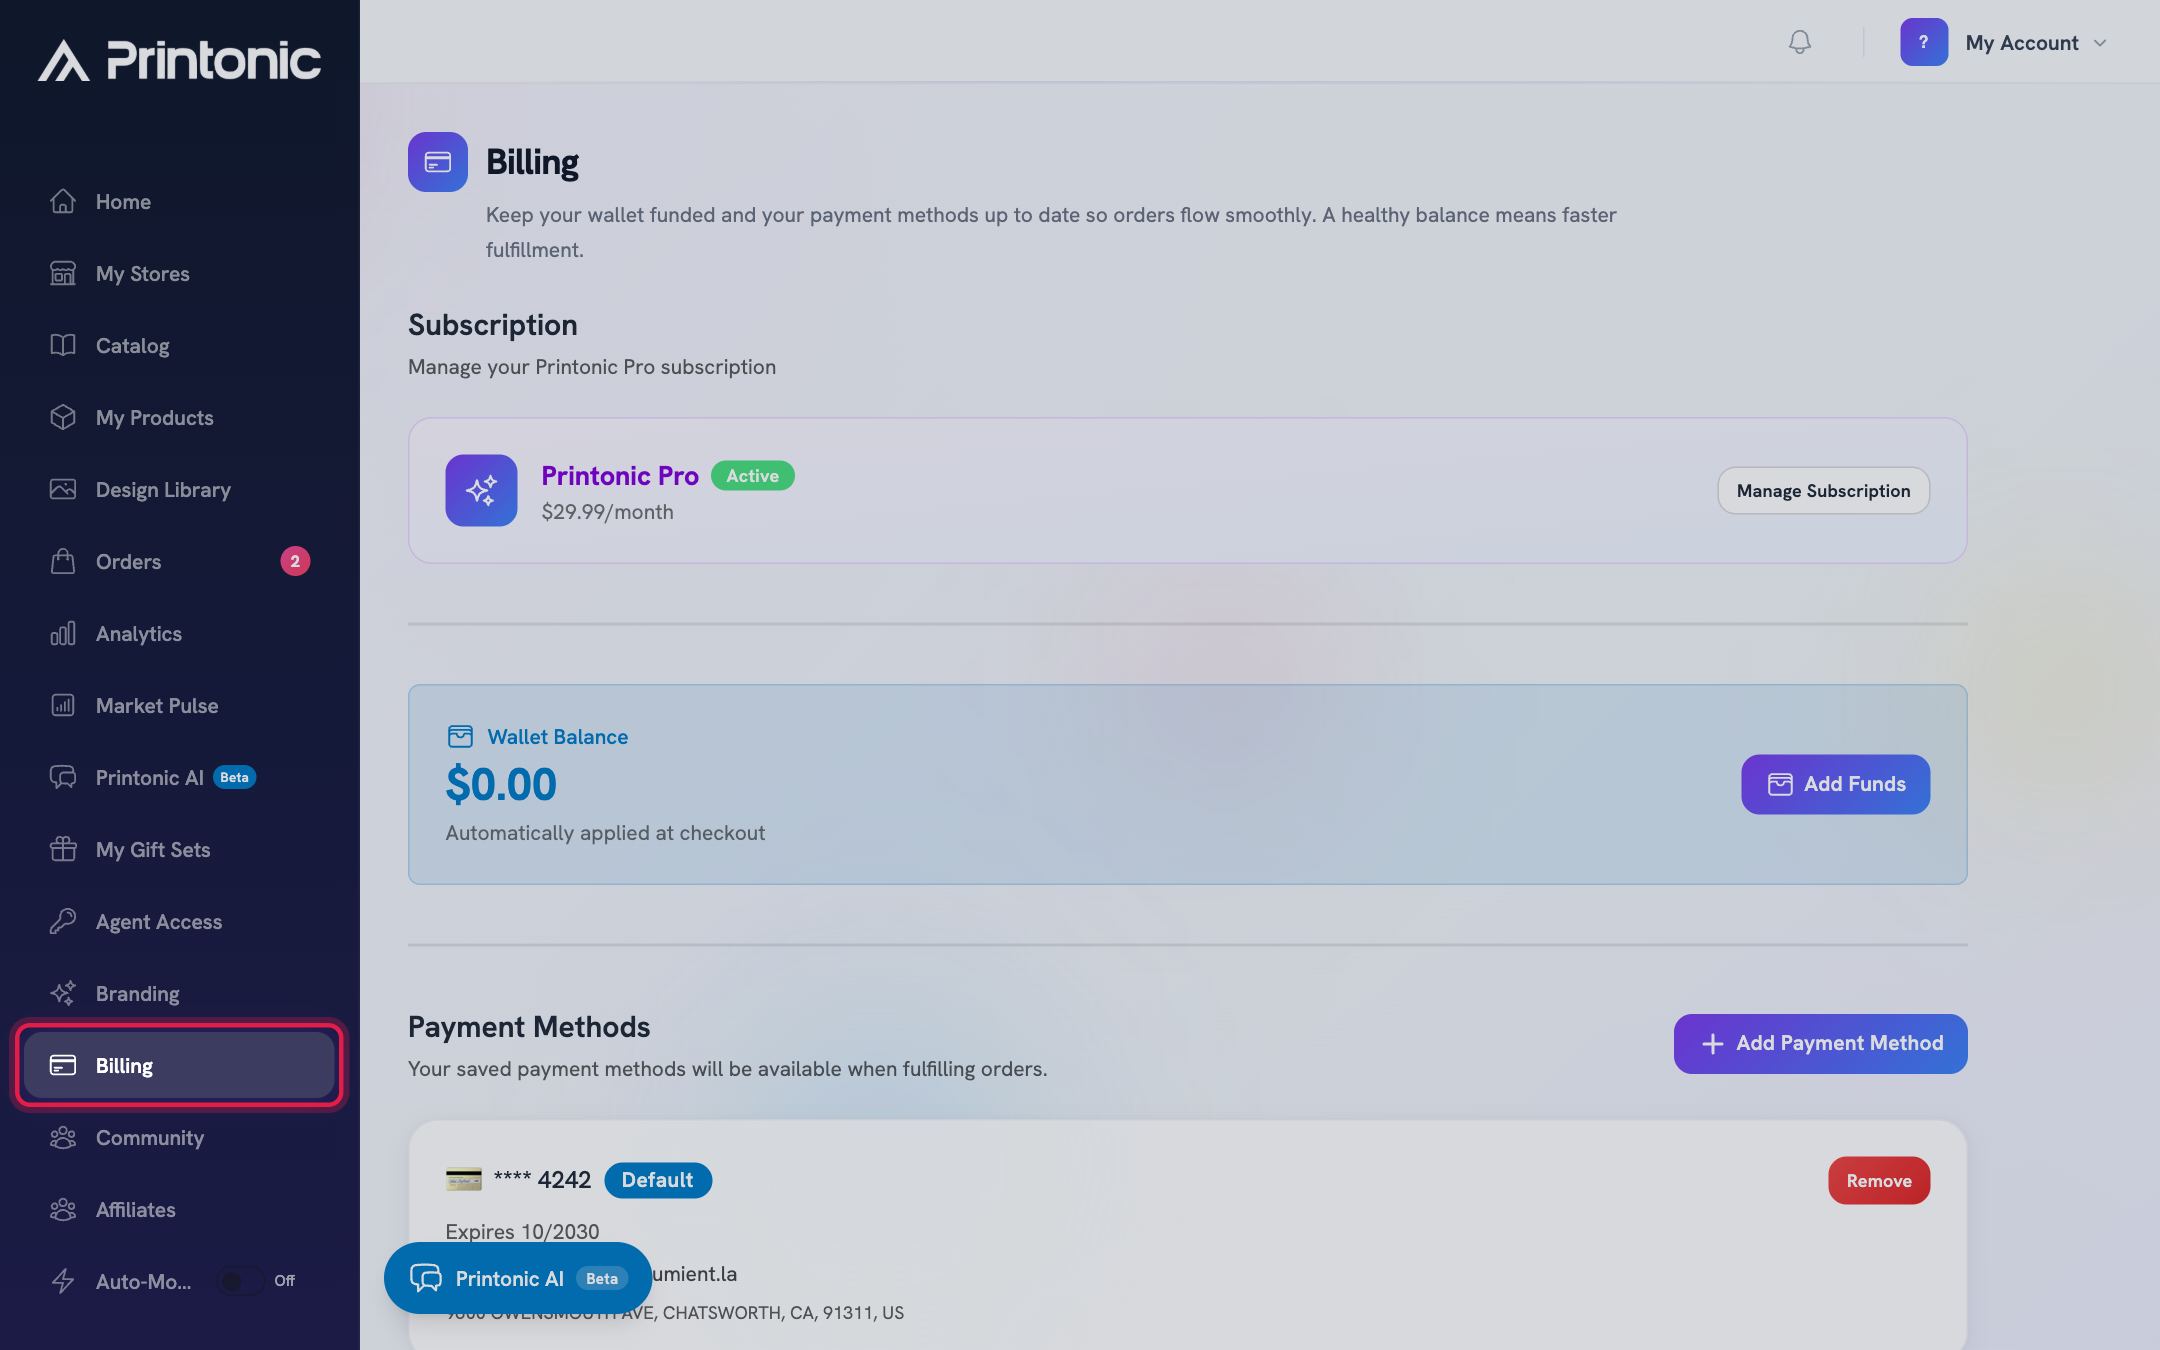
Click Billing in your dashboard. The page is organized into sections from top to bottom: Subscription, Wallet, Payment Methods, Transaction History, and Reports & Exports. Each section works on its own, so you can jump straight to the part you need.
- 2
Billing > Payment Methods > Add Payment Method
Add a payment method
Click Add Payment Method. A secure payment form loads where you can enter a card or a US bank account, plus a Billing Email and Billing Address. Fill it in and click Save Payment Method. You are returned to Billing and the new method appears in the Payment Methods list, showing the last four digits, the expiry date for cards, and your billing details.
Your saved payment methods are what you use when fulfilling orders and when adding wallet funds. If you have no method saved yet, you will see 'No payment methods yet' and you cannot add wallet funds until you save one.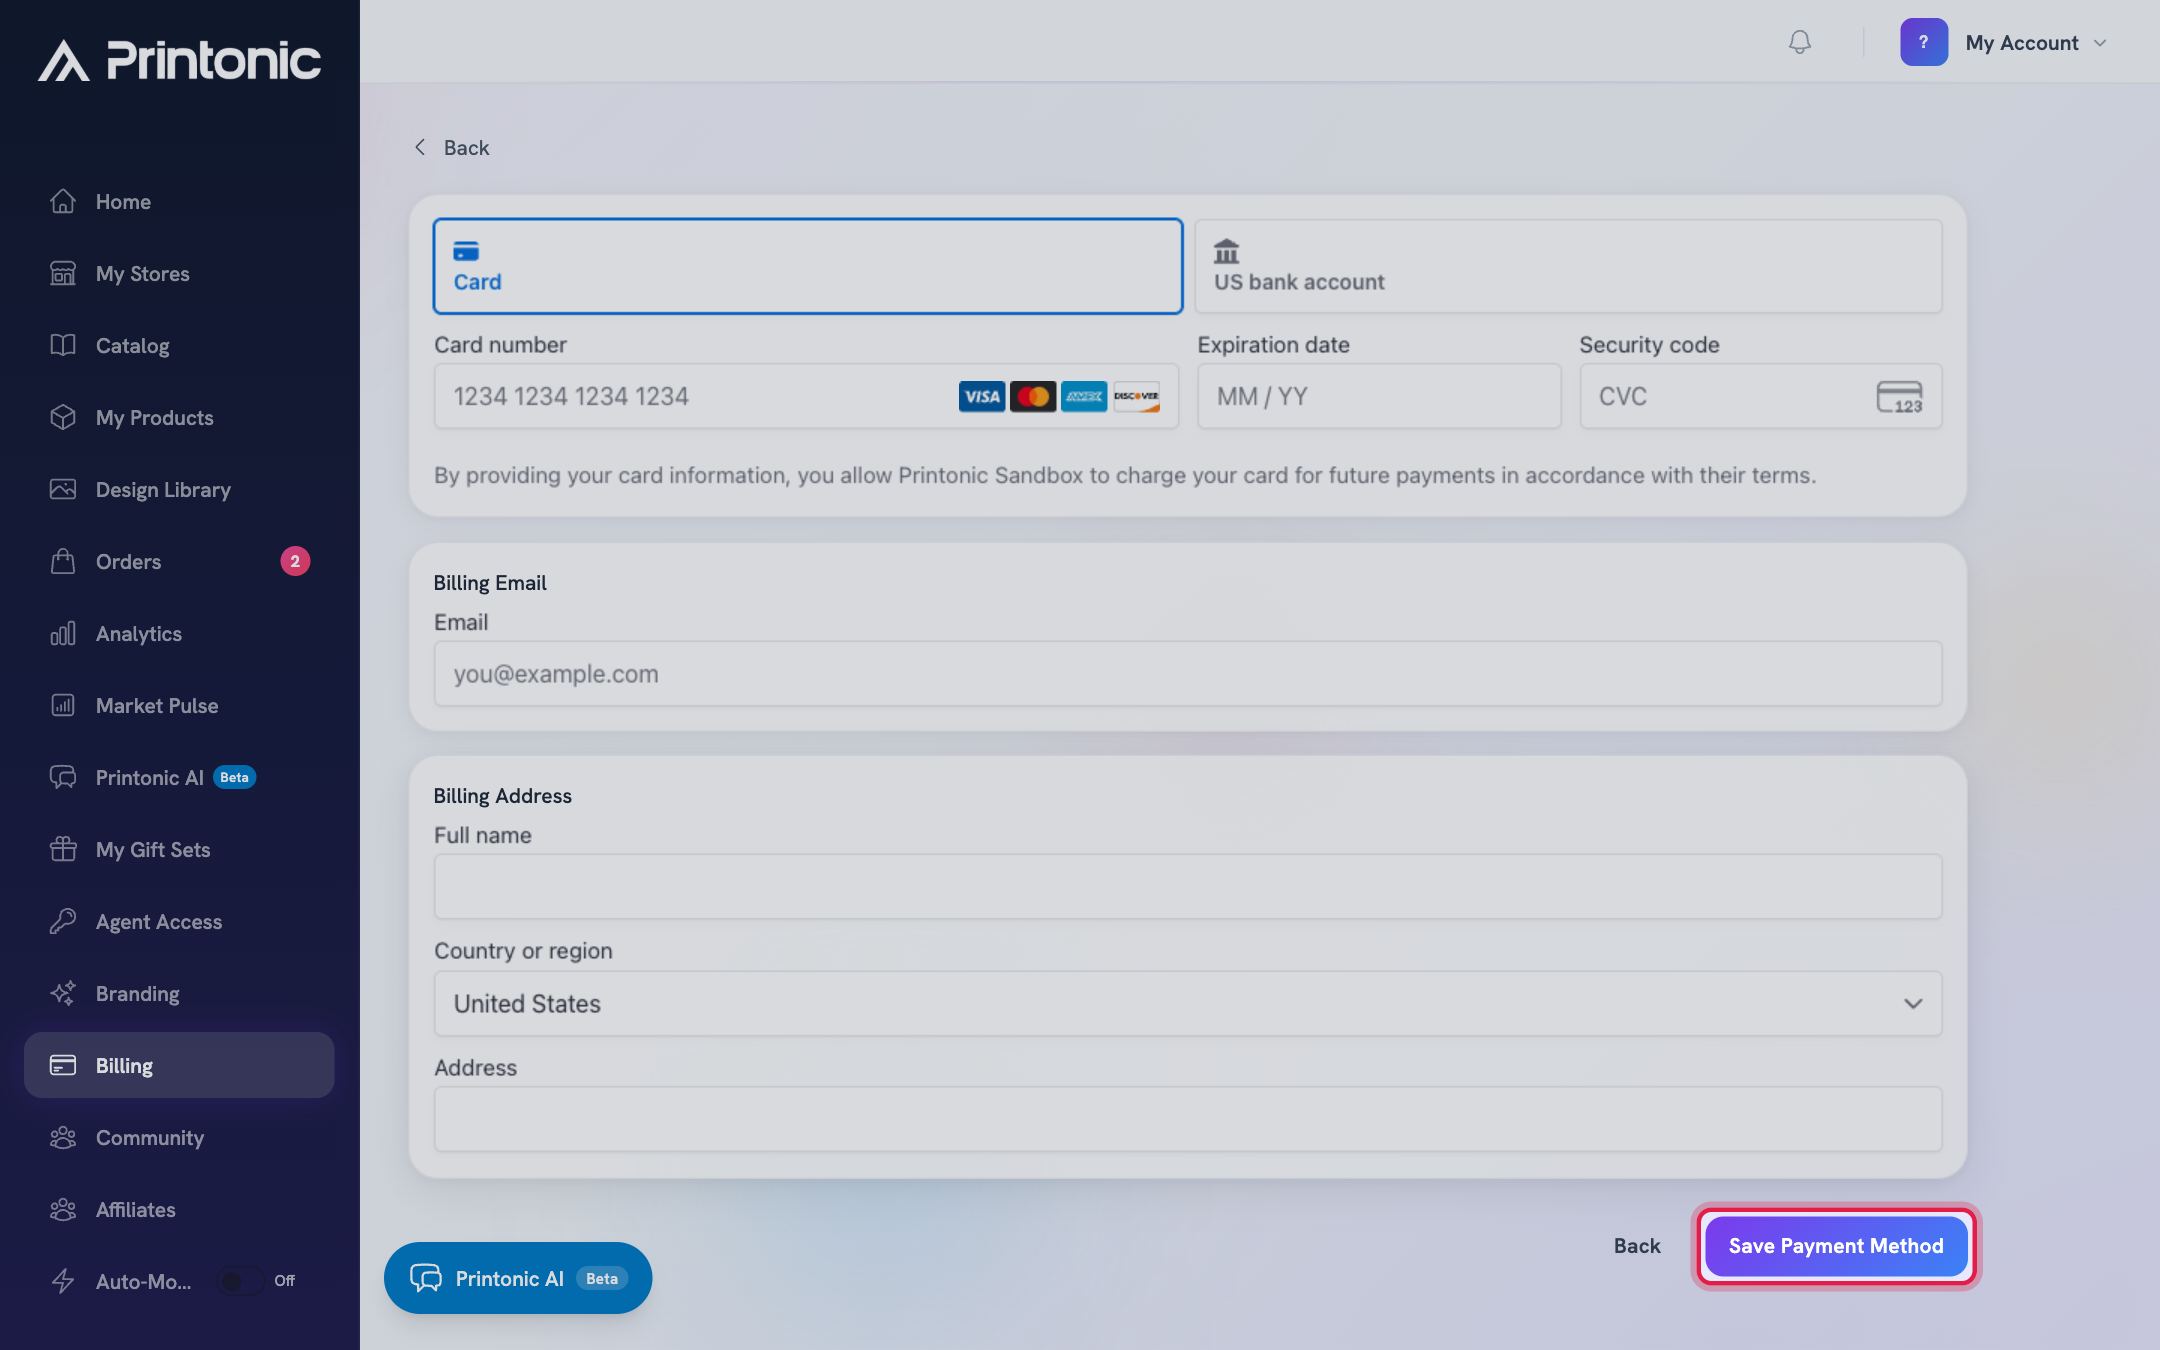
- 3
Billing > Payment Methods
Set a default or remove a method
Each saved method has buttons on the right. Click Make Default to make it the one Printonic prefers at checkout (it gets a Default badge). Click Remove to delete a method you no longer use.
The Remove button is disabled on your default method. To remove it, click Make Default on another method first, then remove the old one.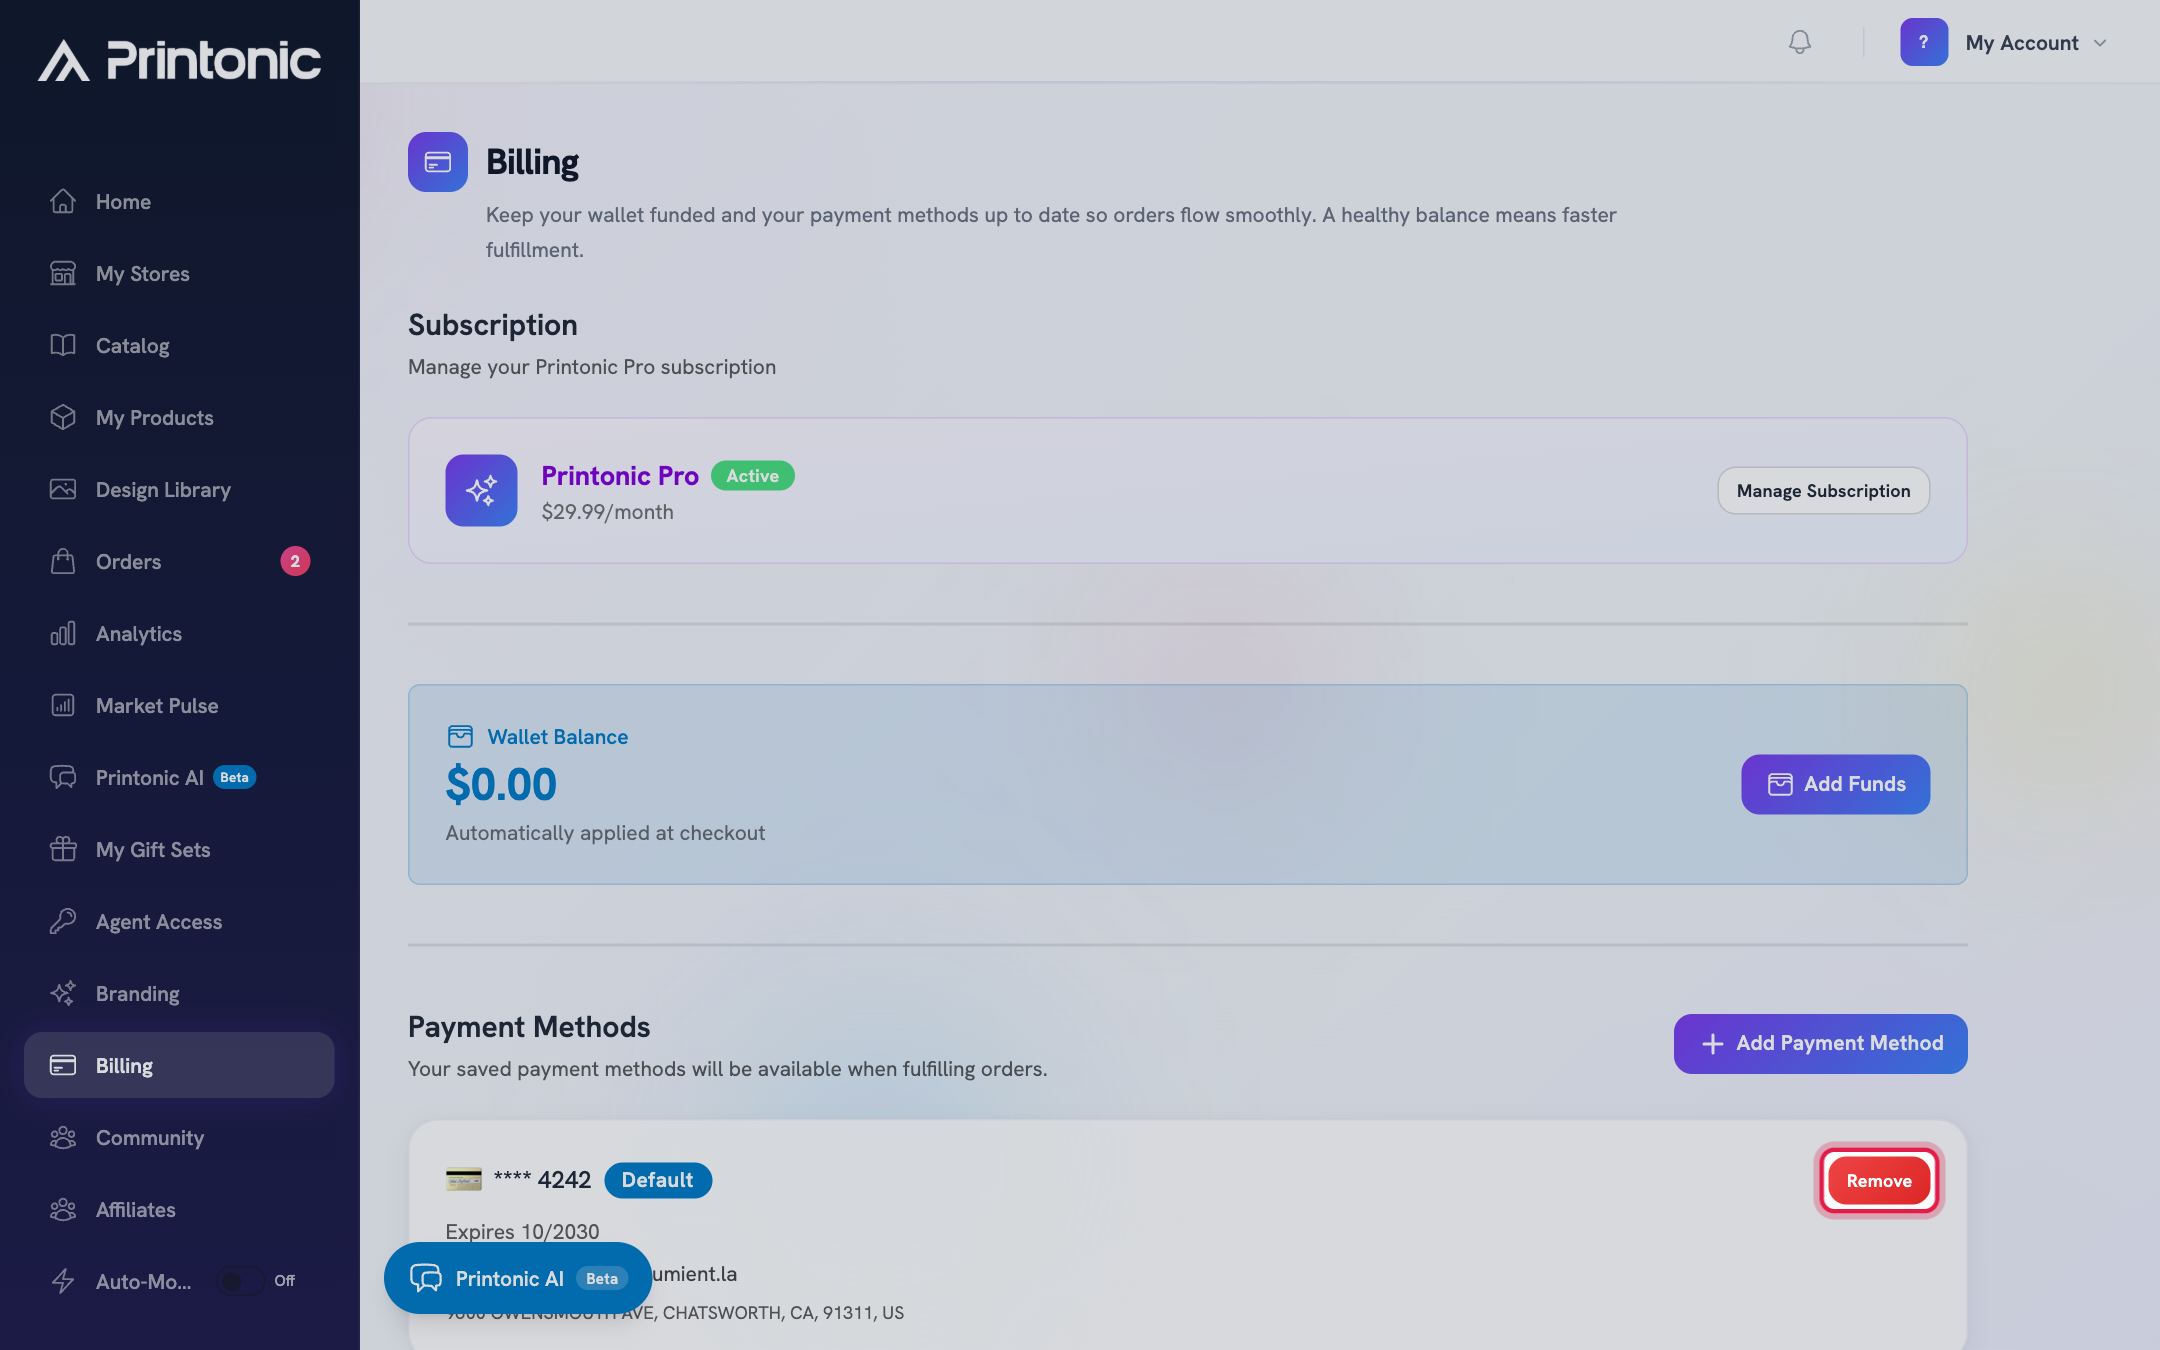
- 4
Billing > Wallet
Understand your wallet balance
The Wallet Balance card shows your total balance, which is your deposited funds plus any promotional credits Printonic has granted you. The card says 'Automatically applied at checkout', and that is exactly what happens: when you pay for orders, credits are used first, then your deposited cash, and any remainder is charged to your selected payment method.
If any of your credits have an expiration date, a 'Credits Expiring Soon' warning appears below the balance listing each amount, the reason it was granted, and the date it expires. Since credits are spent first at checkout, using your wallet before those dates means nothing goes to waste.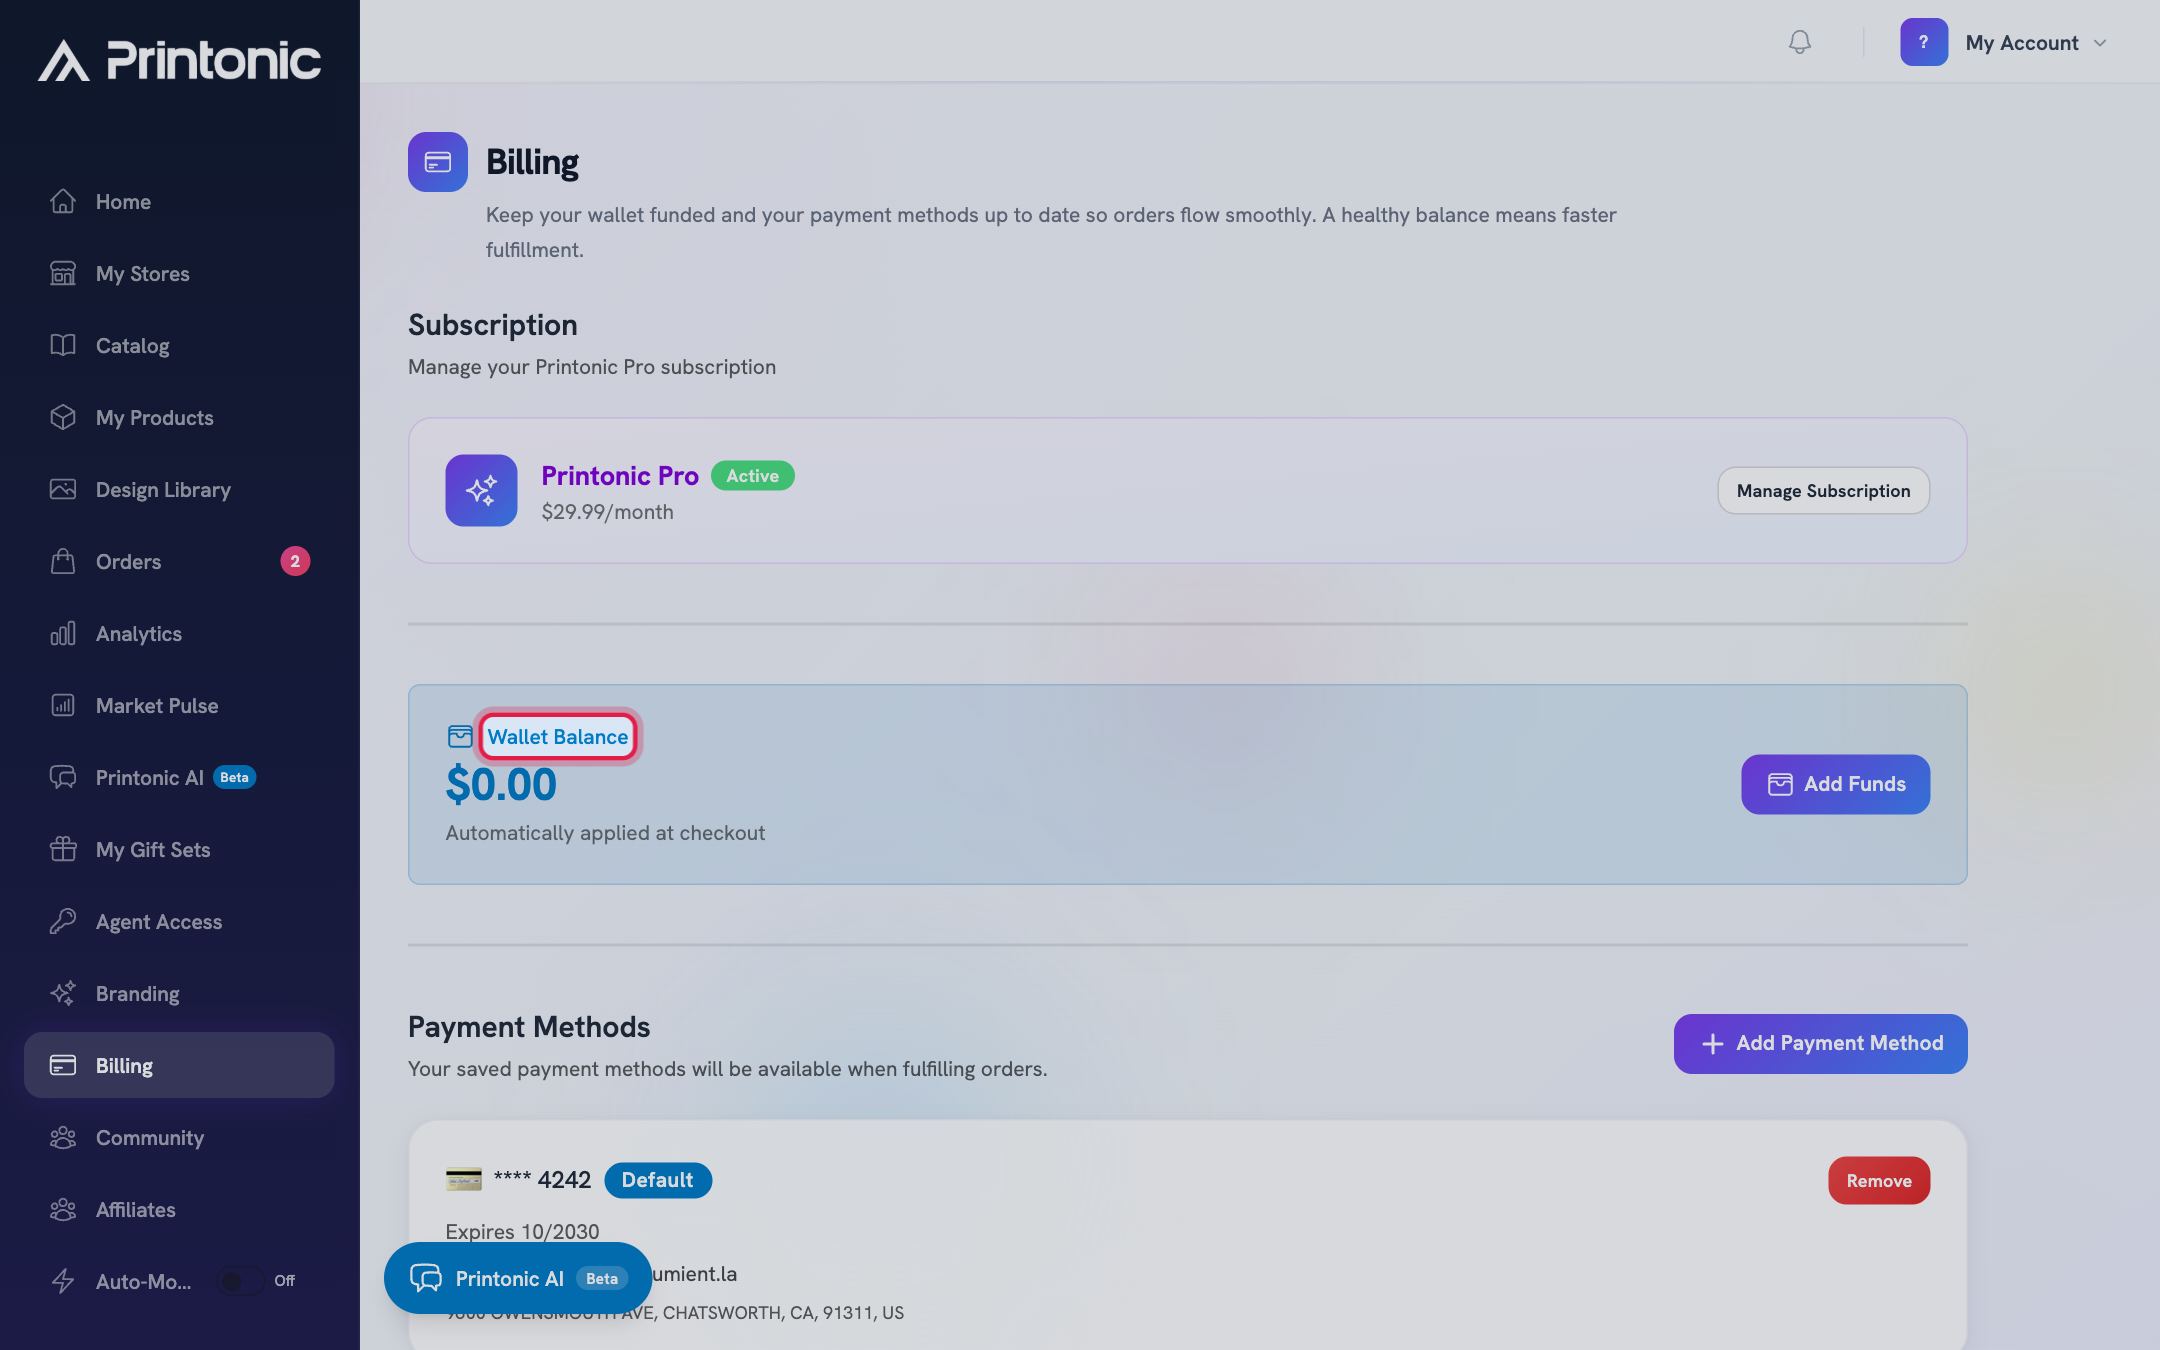
- 5
Billing > Wallet > Add Funds
Add funds to your wallet
Click Add Funds. On the Add Funds to Wallet page, pick a preset amount ($25, $50, $100, or $250) or enter a custom amount, then click Continue to Payment. Choose one of your saved payment methods and click the Add button showing your amount (for example, 'Add $50.00 to Wallet'). On success you will see 'Funds Added Successfully!' and can click Back to Billing.
Deposits must be between $5.00 and $1,000.00. If you pay with a bank account, you will see 'Deposit Processing' instead: bank transfers take 3 to 5 business days, and your balance updates once the transfer is confirmed.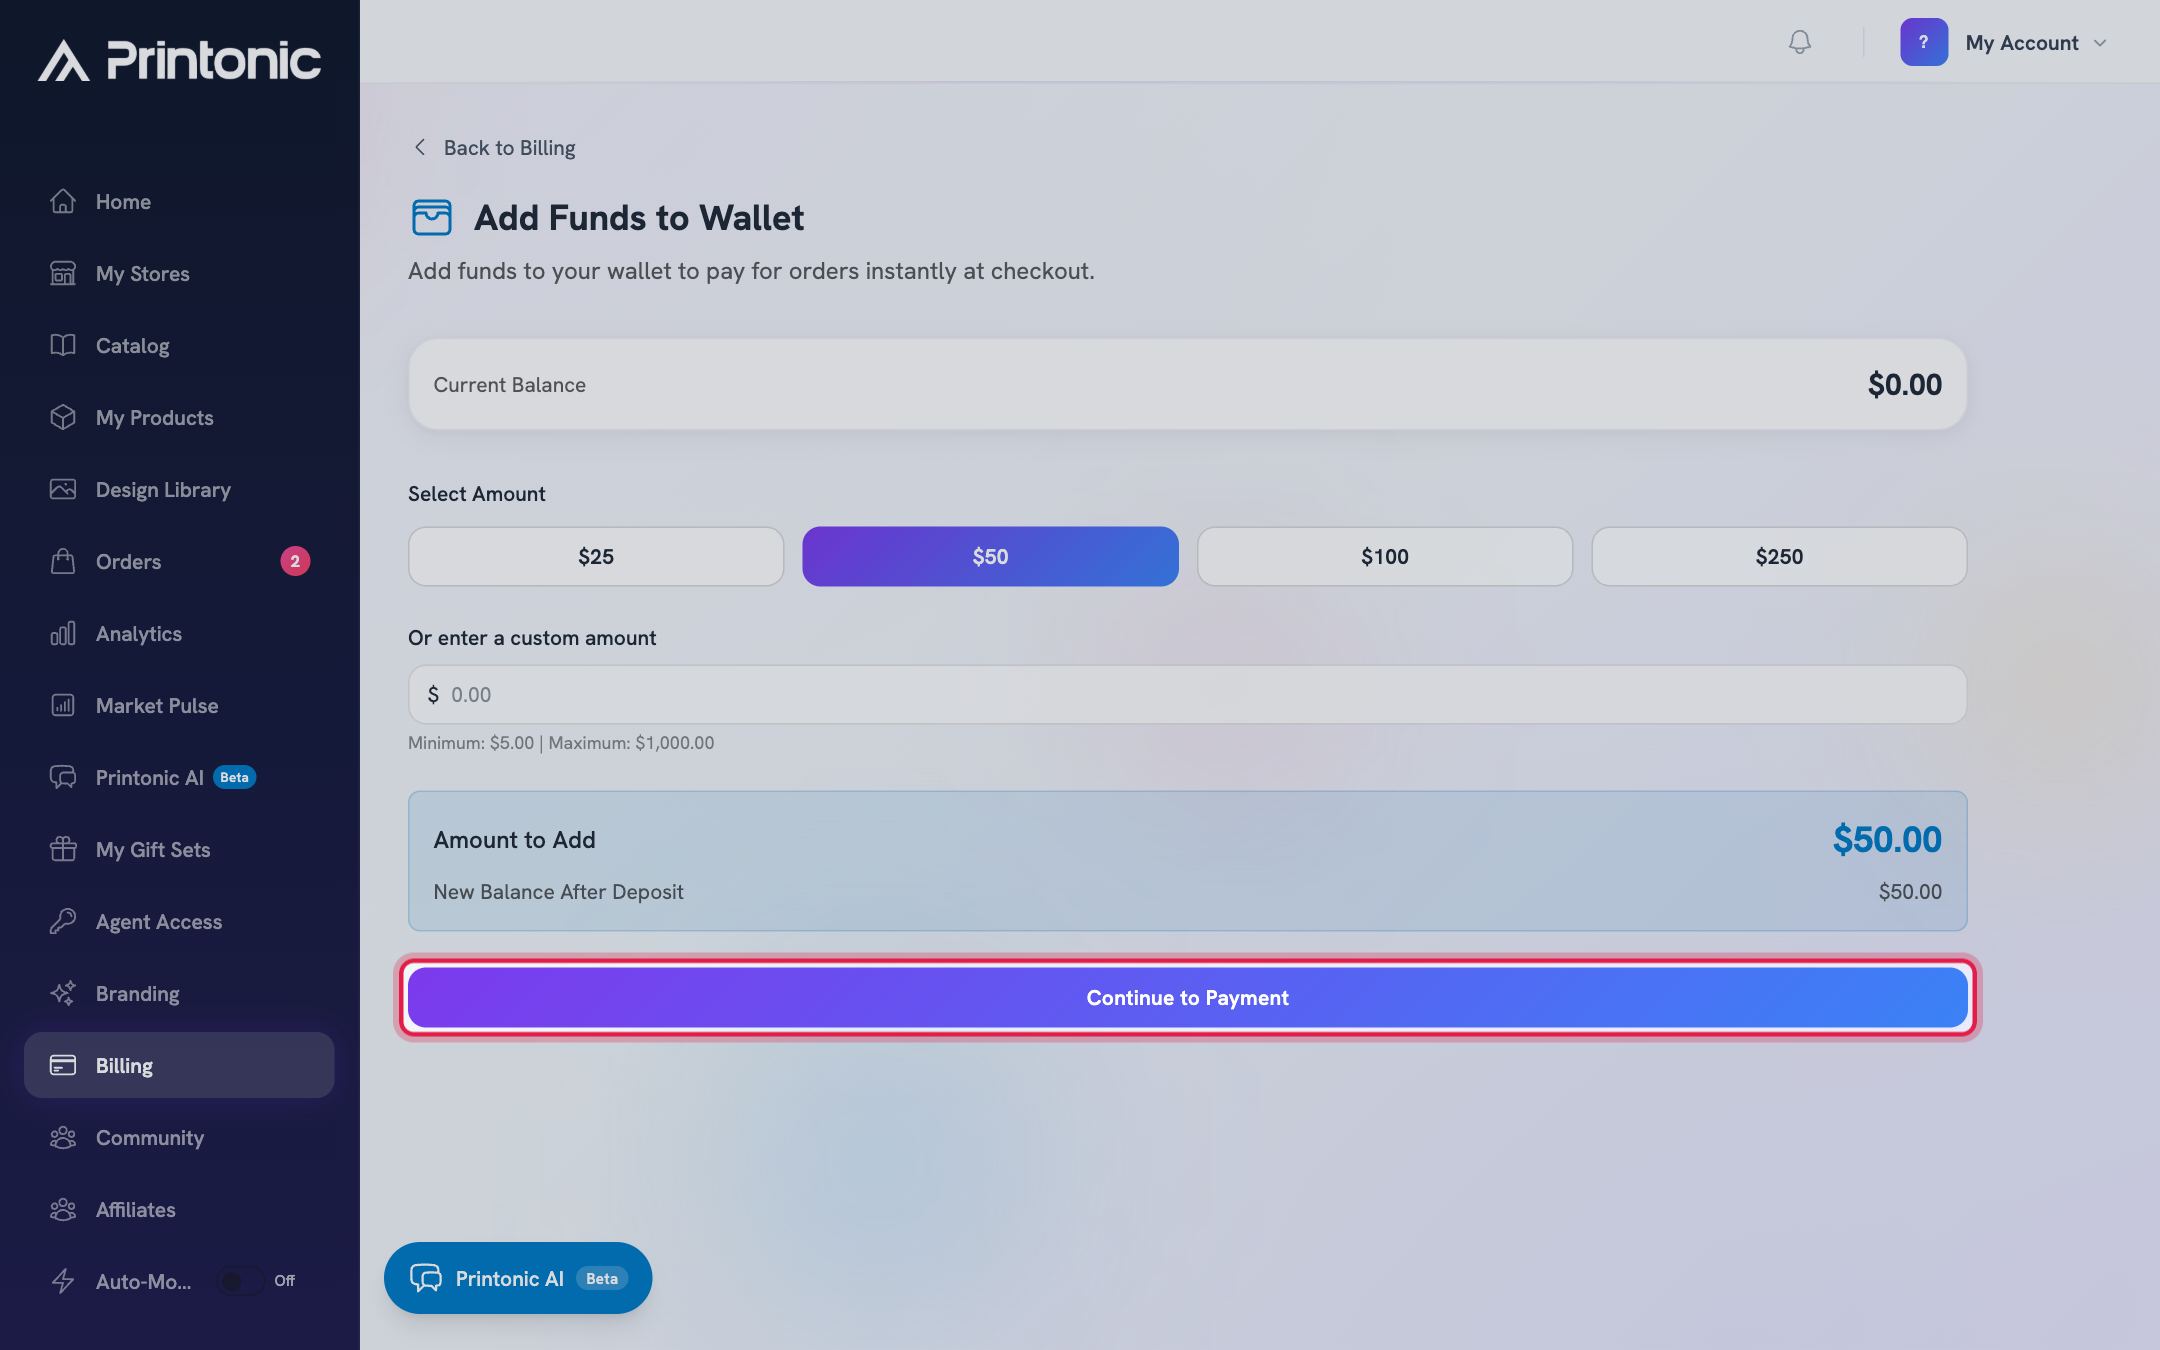
- 6
Billing > Transaction History
Read your transaction history
This table lists your wallet deposits, credits, and order payments with Date, Type, Description, and Amount columns. Deposits and credits show as green positive amounts, payments as red negative amounts. Order payments include a small breakdown line showing how the total was split, for example '$10.00 wallet + $15.00 Visa' with the card's last four digits.
A yellow Pending badge means the money is still in transit (typically a bank deposit). It counts once it clears. The table shows your 10 most recent transactions; a line underneath tells you how many exist in total.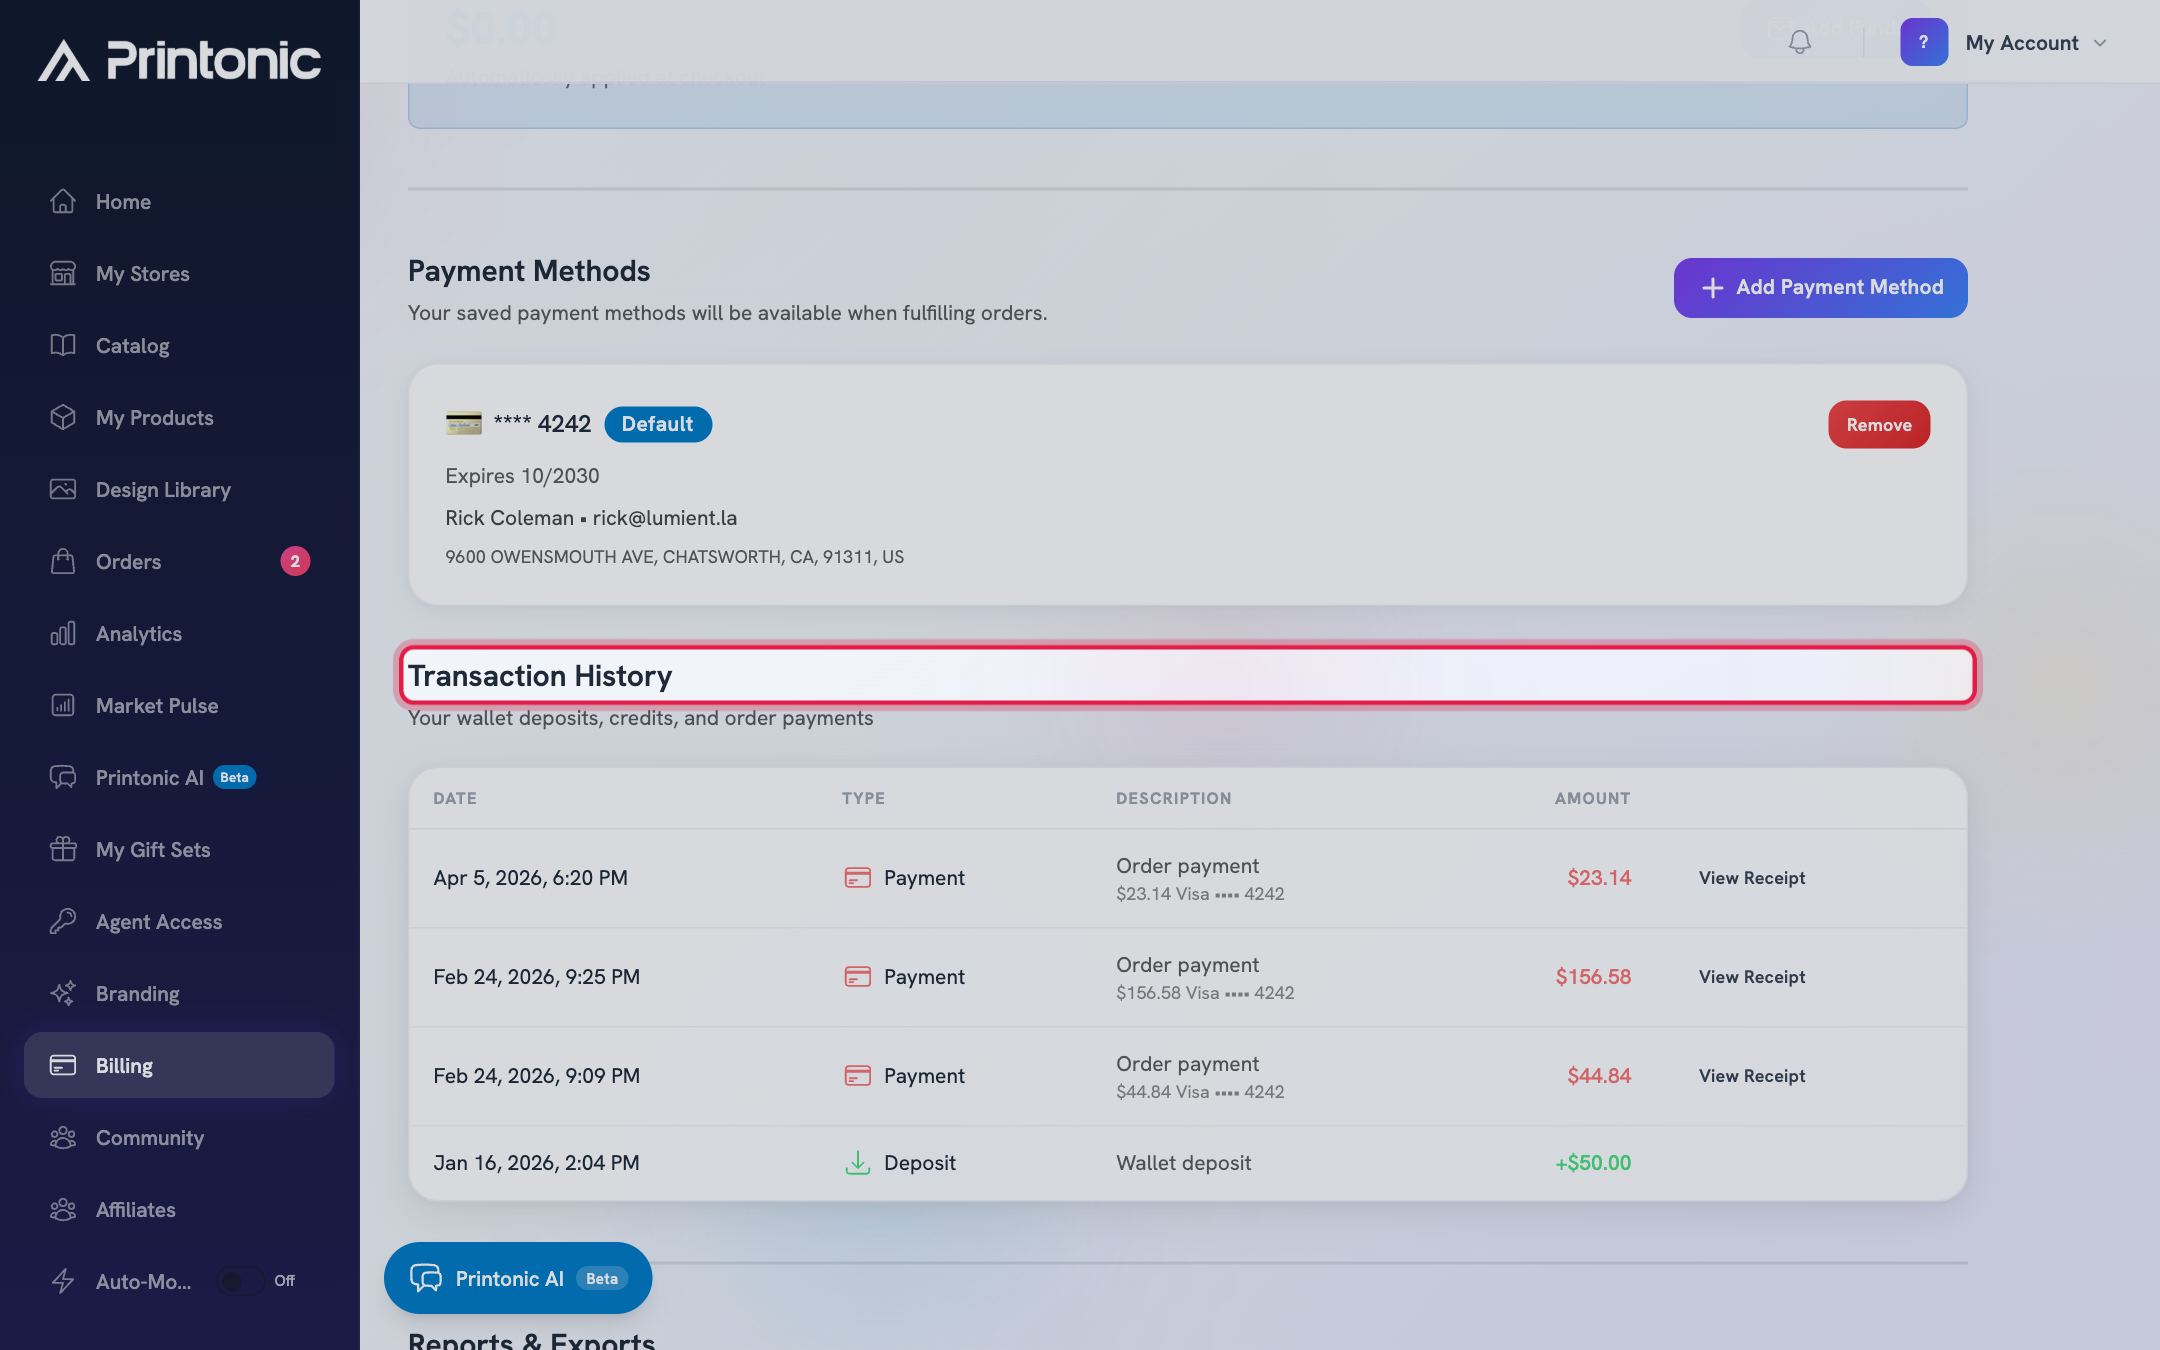
- 7
Billing > Transaction History > View Receipt
View and print receipts
Rows with a receipt attached show a View Receipt button and can be clicked anywhere on the row. This opens the Purchase Receipt page with the receipt number, a Paid badge, the order summary, how it was paid (wallet, card, or both), and the individual order items. Click Print Receipt to print it or save it as a PDF from your browser's print dialog.
- 8
Billing > Reports & Exports
Download a CSV export for taxes or records
Pick a Date range (This month, Last month, This year, or Last year) and an Export type. 'Summary (transactions)' gives you one row per transaction, while 'Detailed (order line items)' breaks every order payment down to its individual items. Click Download CSV and the file saves to your computer.
If there is nothing to export for the chosen range, you will see 'No transactions in this period.' Try a wider date range.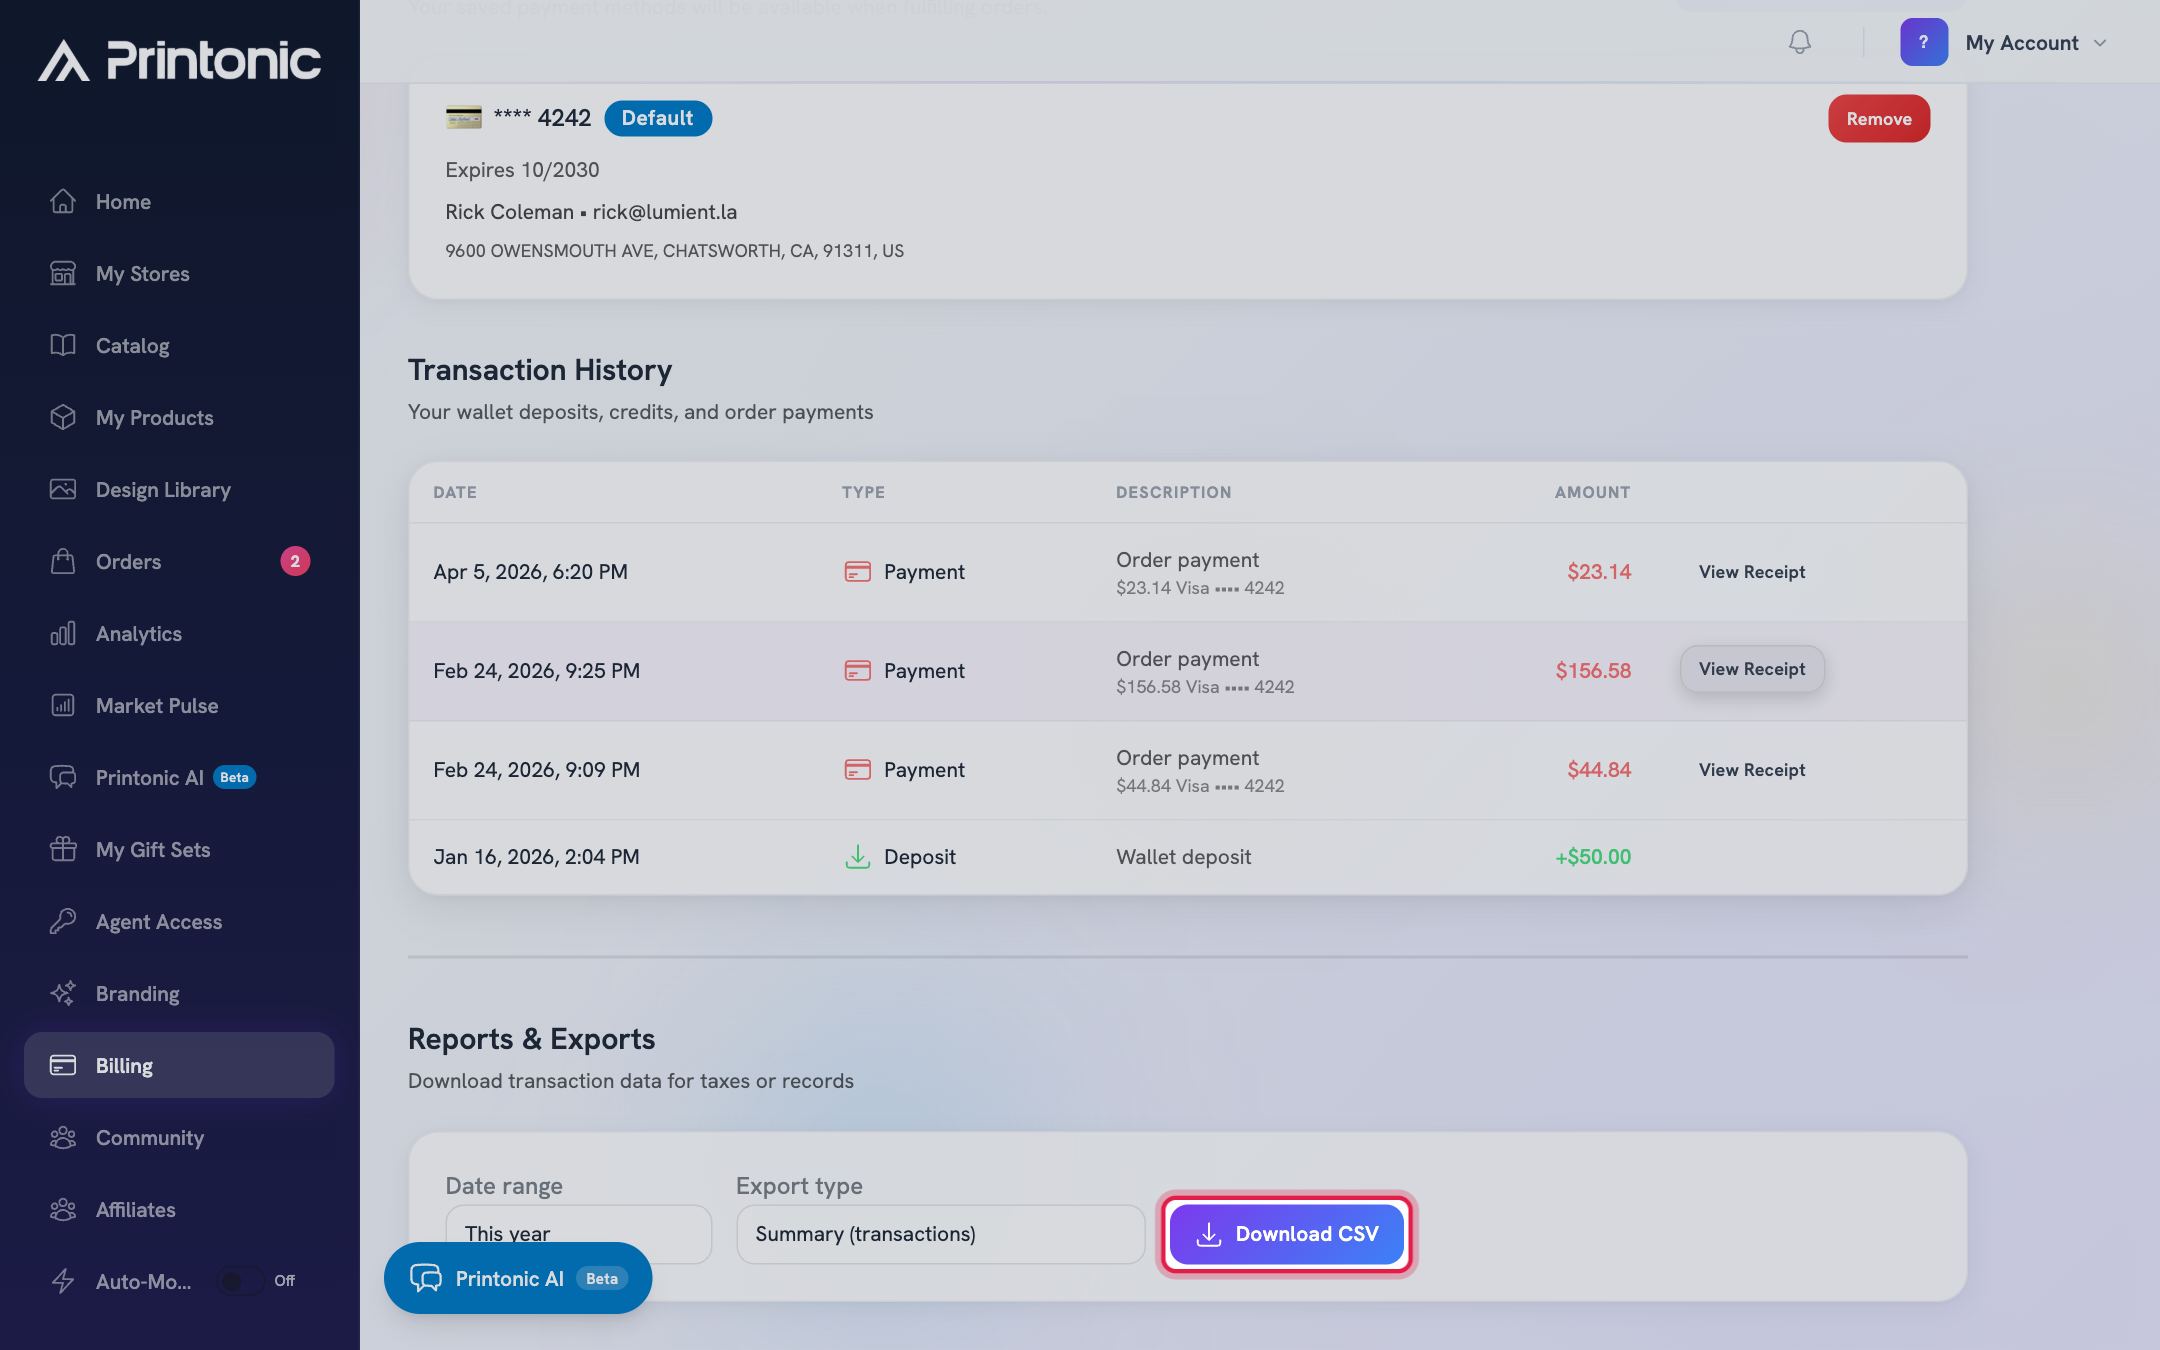
- 9
Billing > Monthly statements
Download a monthly statement for your accountant
A CSV is a list of transactions; a statement is a dated document. Enter your billing details once (registered business name, address, and your tax ID, whether that is a VAT number, EIN, GST or ABN), click Save billing details, then pick a month and click Download statement. The PDF carries its own statement number, the period it covers, your business details as 'Bill to', every charge and refund in the month, and the totals.
Statements are available from the first day of the following month, because a part-finished month is not a record anyone should file. Balance top-ups appear as a memo rather than a charge, since they are prepayments and the work they pay for may fall in a different month.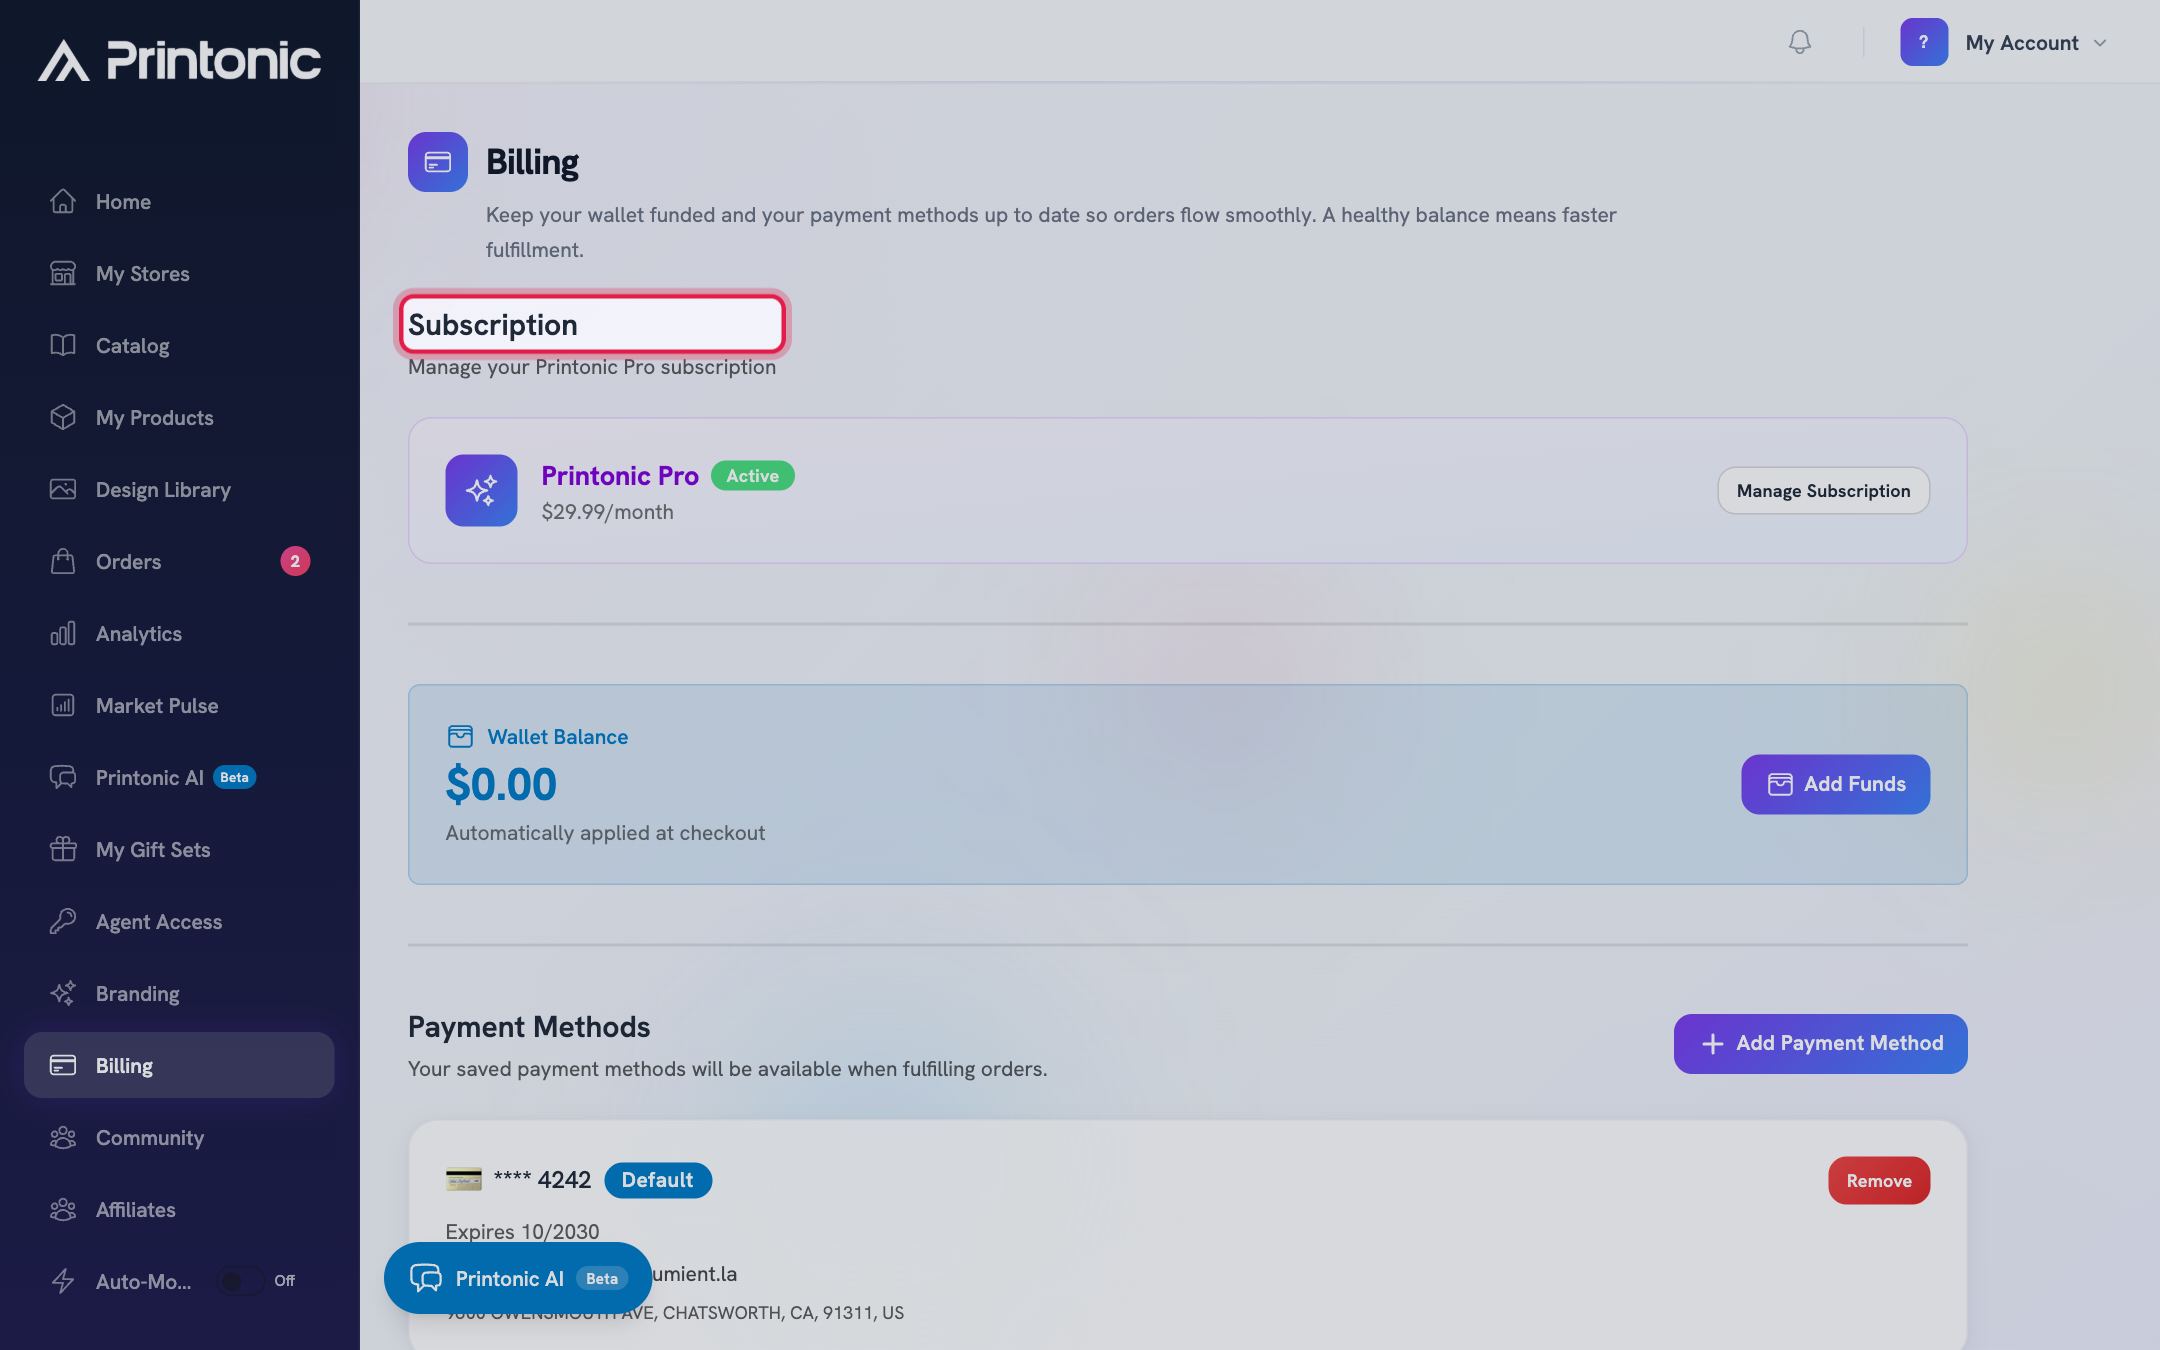
- 10
Billing > Subscription
Check your subscription plan
The Subscription section at the top shows your plan. If you are on Printonic Pro you will see an Active badge, the monthly price, and your renewal date; click Manage Subscription to update your plan, change the card it bills to, or cancel. If you are not subscribed, the section lists what Pro includes and an Upgrade to Pro button that takes you to checkout.
If you cancel, the section shows the date your plan ends (for example 'Cancels August 7, 2026') and Pro stays active until then.
Good to know
- Keep a small balance in your wallet. It is applied automatically at checkout, so funded wallets mean faster, one-click order payments.
- Bank transfers are handy for larger top-ups, but plan ahead: they take 3 to 5 business days to clear, while card deposits are instant.
- Watch for the 'Credits Expiring Soon' warning in the Wallet section. Credits are spent before your cash, so simply paying for orders as usual uses them up first.
- Use the 'Last year' preset with the Summary export in January for a clean, one-file record of everything you spent for tax time.
Common questions
How is my wallet used when I pay for orders?
Automatically. At checkout, promotional credits are applied first, then your deposited funds, and only the remainder (if any) is charged to your payment method. The whole thing shows up as a single Payment row in Transaction History with a breakdown of how much came from your wallet and how much from your card.
Why can't I remove a payment method?
The Remove button is disabled on your default method so you always have a working way to pay. Click Make Default on a different method first, then remove the one you no longer want.
I added funds but my balance has not changed. Why?
You most likely paid with a bank account. Bank transfers take 3 to 5 business days, and the deposit sits in Transaction History with a Pending badge until it clears. Card deposits appear in your balance immediately.
What is the difference between the Summary and Detailed exports?
Summary (transactions) has one row per transaction: each deposit, credit, and order payment. Detailed (order line items) expands every order payment into its individual items, which is useful if you track cost per product for bookkeeping.
My accountant needs an invoice, not a transaction list. What do I send them?
The monthly statement. Fill in your billing details under Billing > Monthly statements so your registered business name, address and tax ID print on it, then download the month you need. It is a dated PDF with its own statement number, the charges and refunds for that month, and the totals.
Does Printonic charge VAT, GST or import duties?
No. Printonic does not collect destination VAT, GST or import duties on international orders. Where they apply, you or your recipient are the importer of record and they are paid on delivery. Your statement states this, and it reproduces the tax ID you entered exactly as you gave it to us, without validating it.
Related guides
Send orders to fulfillment and pay
Submit one order or a whole batch for production. Covers the Send to Fulfillment button, the checkout cost breakdown, how your wallet balance applies automatically, paying the rest with a saved card, and adding funds mid-checkout.
Manage your orders
Every order from every connected store lands in one Orders tab. Learn what each status means, how to sync, and how to send, ignore, restore, or resubmit orders in bulk.
Your dashboard at a glance
A quick tour of the dashboard Home page: stat cards, alerts, quick actions, recent orders, store health, and the Getting Started checklist for new sellers.