Orders & Fulfillment
Send orders to fulfillment and pay
Submit one order or a whole batch for production. Covers the Send to Fulfillment button, the checkout cost breakdown, how your wallet balance applies automatically, paying the rest with a saved card, and adding funds mid-checkout.
Orders that sync in from your store (or that you create manually) sit in the Ready to Submit tab until you send them to production. Sending is a two-part move: click Send to Fulfillment, then complete payment on the Checkout page. Nothing goes to production until payment succeeds, so you always see the exact cost first.
- 1
Dashboard > Orders > Ready to Submit tab
Find orders that are Ready to Submit
Open Orders in your dashboard and click the Ready to Submit tab. These are the orders waiting on you. Orders in other tabs (Submitted, Shipped, Ignored, and so on) cannot be sent from here.
Every item in an order needs its art files before you can submit. If art is missing, fix that first (see the guide on fixing unmatched orders and missing art).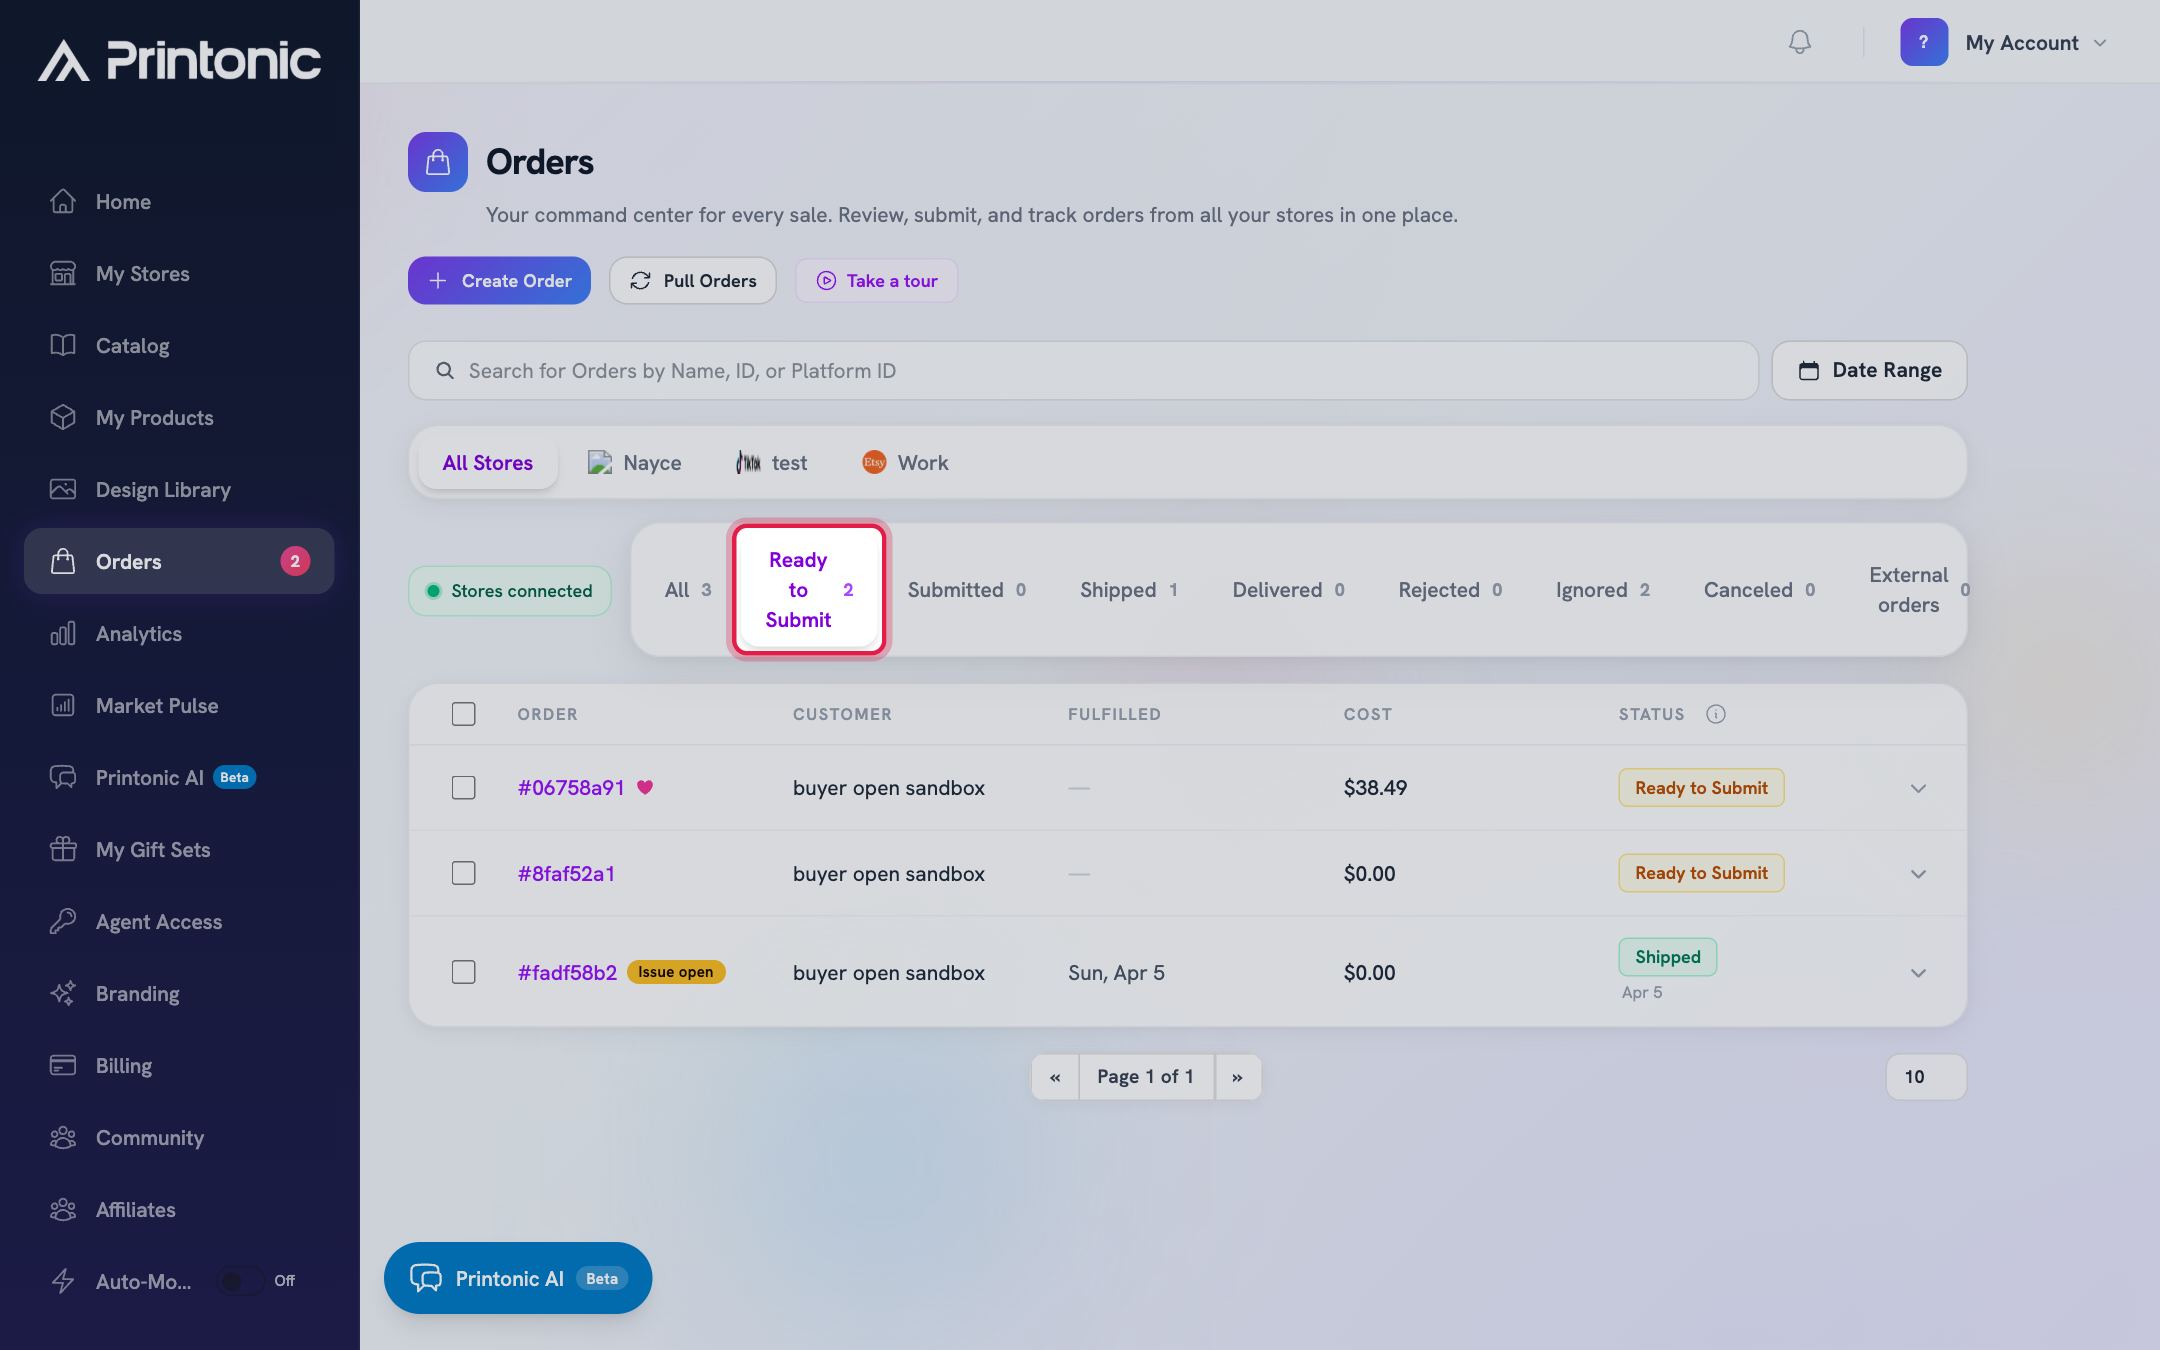
- 2
Orders > click an order to open it
Send a single order
Open the order and click the purple Send to Fulfillment button at the top. The button shows Sending... for a moment, then Printonic takes you to the Checkout page for that order.
If the button is grayed out, hover over it. The tooltip 'Upload art files for all items before submitting' means at least one item in the order has no art attached yet.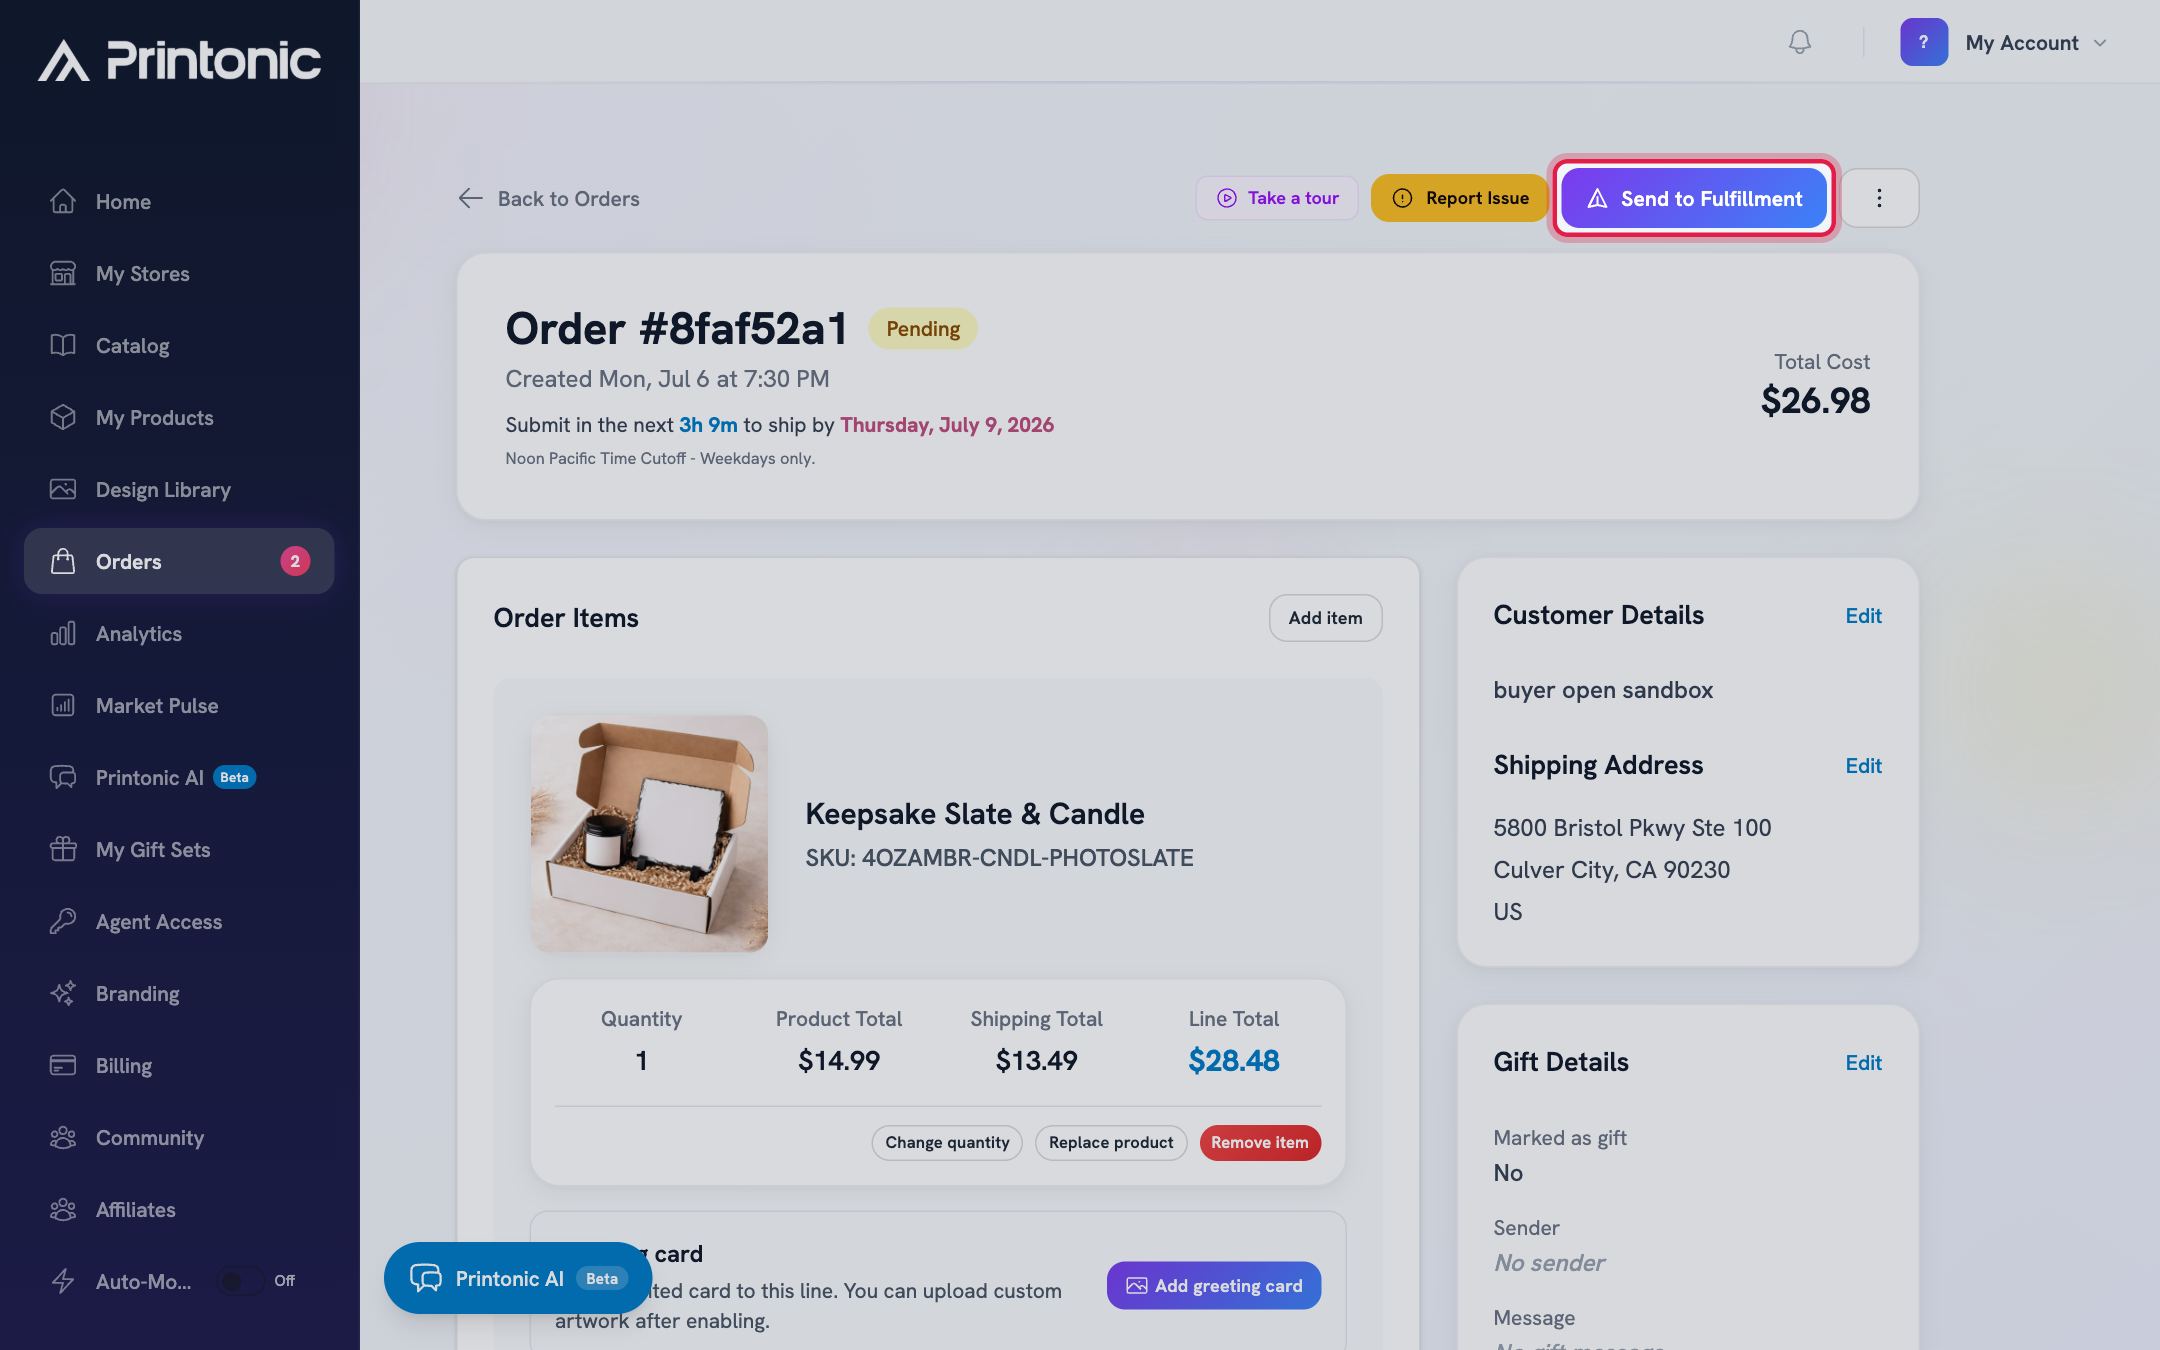
- 3
Dashboard > Orders > Ready to Submit tab
Or send a batch in one checkout
Tick the checkbox on each order you want to send. A selection bar appears above the table showing how many are selected, with a Send to Fulfillment button on the right. You can also click 'Select all X Ready to Submit' in the bar to grab every eligible order at once. Click Send to Fulfillment and all selected orders go into a single checkout.
All selected orders must have the same status. If you mix statuses, the bar shows 'Select orders with the same status' and no action buttons appear.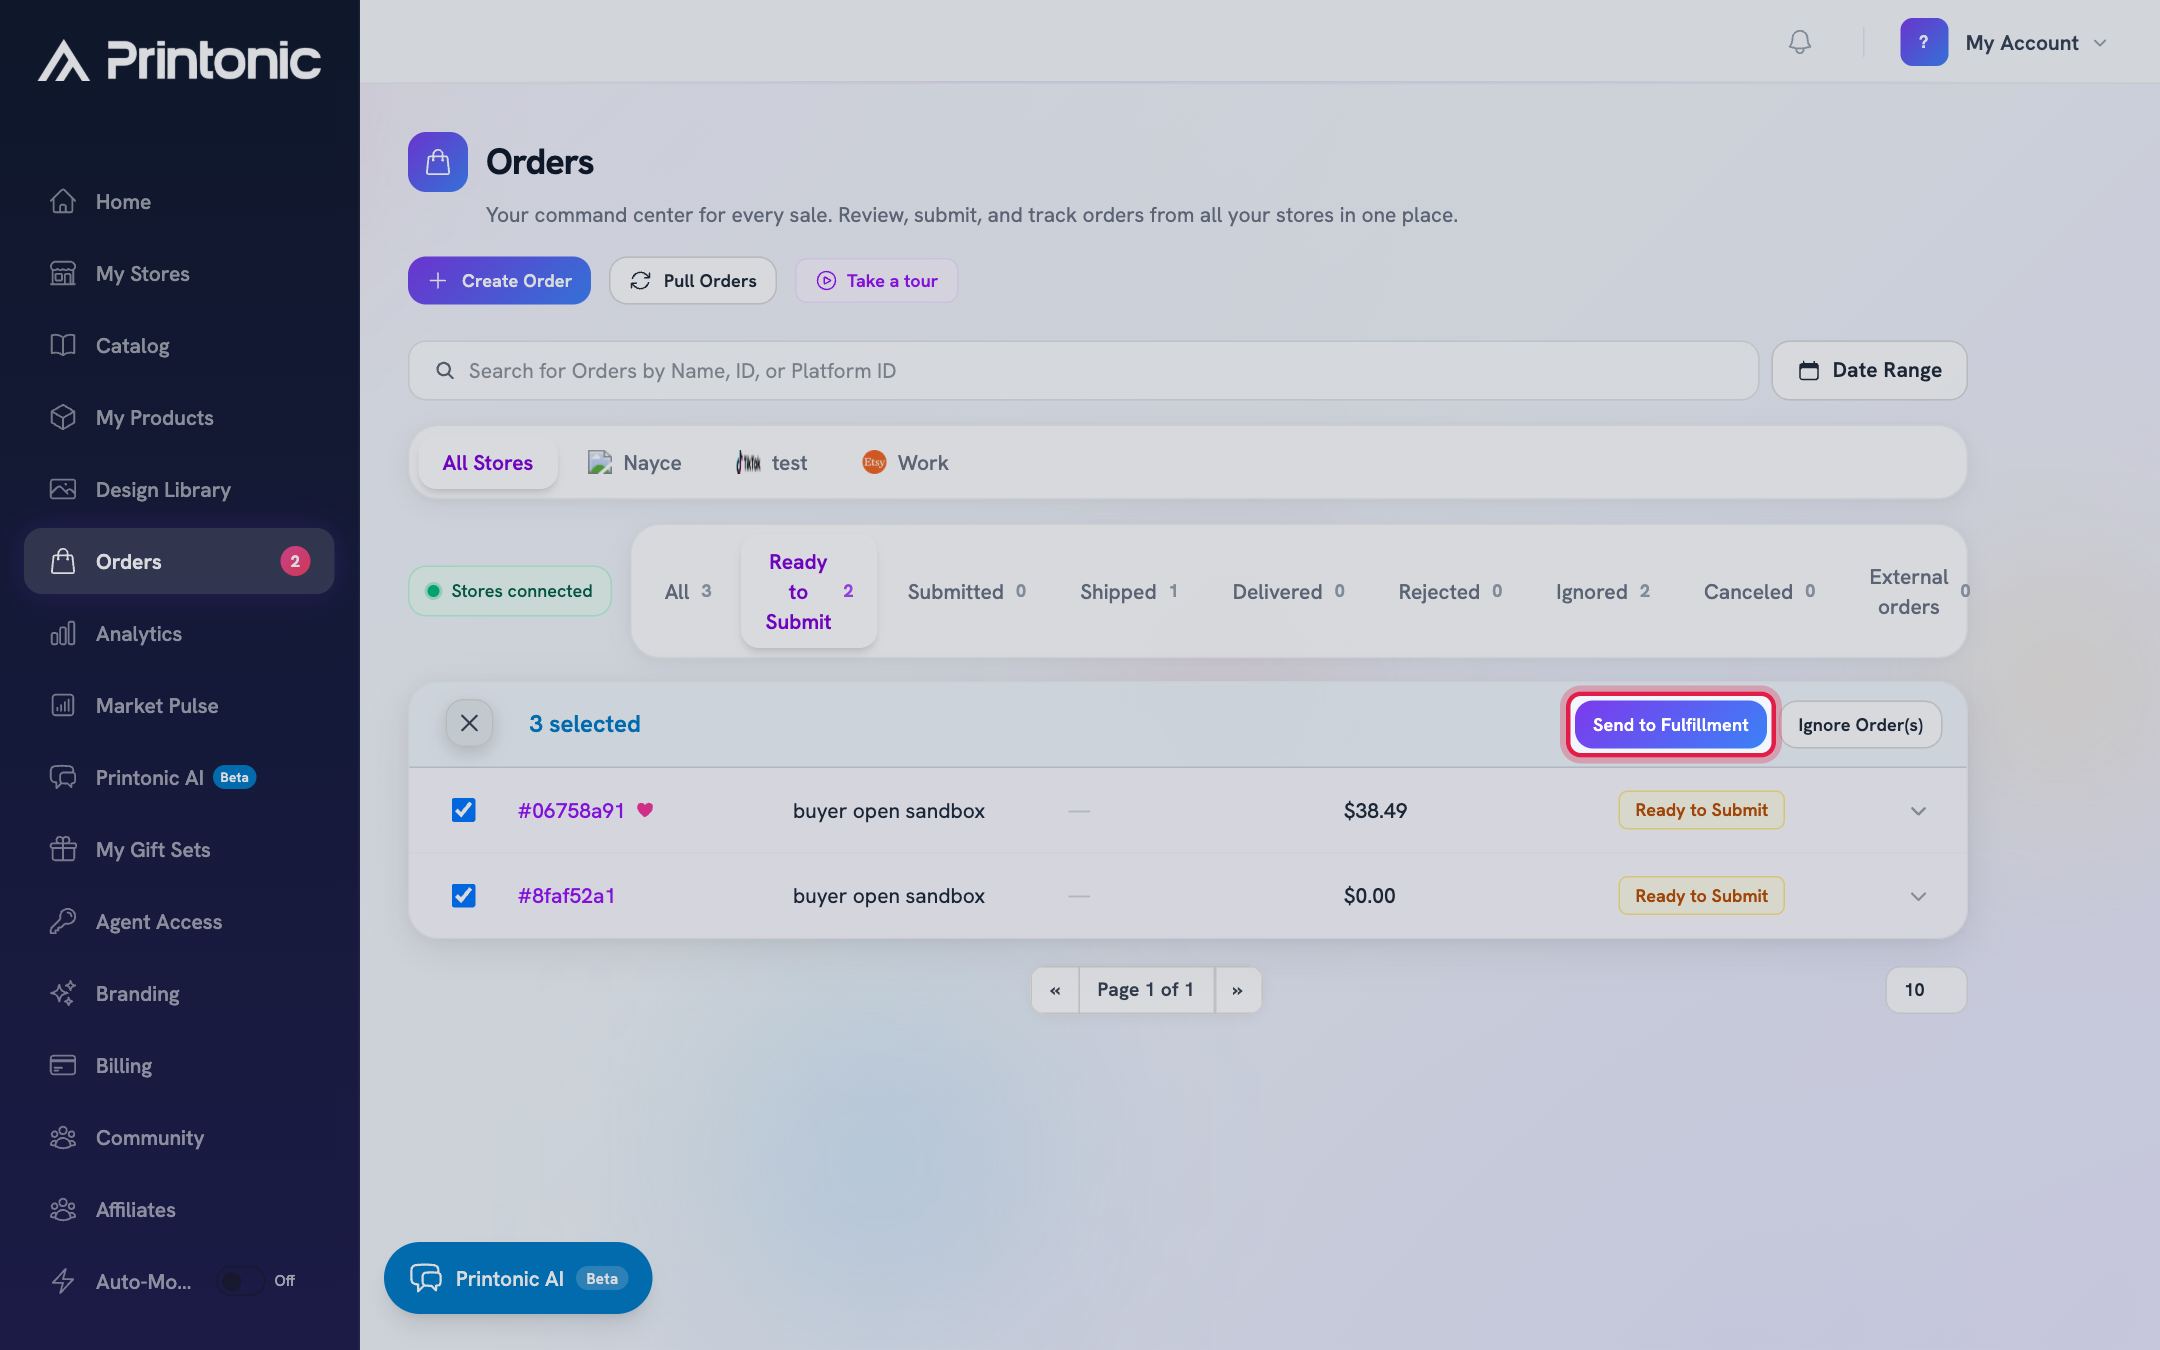
- 4
Orders > Checkout
Review the Order Summary
The Checkout page lists each order in its own card: order number, buyer name, every item with its options and quantity, and small thumbnails of the art files (click a thumbnail to preview the art full size). Under the items, each card breaks out Products, Shipping, any Package Insert or Packaging Sticker charges, and the Order Total.
Pro members see a Pro Discount line here. The discount applies to the product portion only, not to shipping, inserts, or stickers.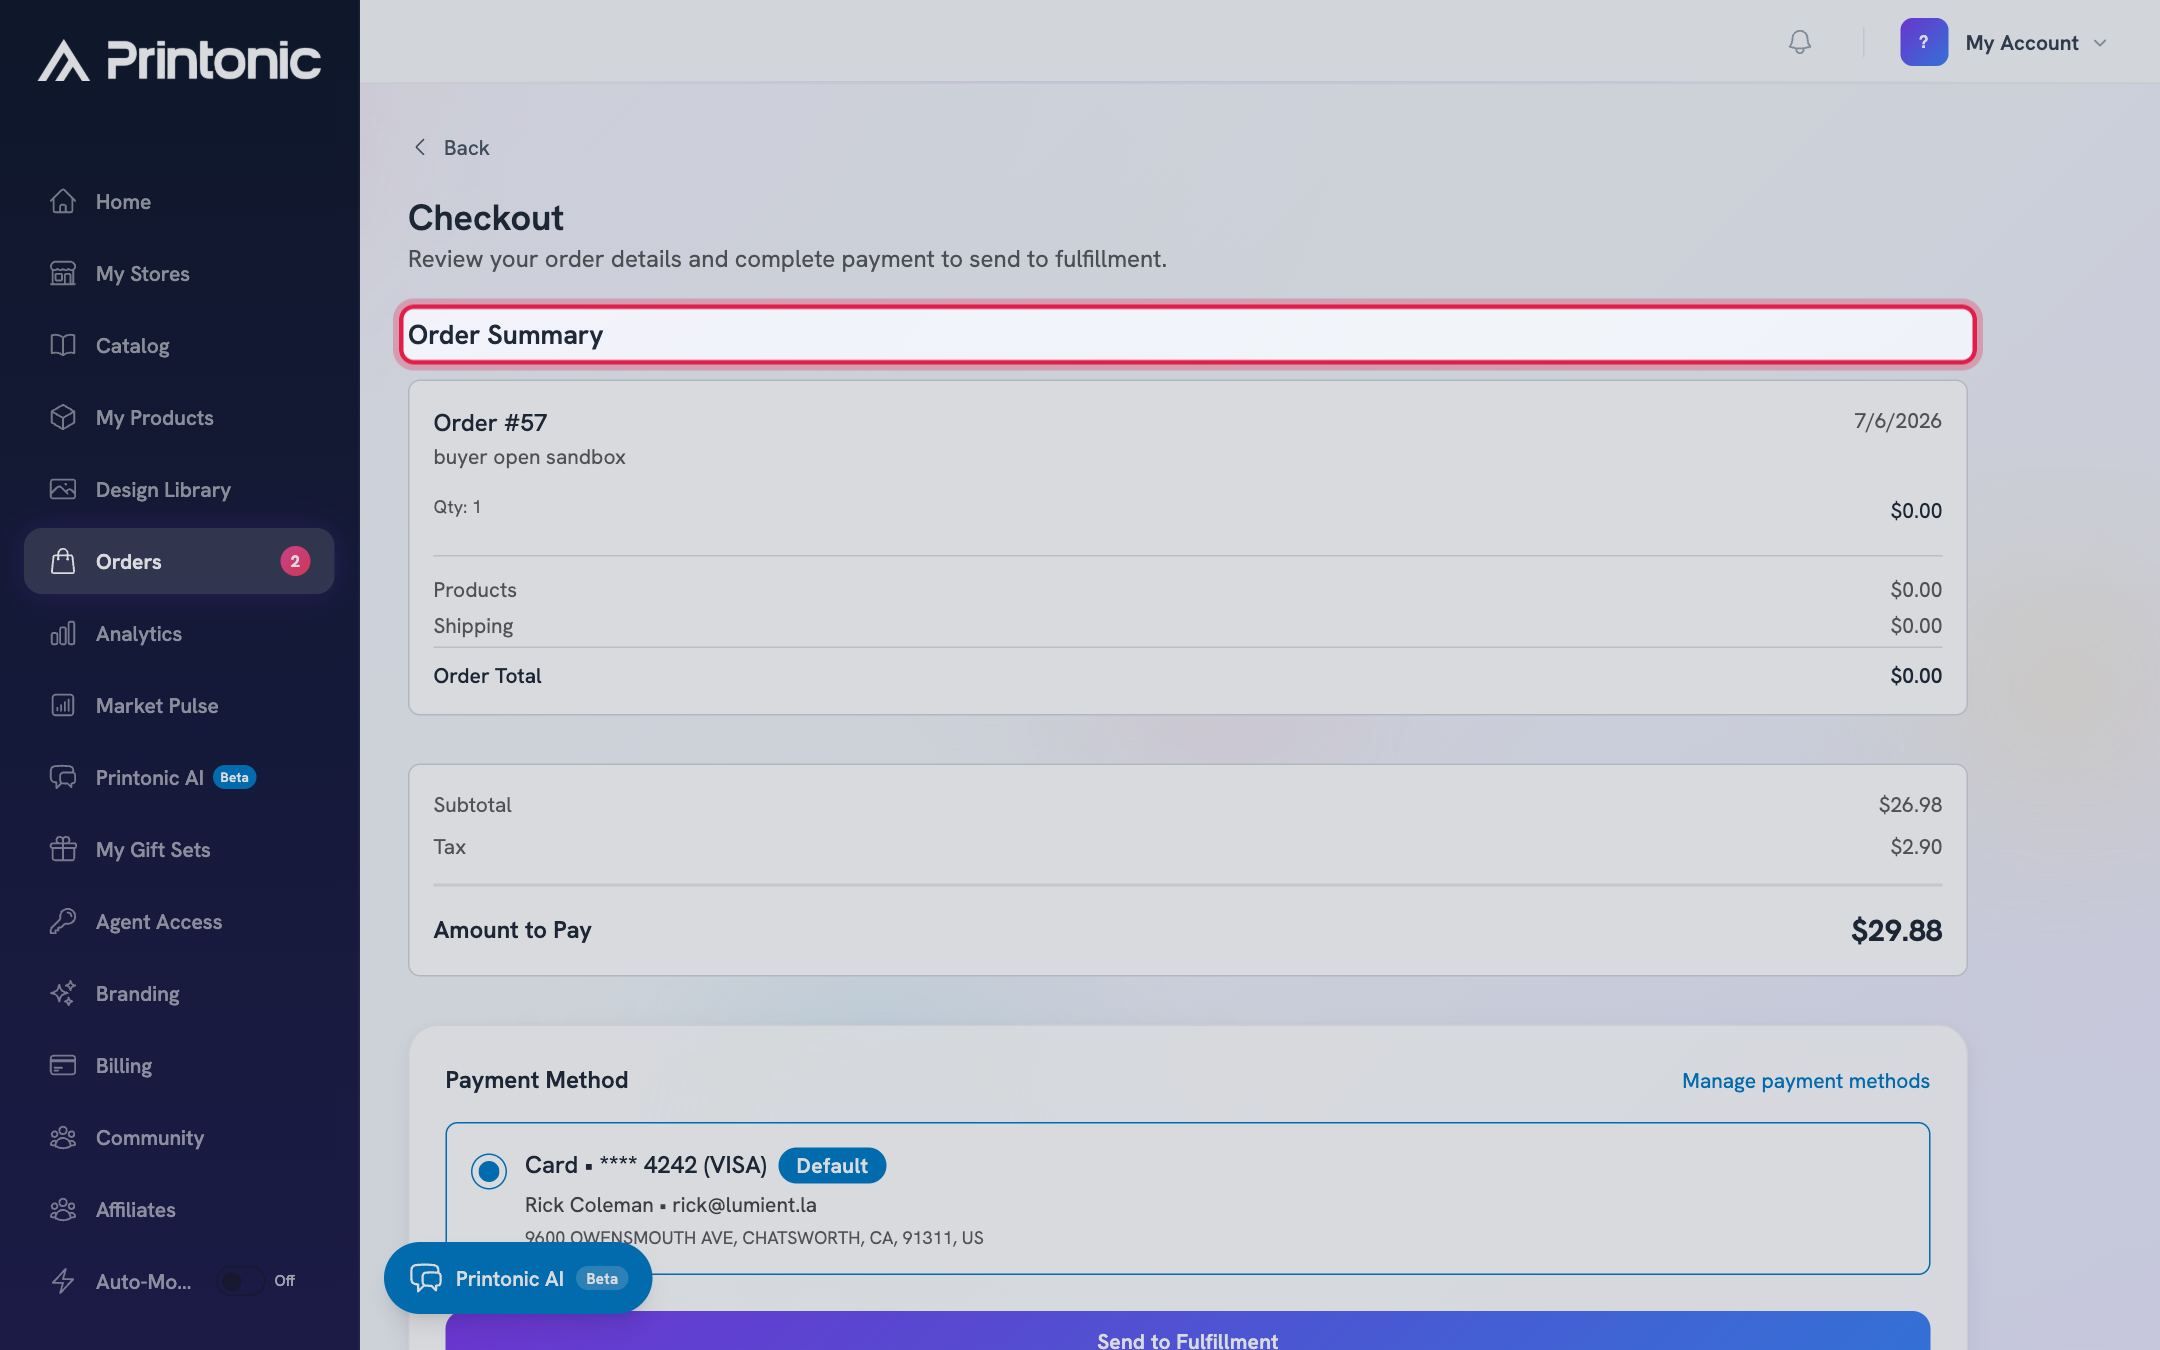
- 5
Orders > Checkout
Check the cost breakdown and wallet
Below the summary, the payment box shows Subtotal, Tax, and the Amount to Pay. If you have money in your wallet, a Wallet Balance banner appears and your balance is applied automatically before anything is charged to a card. Applied amounts show as green 'Wallet Credit Applied' and 'Wallet Balance Applied' lines that reduce the Amount to Pay.
If your wallet covers the whole cost, the box reads 'Total (Paid by Wallet)' with $0.00 to pay, and the banner says 'Your wallet will cover this entire order'.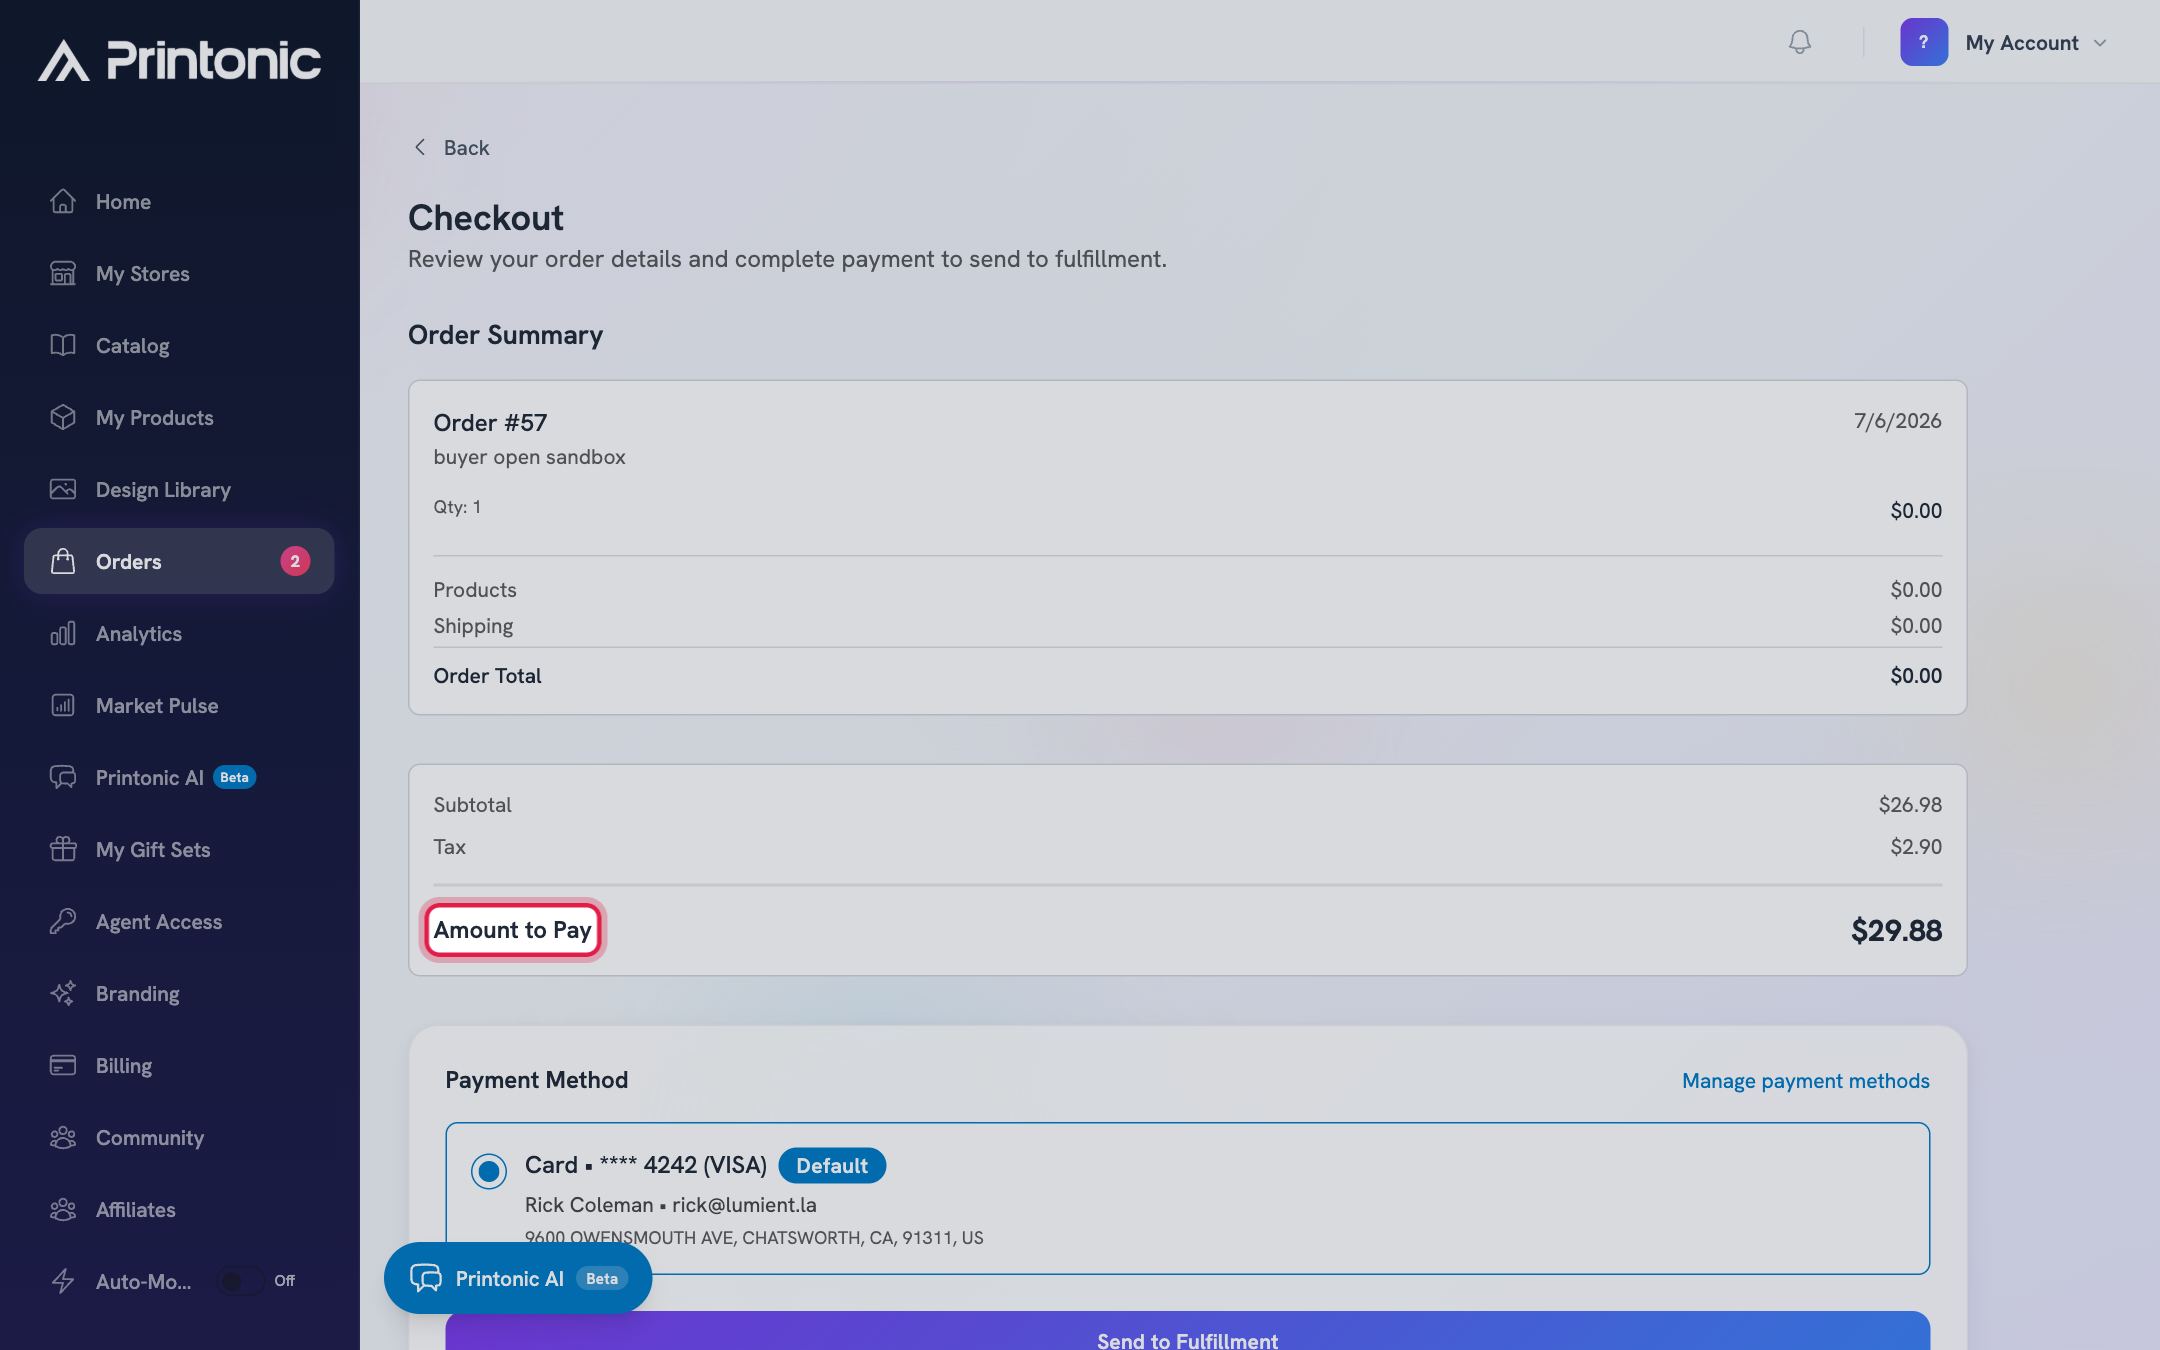
- 6
Checkout > Payment Method
Pick a payment method and pay
If there is anything left to pay after your wallet, choose a saved card or bank account in the Payment Method section (your default is preselected). When you switch methods, a brief 'Recalculating...' runs while taxes and fees update. Then click Send to Fulfillment to pay. If your wallet covers everything, you get a green Pay with Wallet button instead, and no card is charged.
No saved methods? The page shows 'No saved payment methods. Please add one in Billing.' Use the Manage payment methods link to add a card, then come back.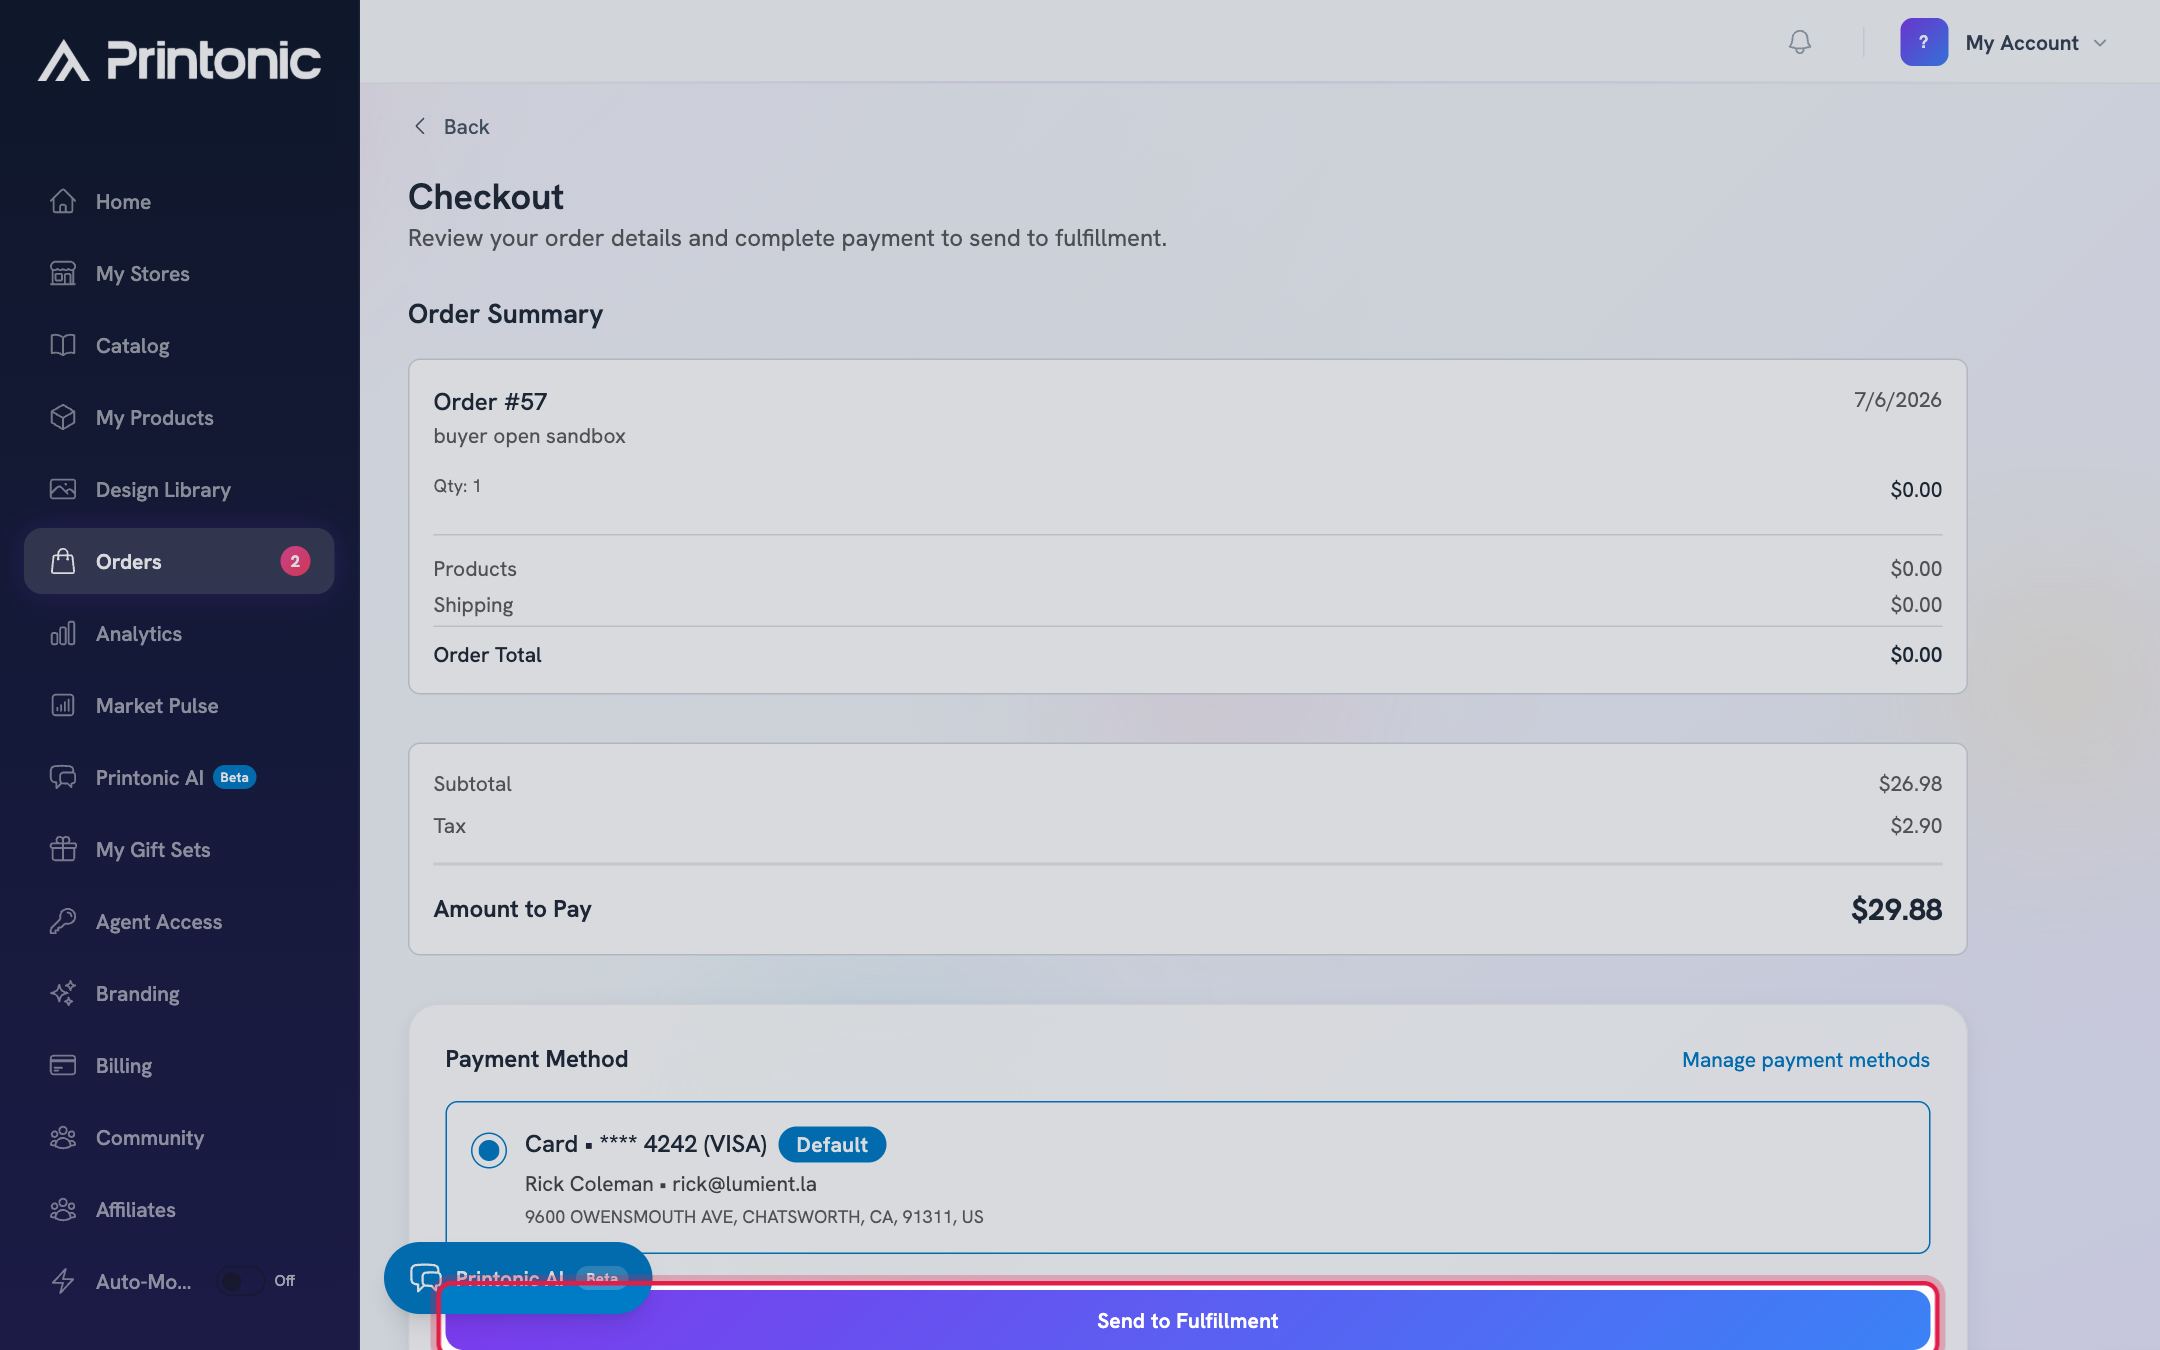
- 7
Dashboard > Billing > Add Funds
Add funds mid-checkout (optional)
Want to pay more (or all) of the order from your wallet? Open Billing in another tab and click Add Funds. Pick a preset amount or enter a custom one ($5.00 minimum, $1,000.00 maximum), click Continue to Payment, choose a payment method, and confirm with the Add to Wallet button.
The checkout you already opened will not pick up the new balance on its own. After adding funds, go back to Orders and click Send to Fulfillment again (or refresh the Checkout page) so the new balance is applied. Card deposits are instant; bank transfers take 3 to 5 business days to clear.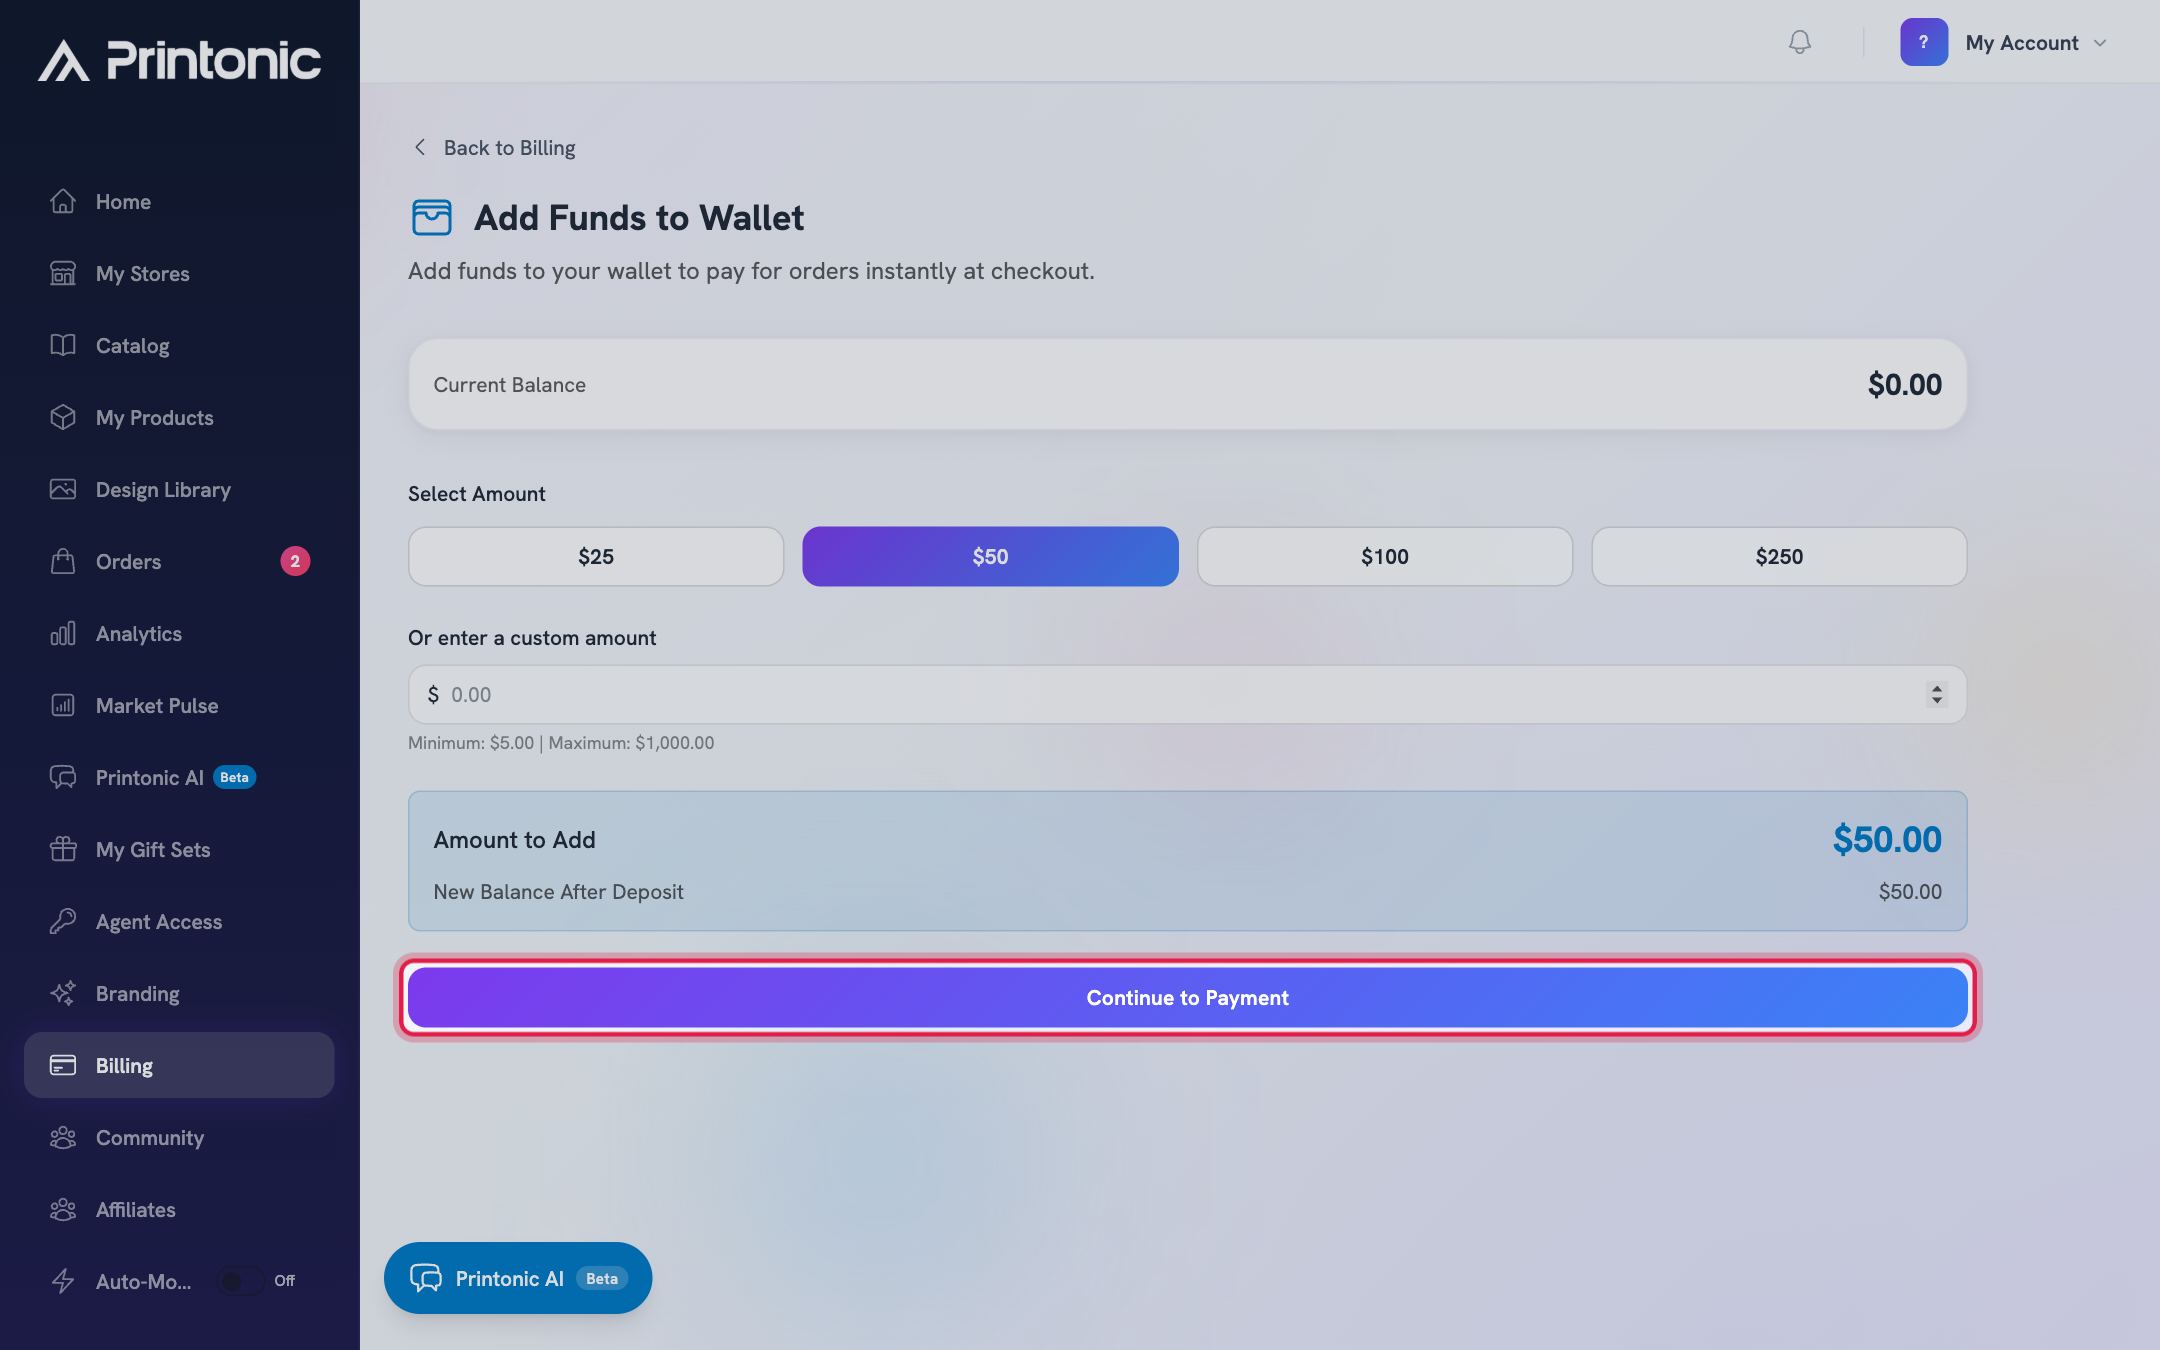
- 8
Checkout > success screen
Confirm success
After payment you see 'Payment Successful!' while Printonic submits your orders, then 'Orders Submitted!' once they are confirmed. You are redirected to the Orders page with the Submitted tab open, where your orders now show a Submitted status and are queued for production.
If the screen says your orders are still being submitted, that is normal for a few seconds. If an order still shows in Ready to Submit a minute after a successful payment, contact support.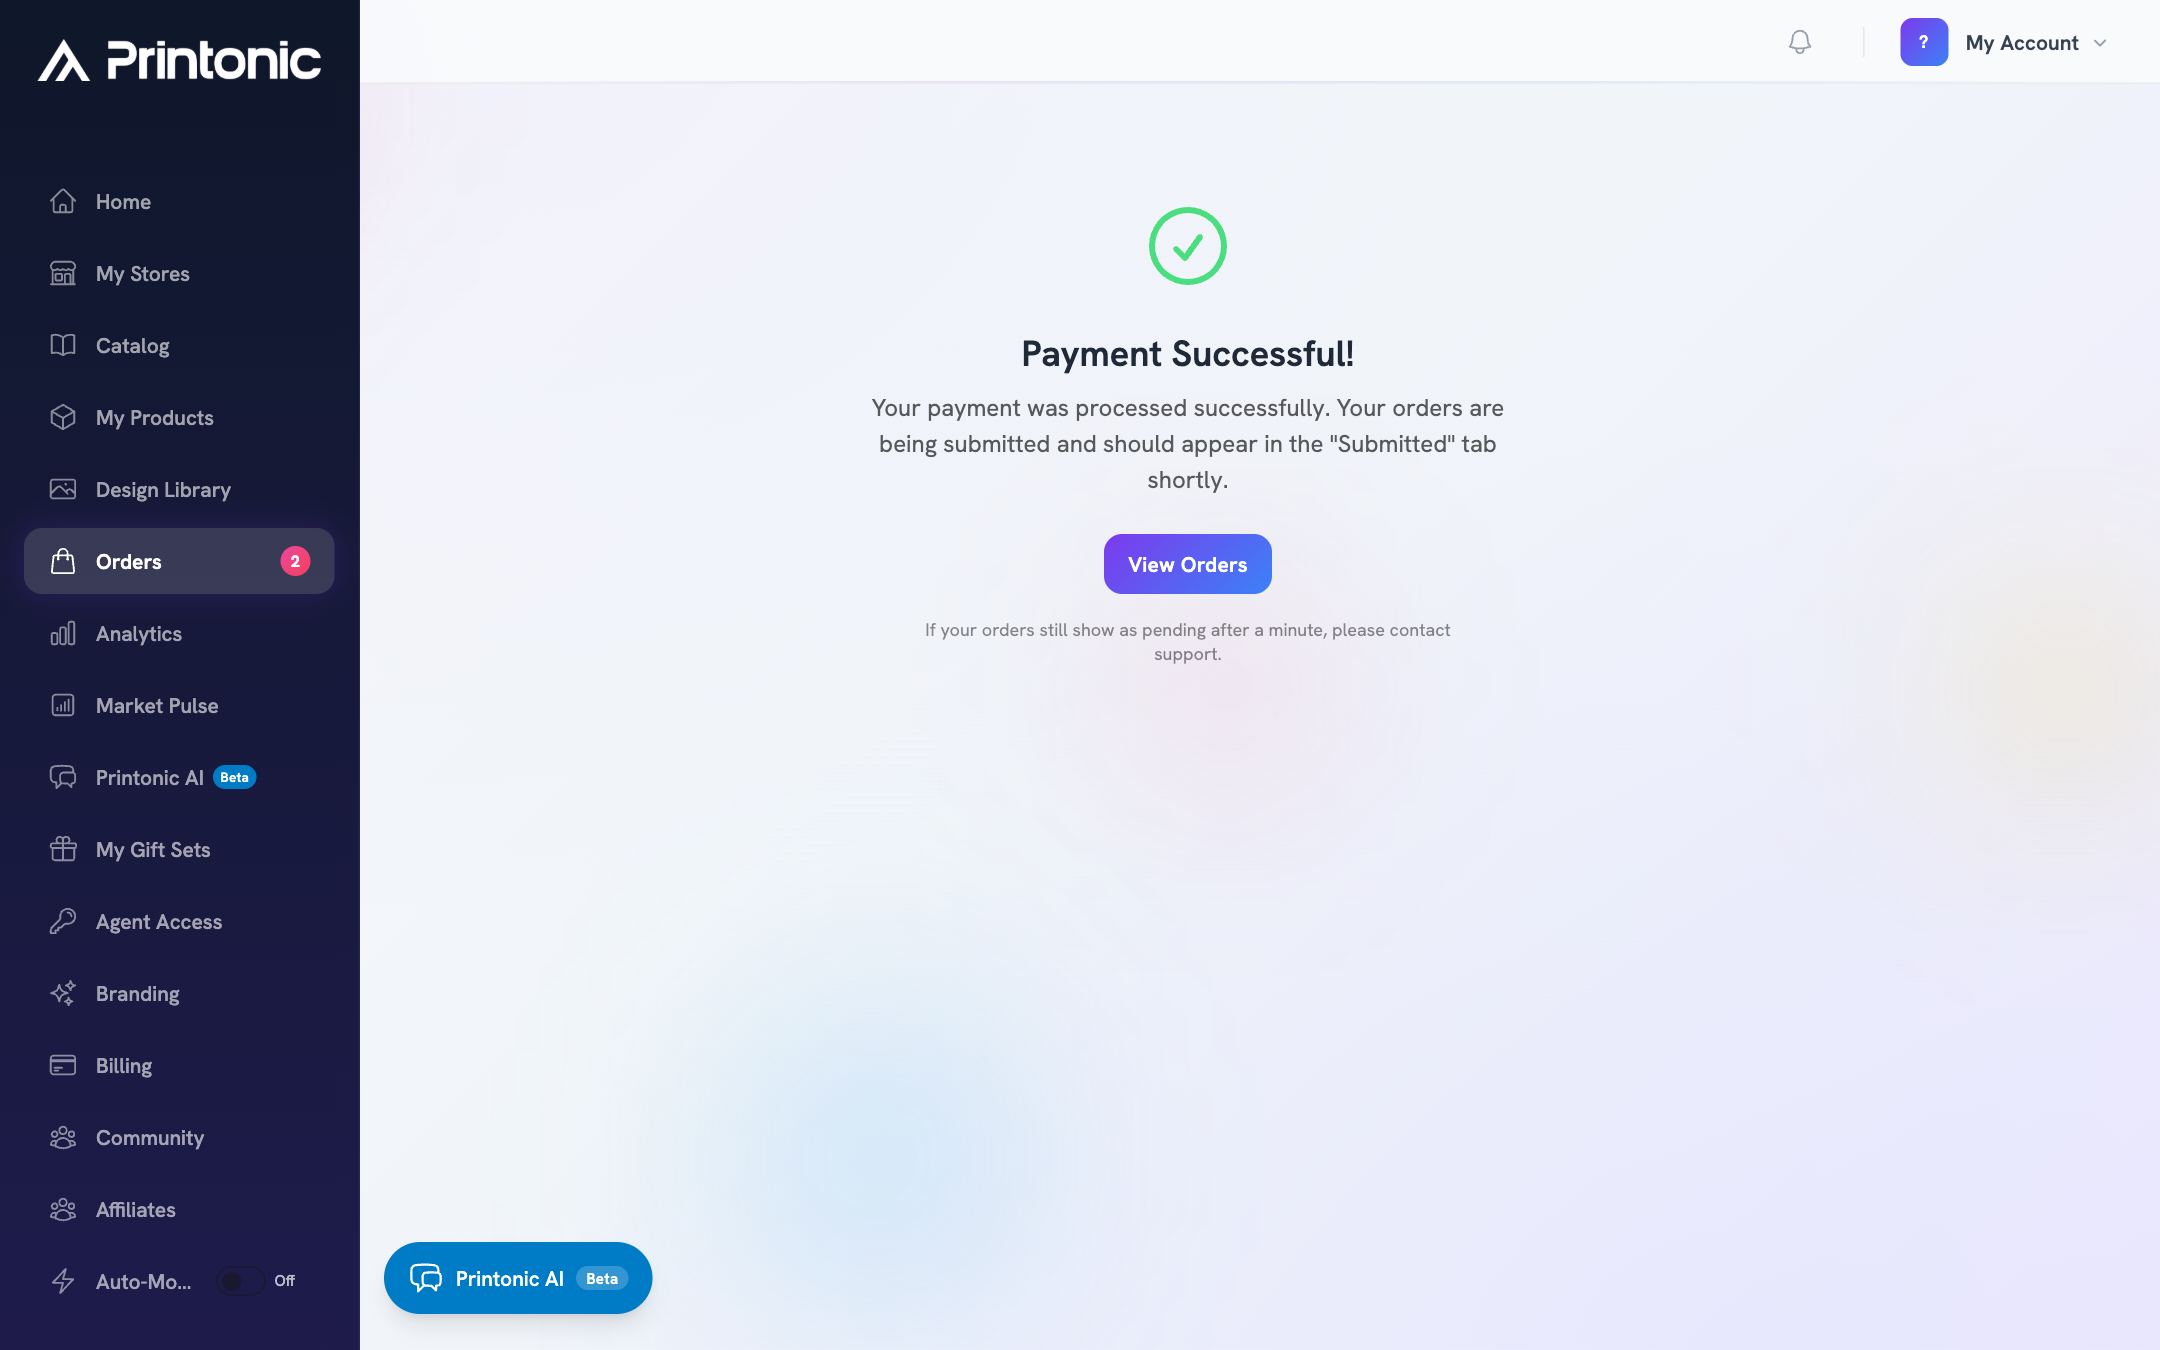
Good to know
- Batch your sends. Selecting several orders and checking out once means one payment, one tax calculation, and one receipt instead of many.
- Keep a wallet balance topped up. Orders your wallet fully covers check out with a single Pay with Wallet click and no card charge at all.
- The Amount to Pay can change slightly when you switch payment methods, because taxes and processing fees are recalculated for the method you pick. Wait for 'Recalculating...' to finish before comparing numbers.
- Shipping discounts show right in the summary: when multiple items ship together, you will see the original shipping price crossed out next to the lower combined rate.
Common questions
Can I pay with part wallet, part card?
Yes, and it happens automatically. Your wallet balance is always applied first, and only the remainder is charged to the card or bank account you select. The green applied lines in the breakdown show exactly how much came from your wallet.
Why is the Send to Fulfillment button disabled on my order?
At least one item in the order is missing its art files. Hover over the button and you will see 'Upload art files for all items before submitting'. Add art to every item, then the button unlocks.
What happens to an order after I pay?
It moves from Ready to Submit to Submitted and enters the production queue. You can follow it through the Submitted, Shipped, and Delivered tabs on the Orders page.
I added funds during checkout but the Amount to Pay did not change. Why?
The checkout total was calculated when the page loaded. Refresh the Checkout page, or return to Orders and click Send to Fulfillment again, and the new wallet balance will be applied.
Related guides
Manage your orders
Every order from every connected store lands in one Orders tab. Learn what each status means, how to sync, and how to send, ignore, restore, or resubmit orders in bulk.
Fix unmatched orders and missing art
Two things can pause an order: Printonic does not recognize the item's SKU (it lands in External orders), or an item is missing a required print file (Send to Fulfillment stays disabled). Here is how to fix both.
Wallet and billing
Fund your wallet, save cards or bank accounts, read your transaction history, print receipts, and download CSV exports for taxes, all from the Billing tab.
Shipping options and upgrades
Every order ships with DHL SmartMail Parcel Expedited by default. Learn how to compare faster carriers on an order, what an upgrade costs, and why TikTok prepaid-label orders have no carrier choice.