Orders & Fulfillment
Create an order manually
Place an order yourself for an offline sale, a product sample, or a test run. Pick your published products, enter the shipping address, review costs, and send it to fulfillment like any other order.
Most orders arrive in Printonic automatically from your connected stores. But sometimes you need to place one yourself: a sale you made in person, a sample you want to check before launching, or a gift you are sending directly. Manual orders cover all of these.
The Create Manual Order wizard walks you through four steps: Select Store, Add Items, Shipping Info, and Review Order. You can only pick from products you have already published, and the prices you see are what you pay Printonic to produce and ship the items.
- 1
Dashboard > Orders
Open Orders and click Create Order
Go to Orders in your dashboard and click the Create Order button at the top of the page. This opens the Create Manual Order wizard, with a progress bar showing the four steps: Select Store, Add Items, Shipping Info, and Review Order.
You can click any completed step in the progress bar to go back and change something. Steps you have not reached yet stay locked.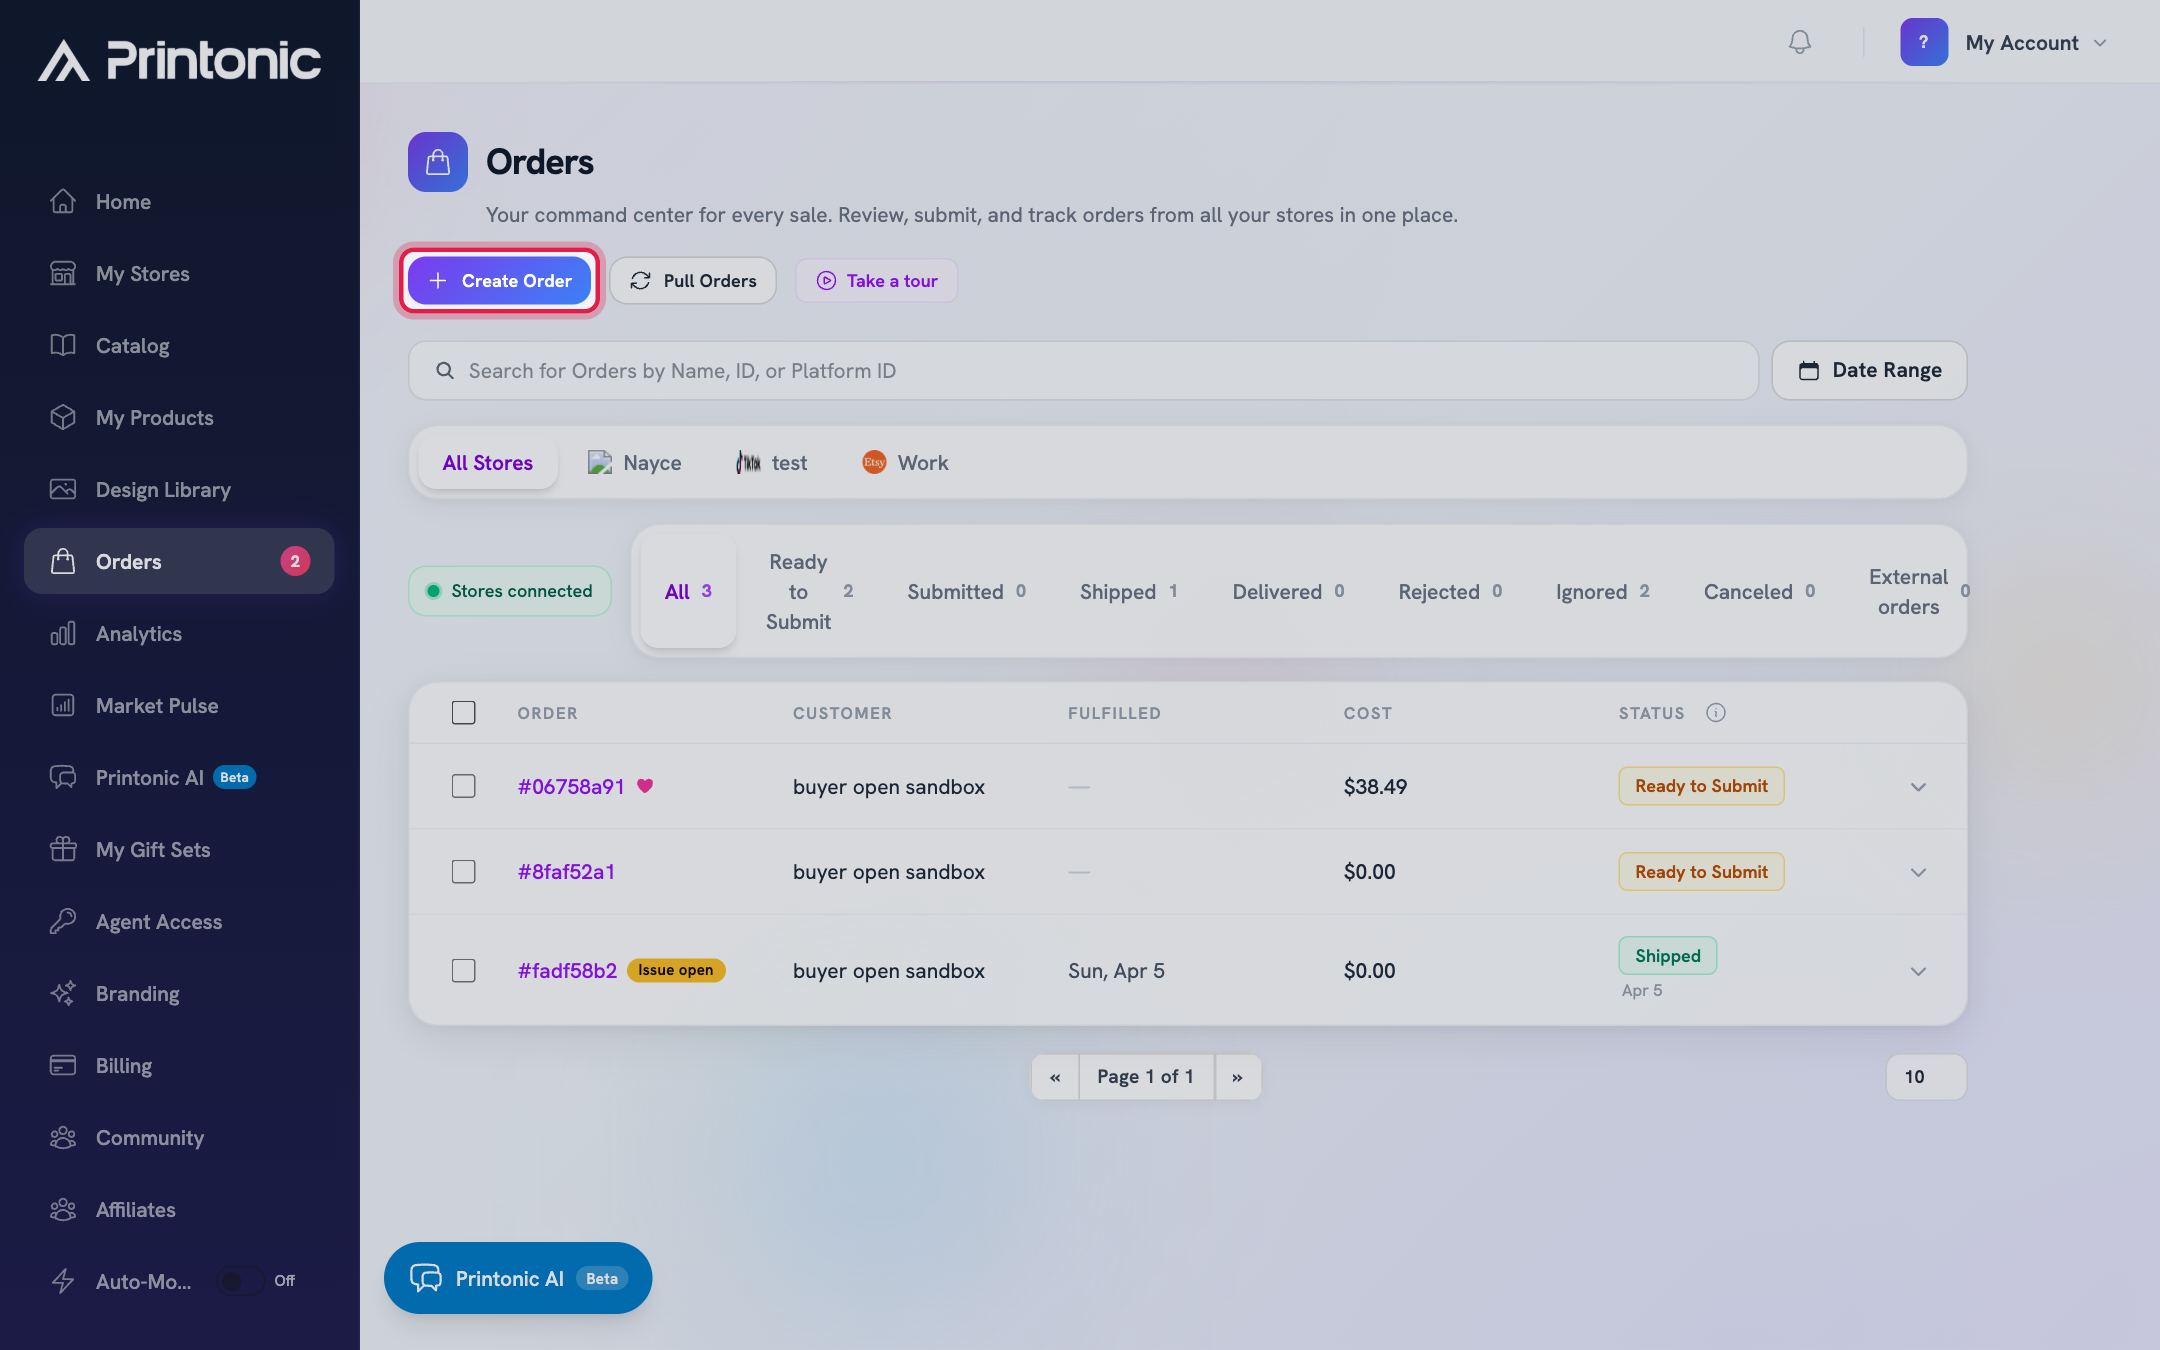
- 2
Create Manual Order > Select Store
Select the store this order belongs to
Pick the store the order is for and click Continue to Products. If you only have one connected store, it is selected for you already. Each store shows its platform logo and a Connected badge.
Only products published to the selected store will be available in the next step. If you see No Connected Stores Found, click Go to Stores and connect a store first.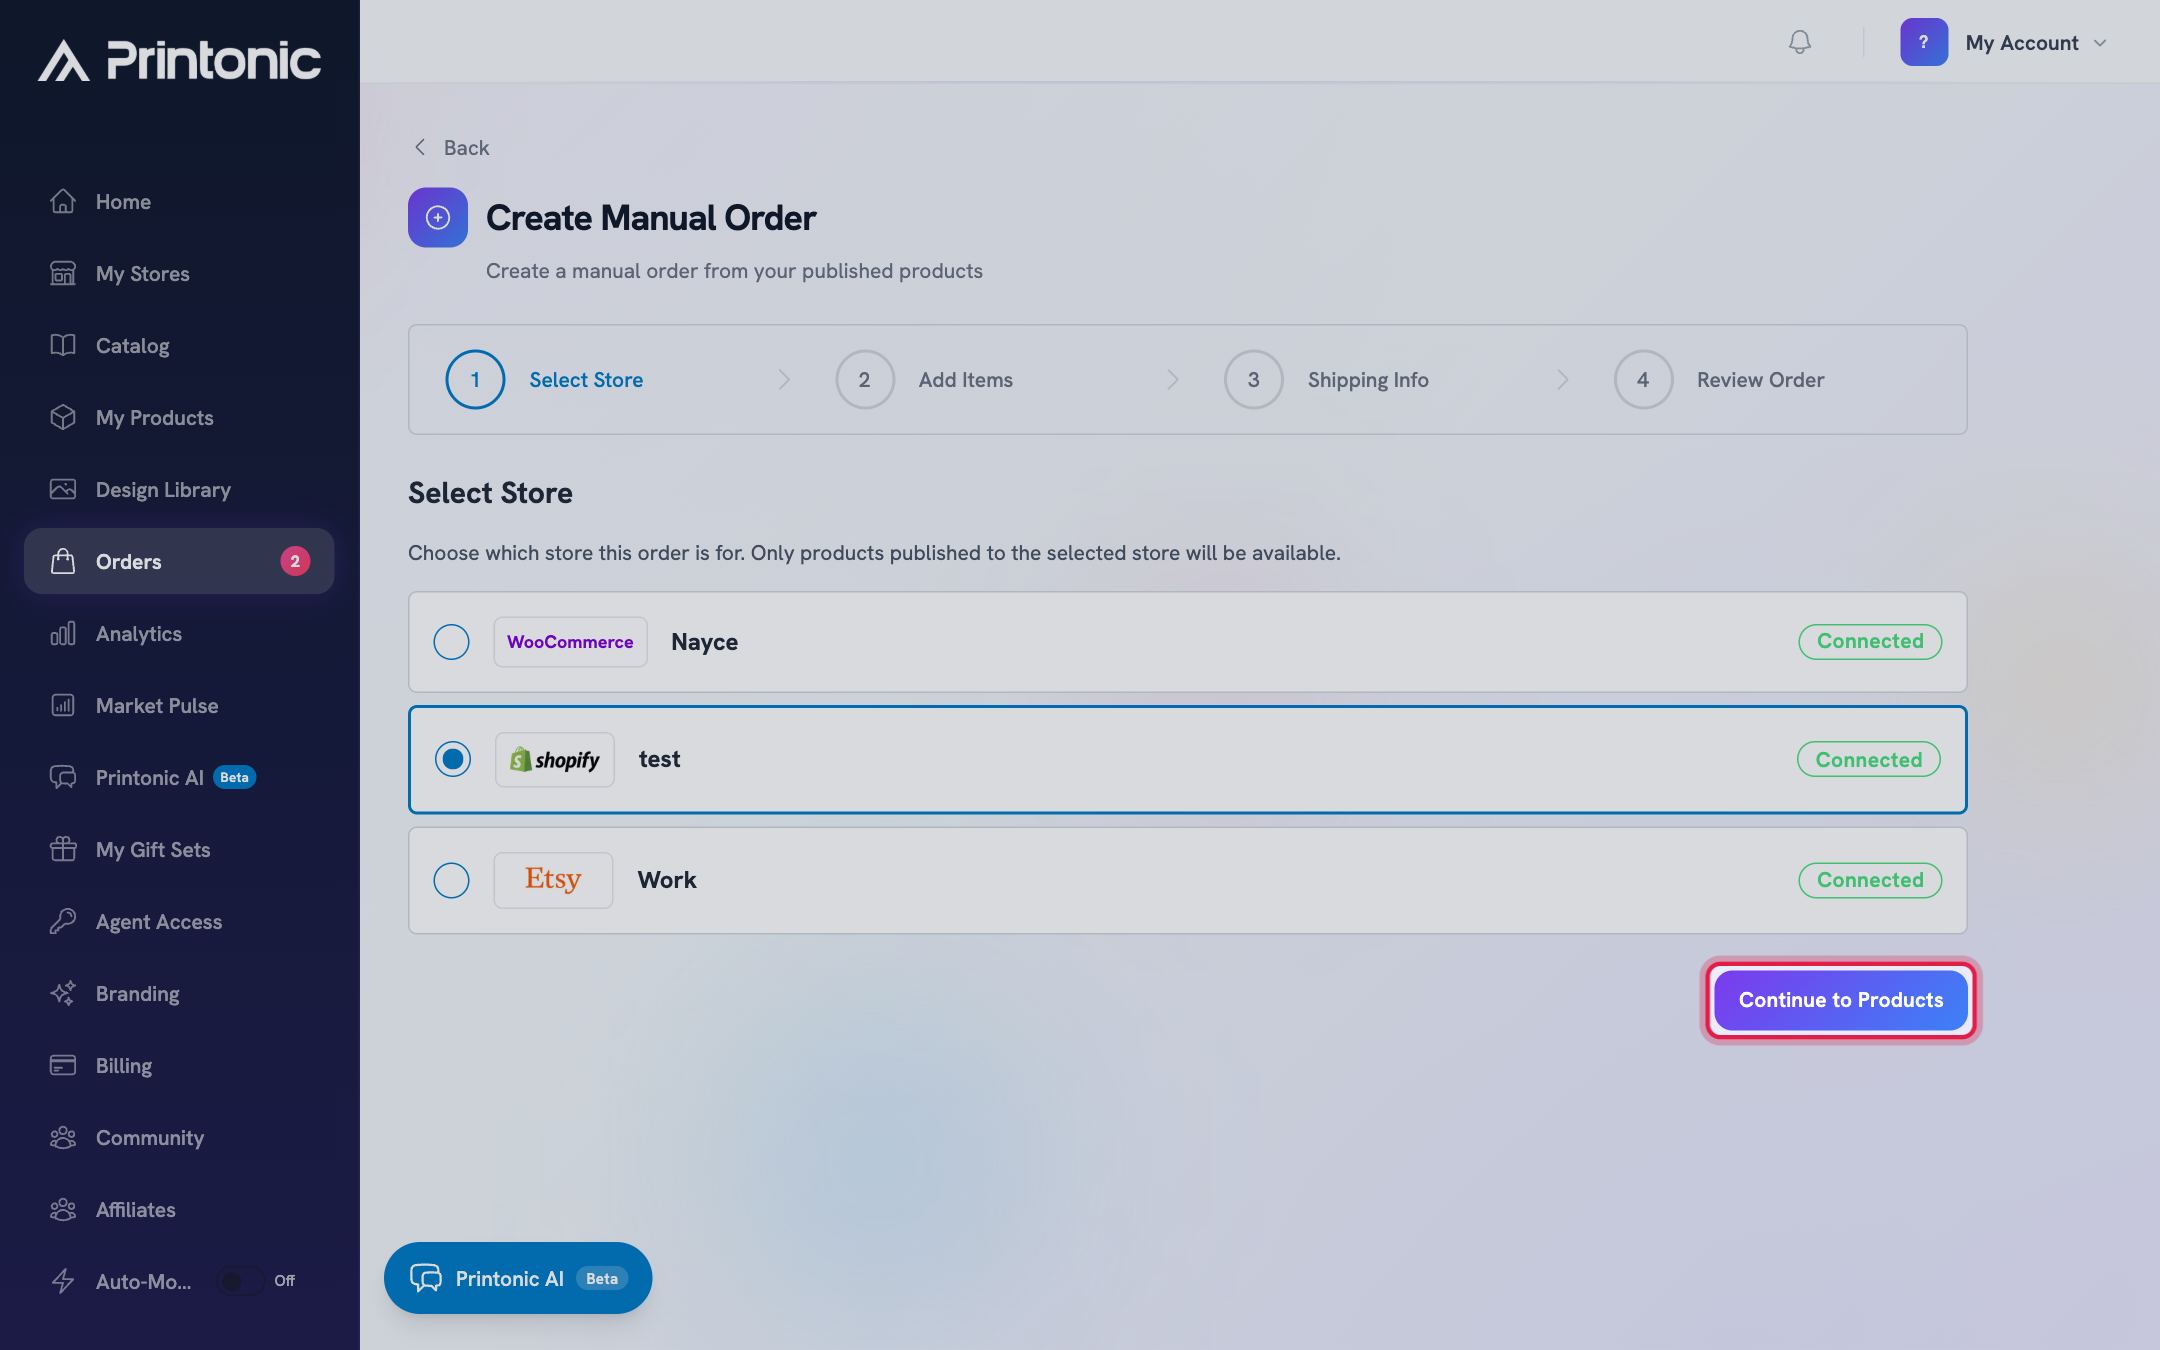
- 3
Create Manual Order > Add Items
Find the product you want to order
Browse the list of your published products, or type in the Search products box to narrow it down. The table shows each product's name, listing title, product photo, and your uploaded art. Click Select on the product you want.
If the list says 'You don't have any published products yet', you need to publish at least one product to this store before you can order it. See the guide on publishing a listing.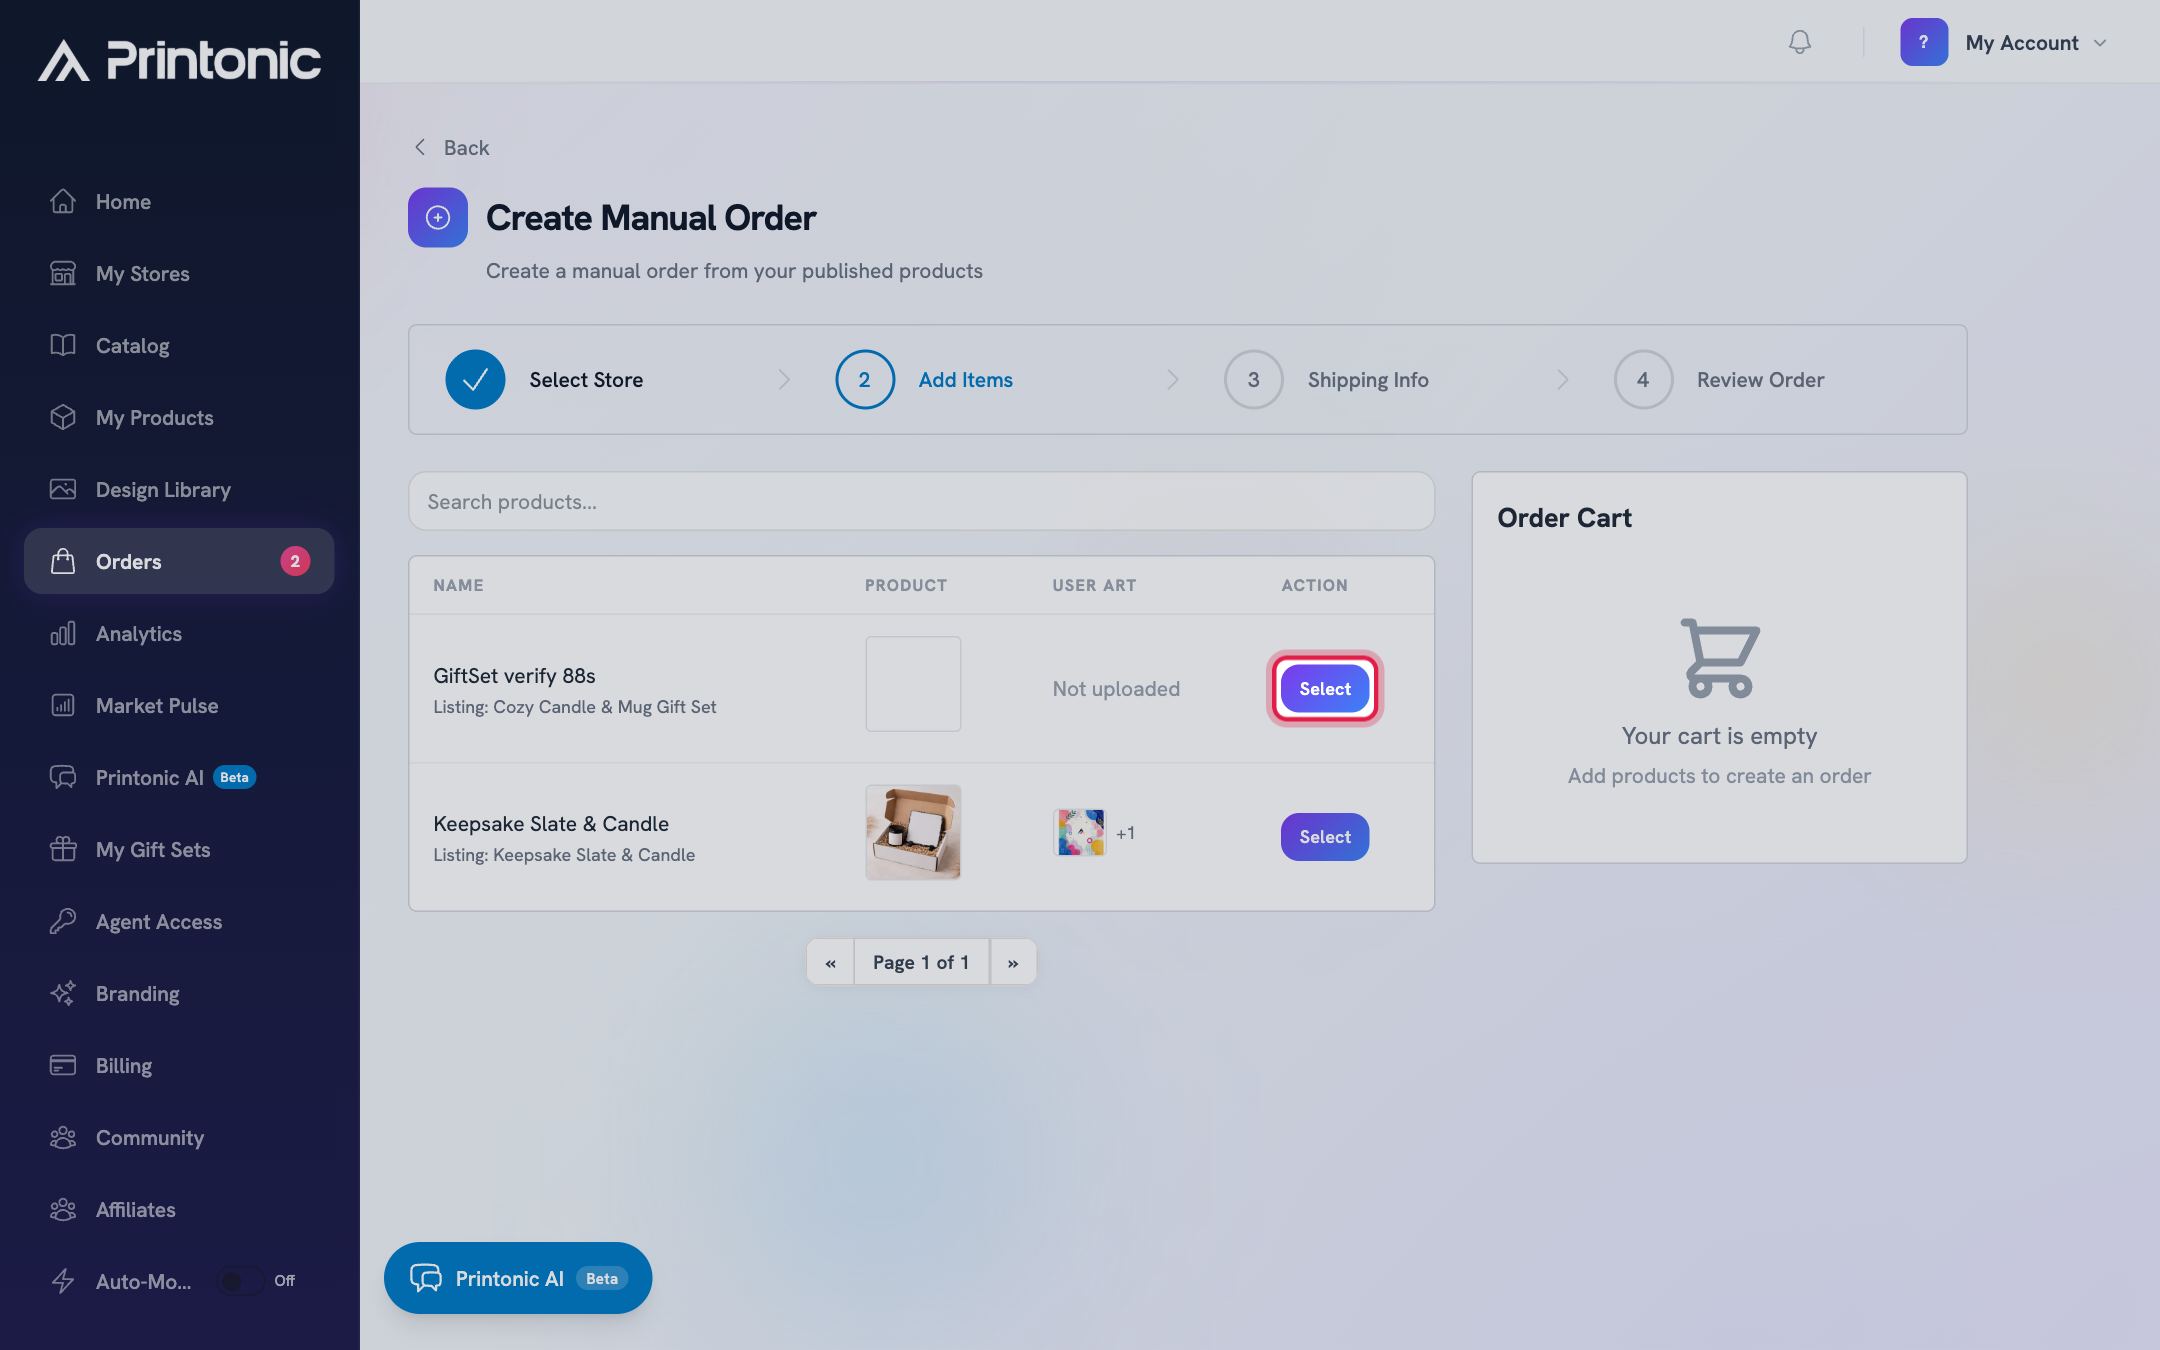
- 4
Create Manual Order > Add Items > product detail
Choose options and quantity, then click Add to Cart
Pick an option for every variation (for example size or color) and set the Quantity. The price updates as you choose options. When everything is selected, click Add to Cart. To grab a different product instead, click Back to Products.
The button reads 'Select all options to continue' until you have picked every variation. Quantity can be anywhere from 1 to 1000 per item.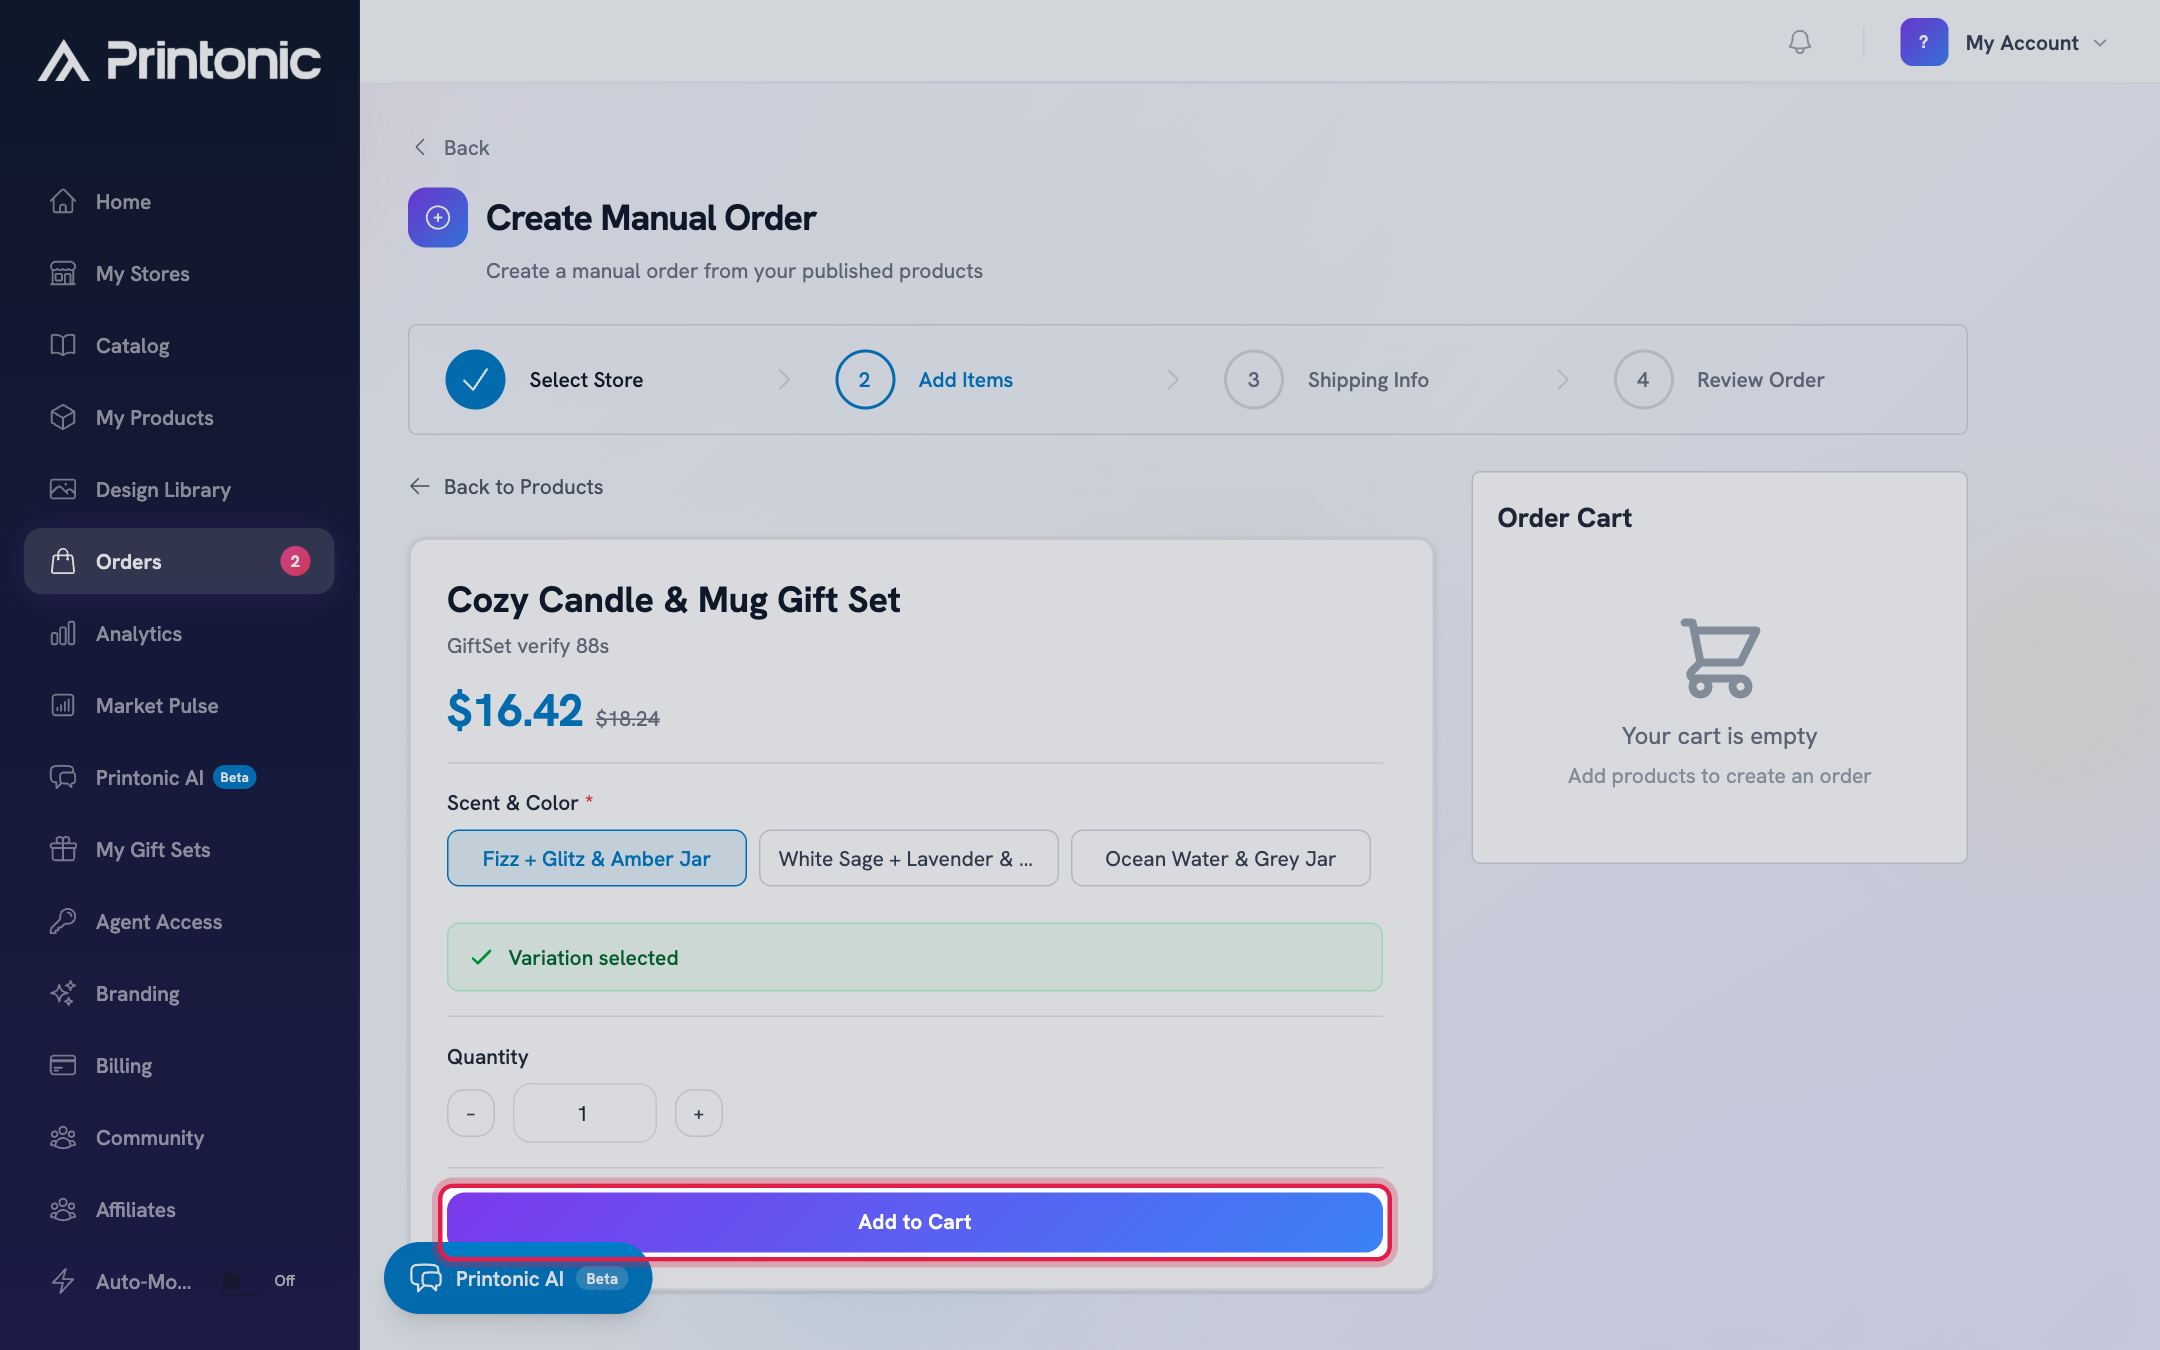
- 5
Create Manual Order > Add Items > Order Cart
Check your Order Cart and continue
Your items appear in the Order Cart panel on the right. Adjust quantities with the plus and minus buttons, or click the X to remove an item. Repeat the previous steps to add more products. When the cart is ready, click Continue to Shipping.
Est. Shipping shows TBD at this point. Shipping is calculated in the next step, once Printonic knows the destination country.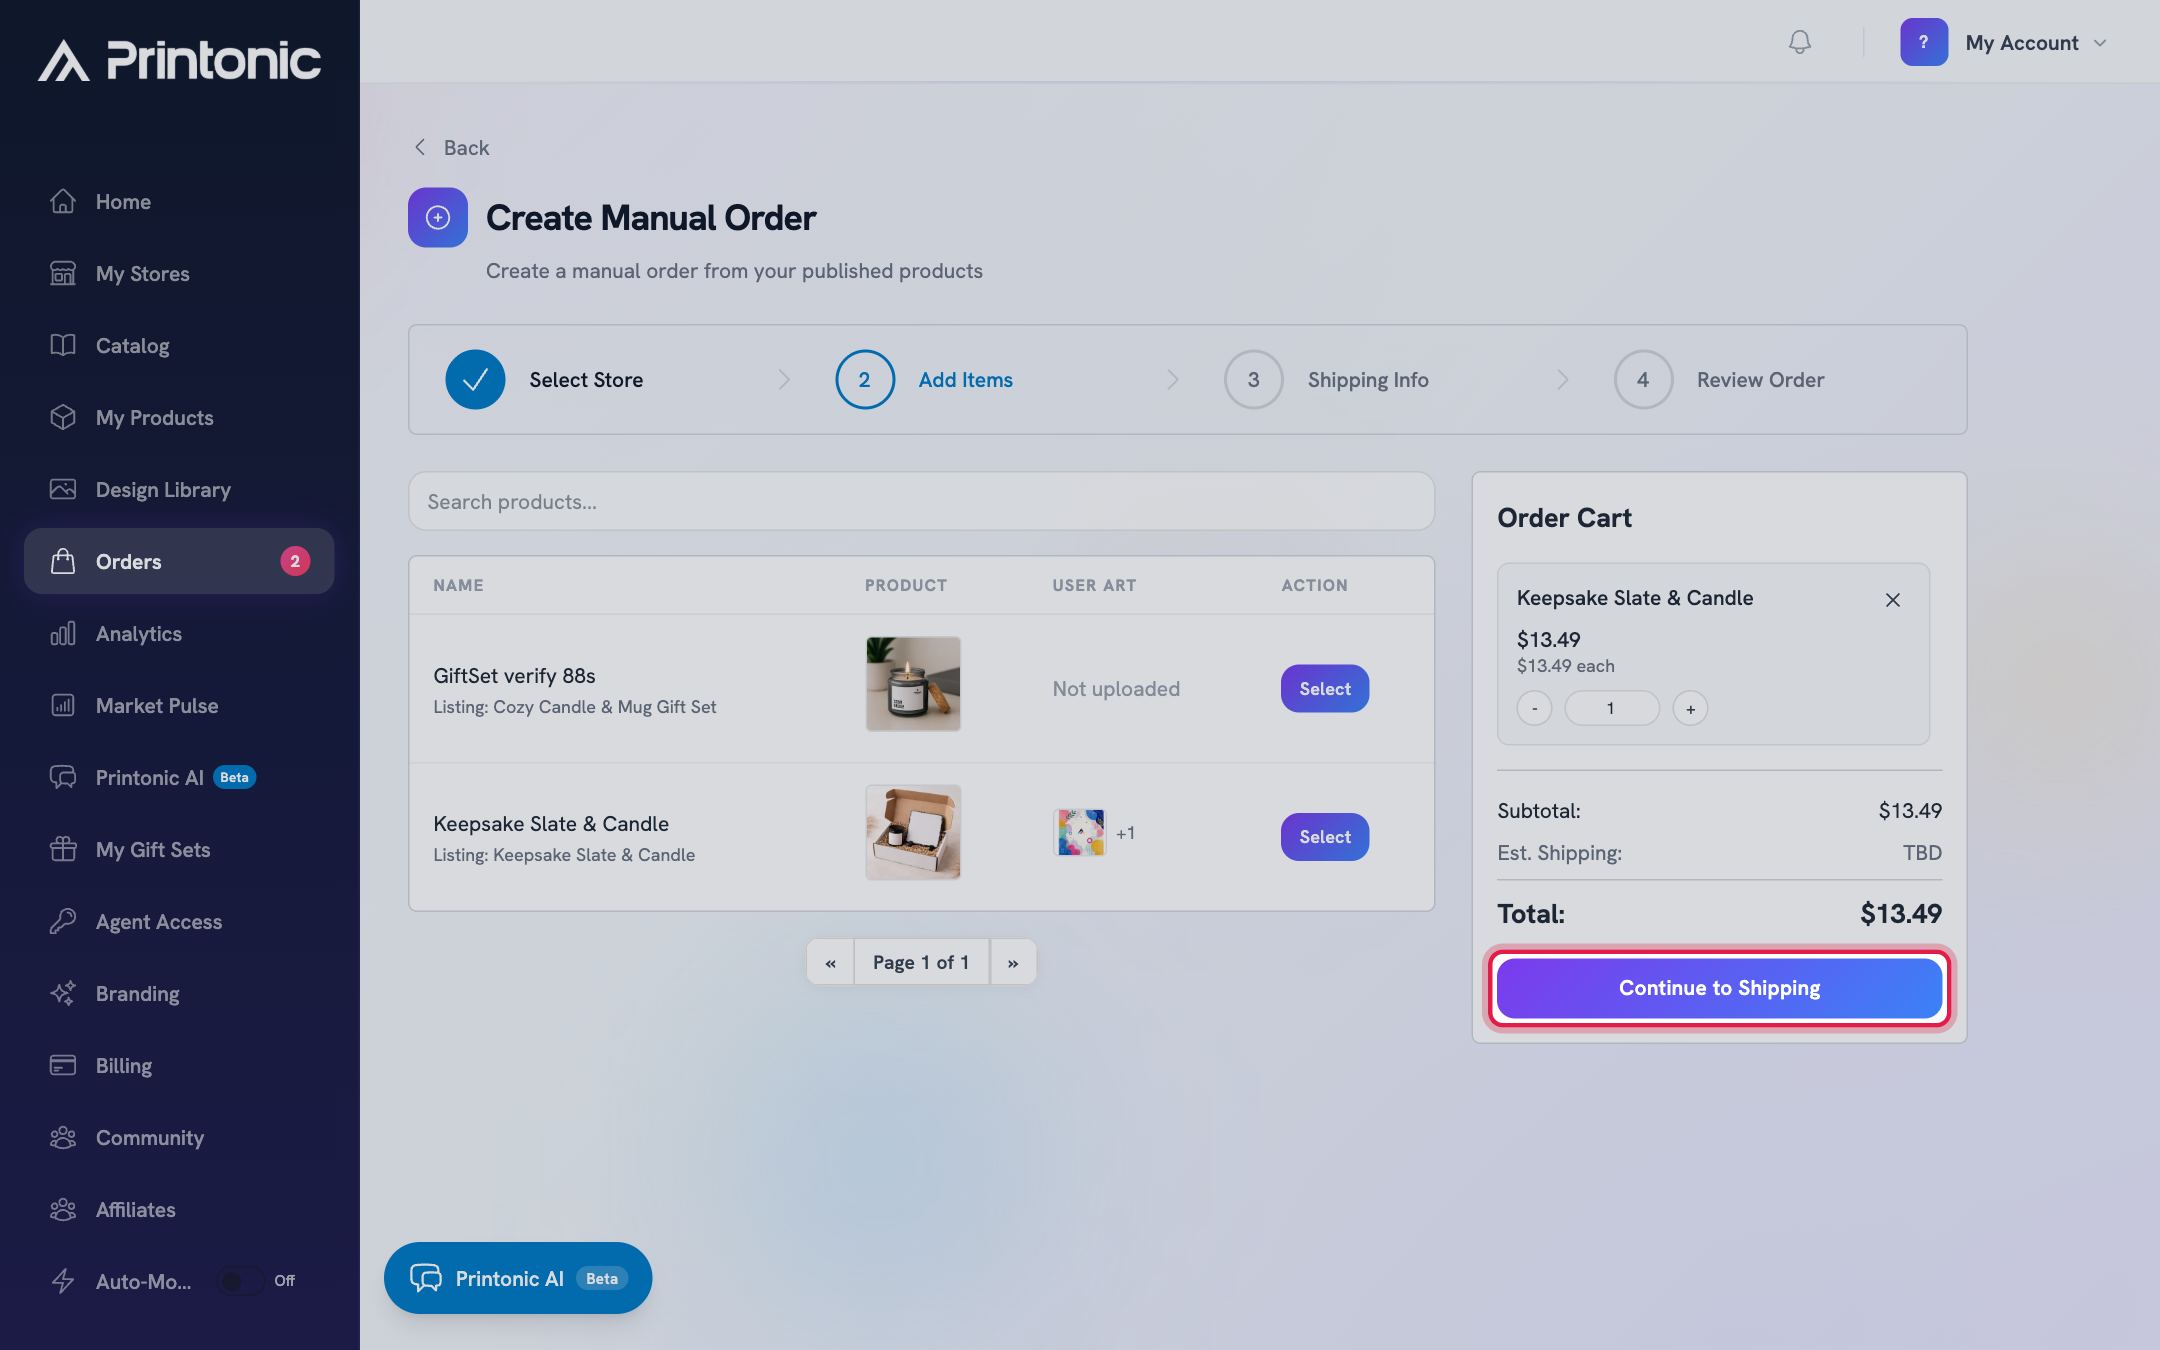
- 6
Create Manual Order > Shipping Info
Enter the shipping address
Fill in Customer Name, Address Line 1, City, State/Province, ZIP/Postal Code, and Country Code (a 2-letter code such as US, CA, GB, or AU). Address Line 2 and Company are optional. Sending a present? Turn on 'This is a gift order' and add the sender name and an optional gift message. Then click Continue.
The Order Summary panel on the right fills in Subtotal, Shipping, and Total based on the destination country. Changing the country recalculates shipping automatically.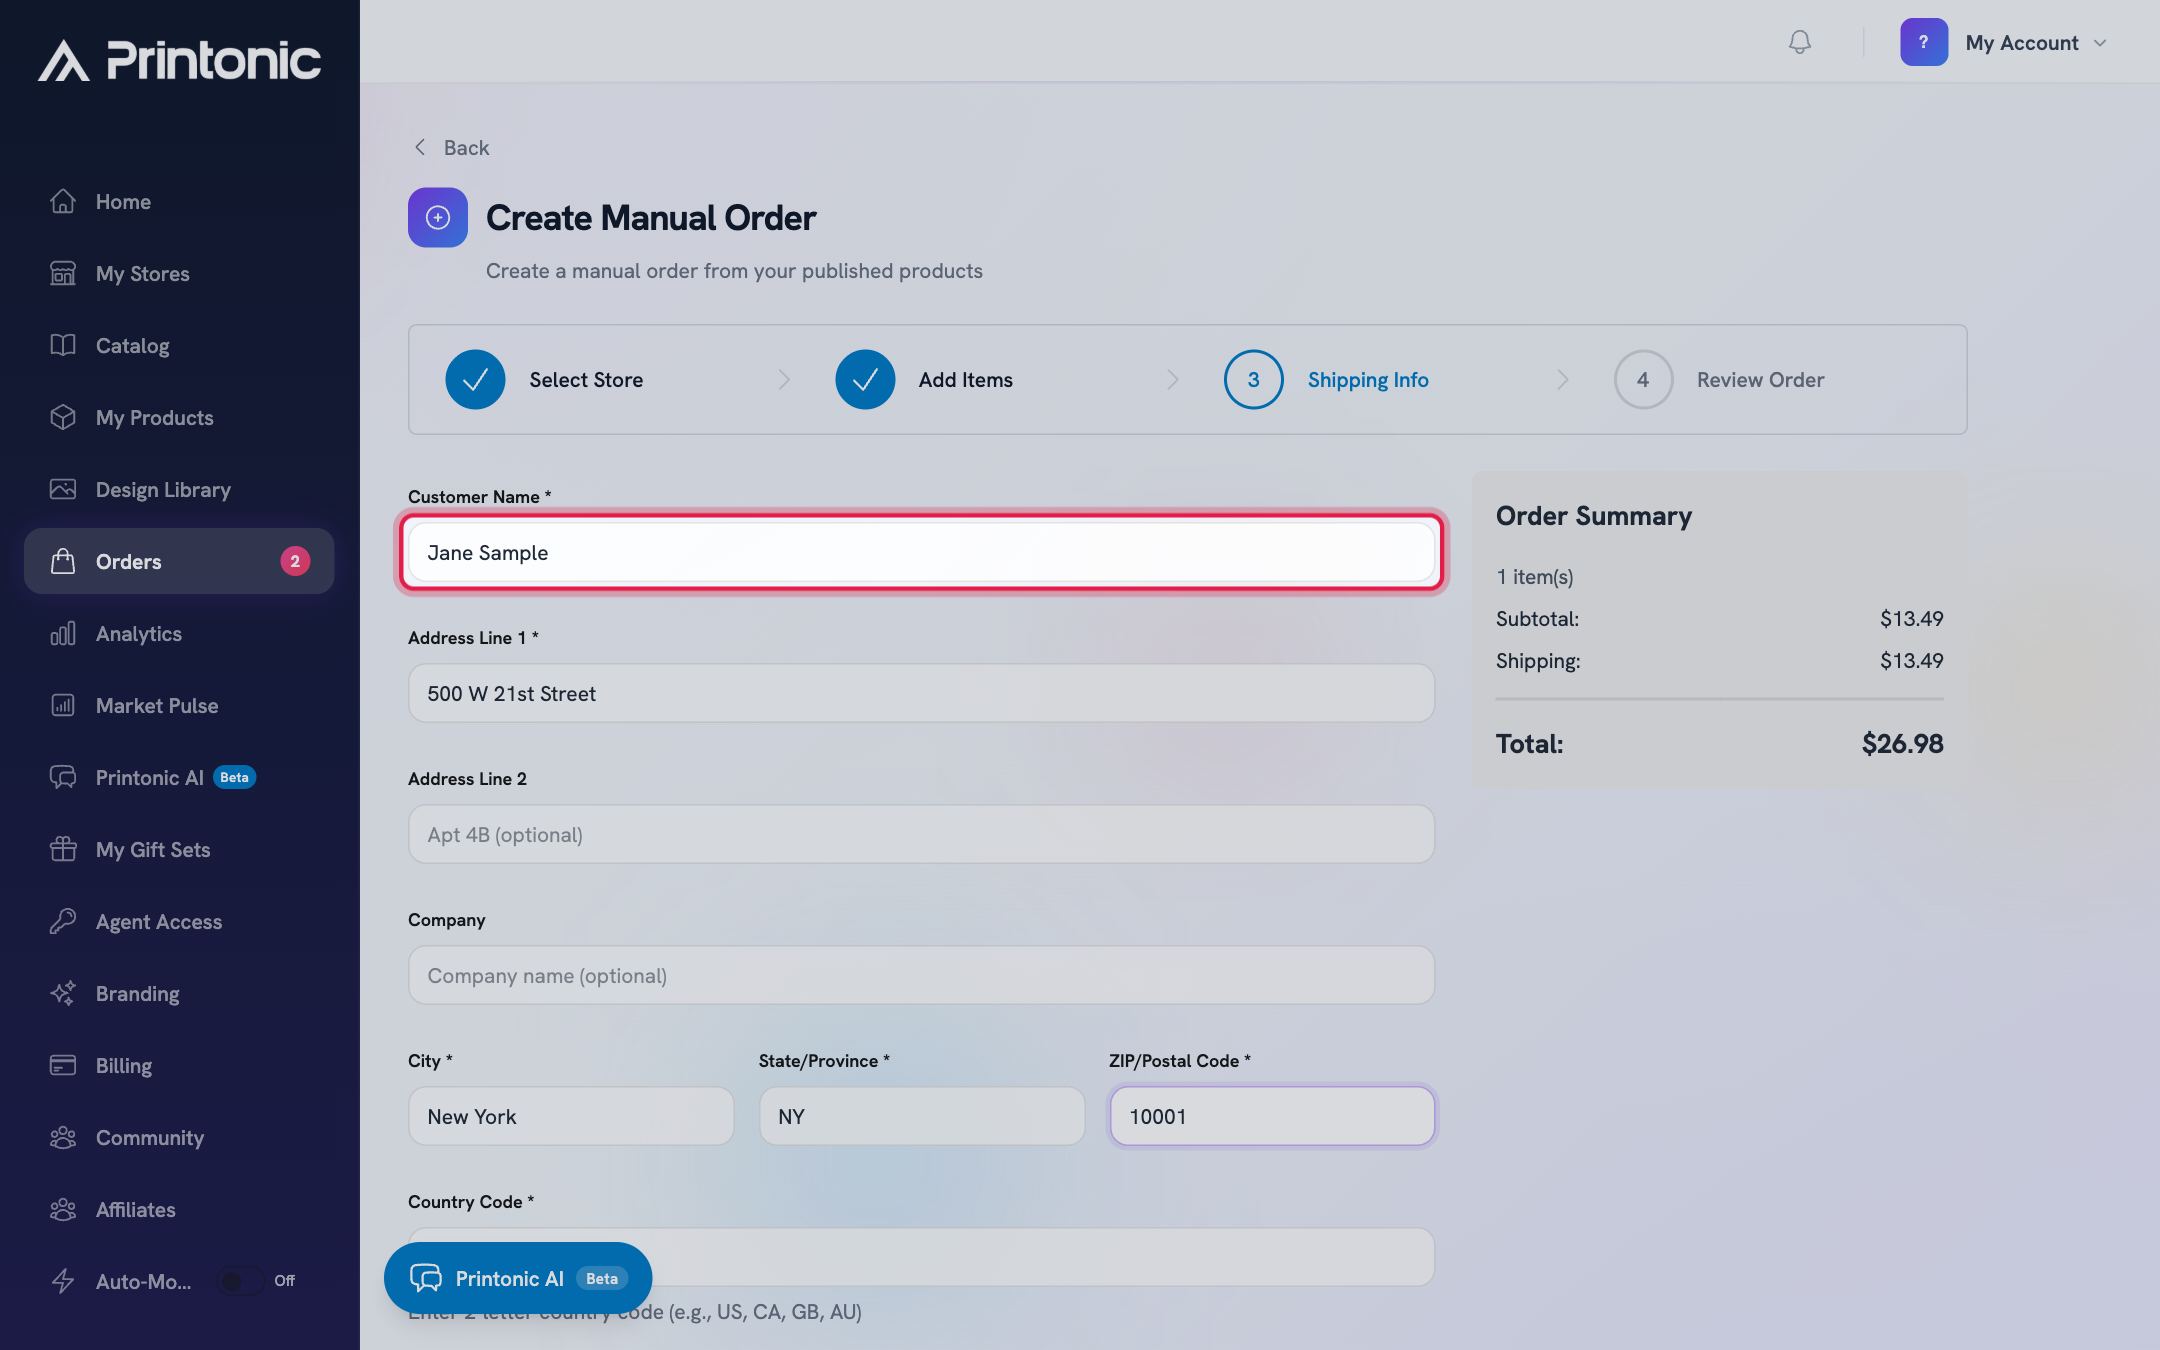
- 7
Create Manual Order > Review Order
Review everything and click Create Order
Check the Shipping To address, the Order Items table, and the Order Summary with Subtotal, Shipping, and Total. Use the Edit buttons to jump back and fix anything. When it all looks right, click Create Order.
You are not charged at this point. You will see an Order Created confirmation with your order ID, then be taken back to Orders, where the new order sits in the Ready to Submit tab.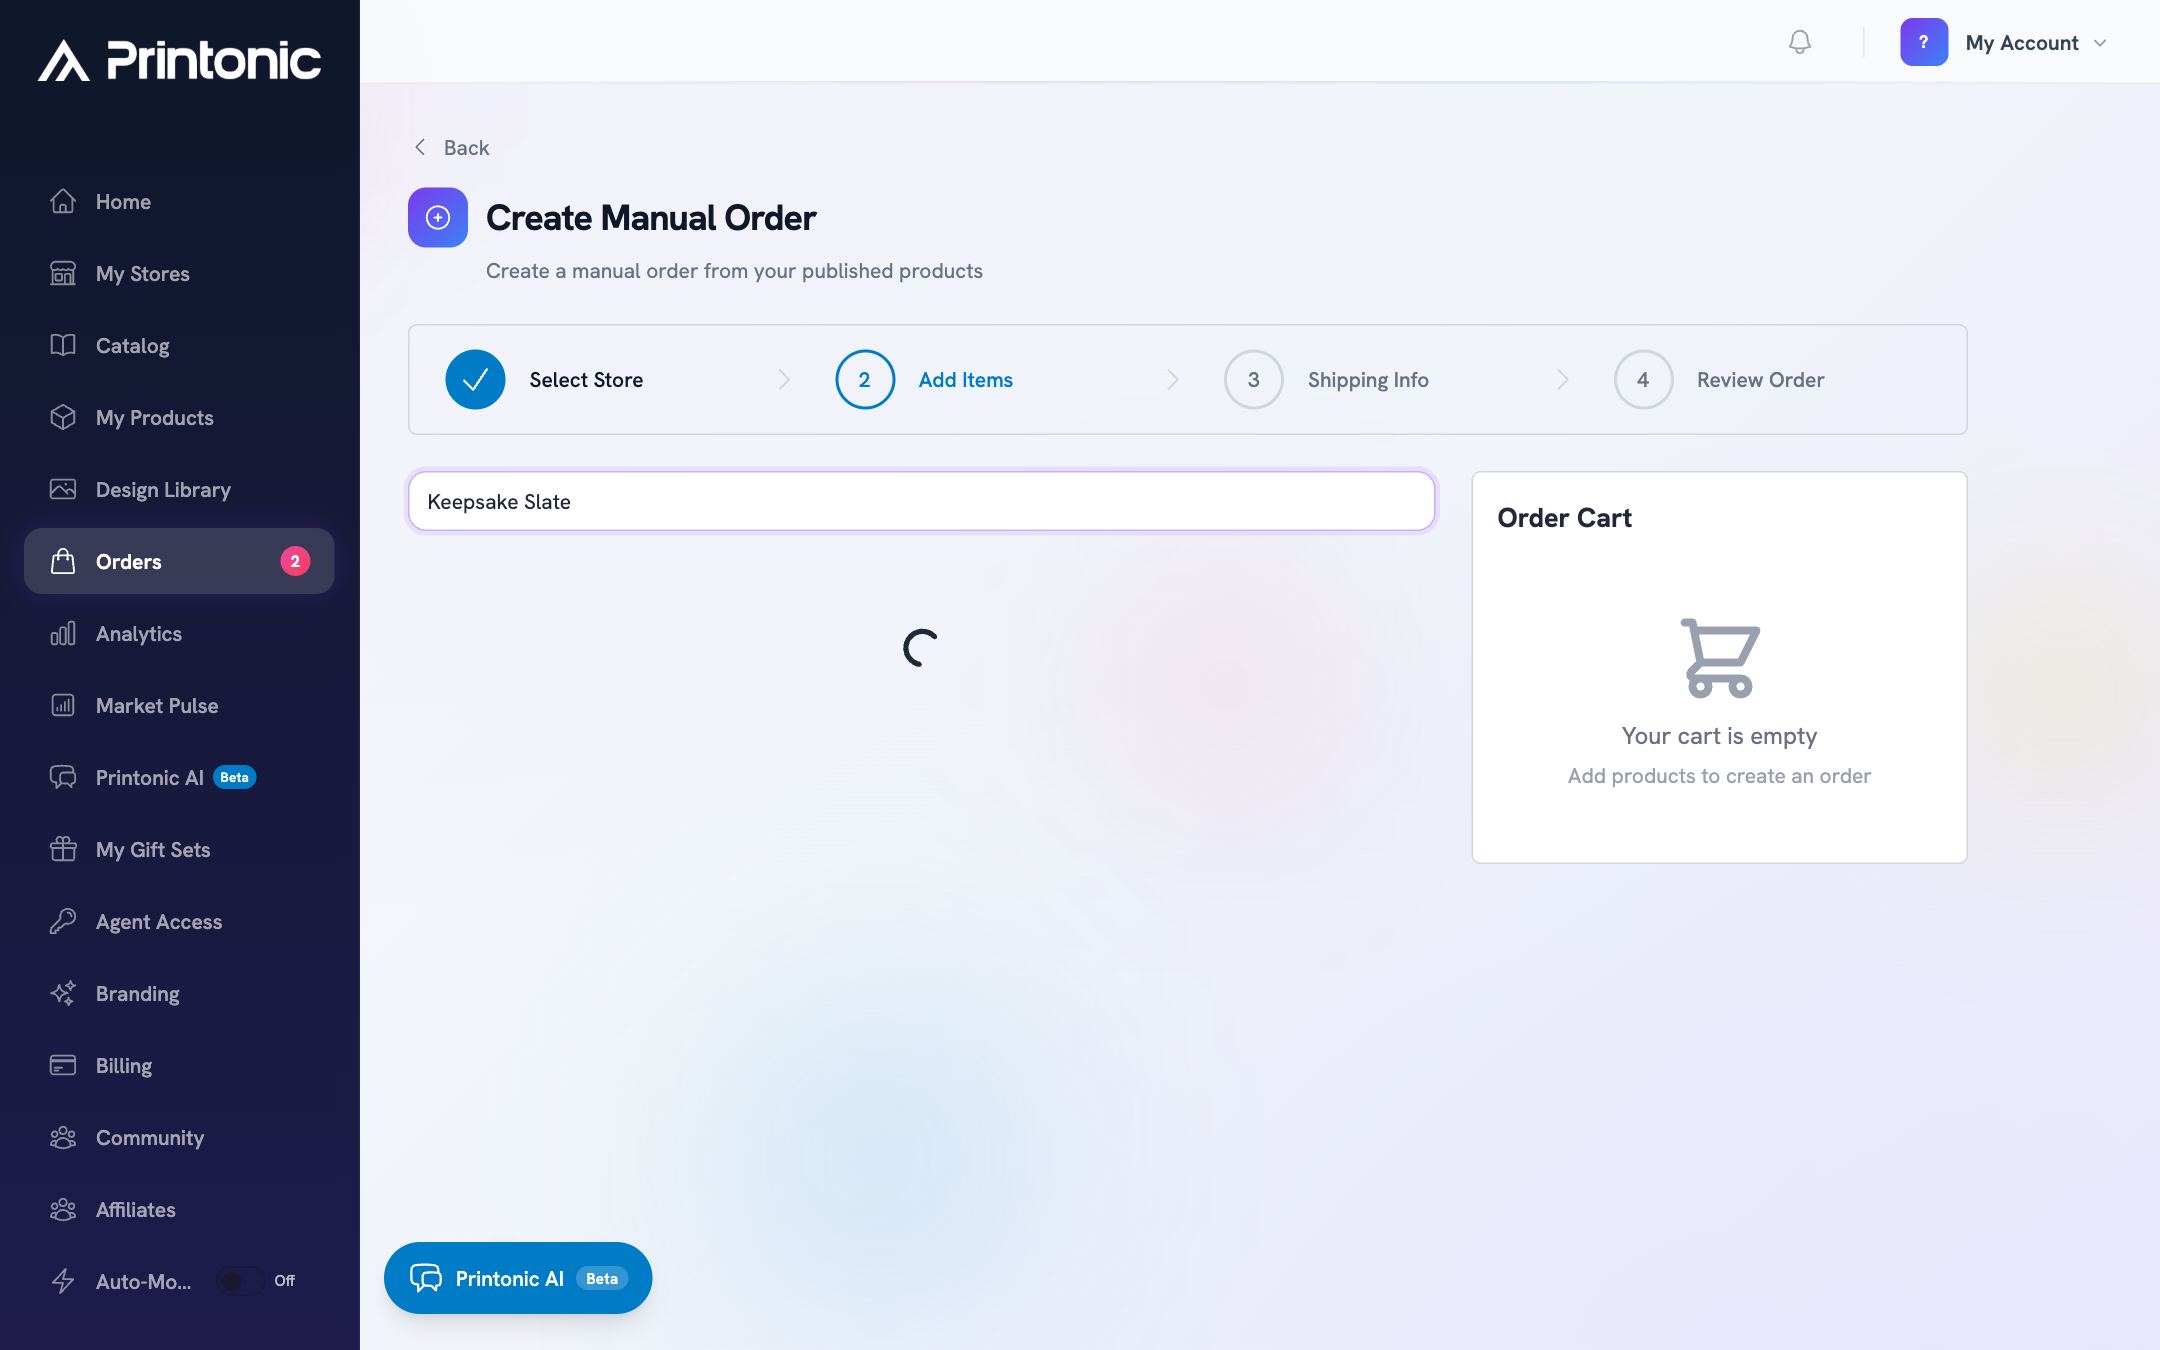
- 8
Dashboard > Orders > Ready to Submit
Send the order to fulfillment
Your manual order now behaves like any other order. When you are ready for Printonic to produce and ship it, tick the checkbox next to the order and click Send to Fulfillment, then complete checkout.
Nothing is printed and nothing is charged until you send the order to fulfillment. See the 'Send orders to fulfillment and pay' guide for that part.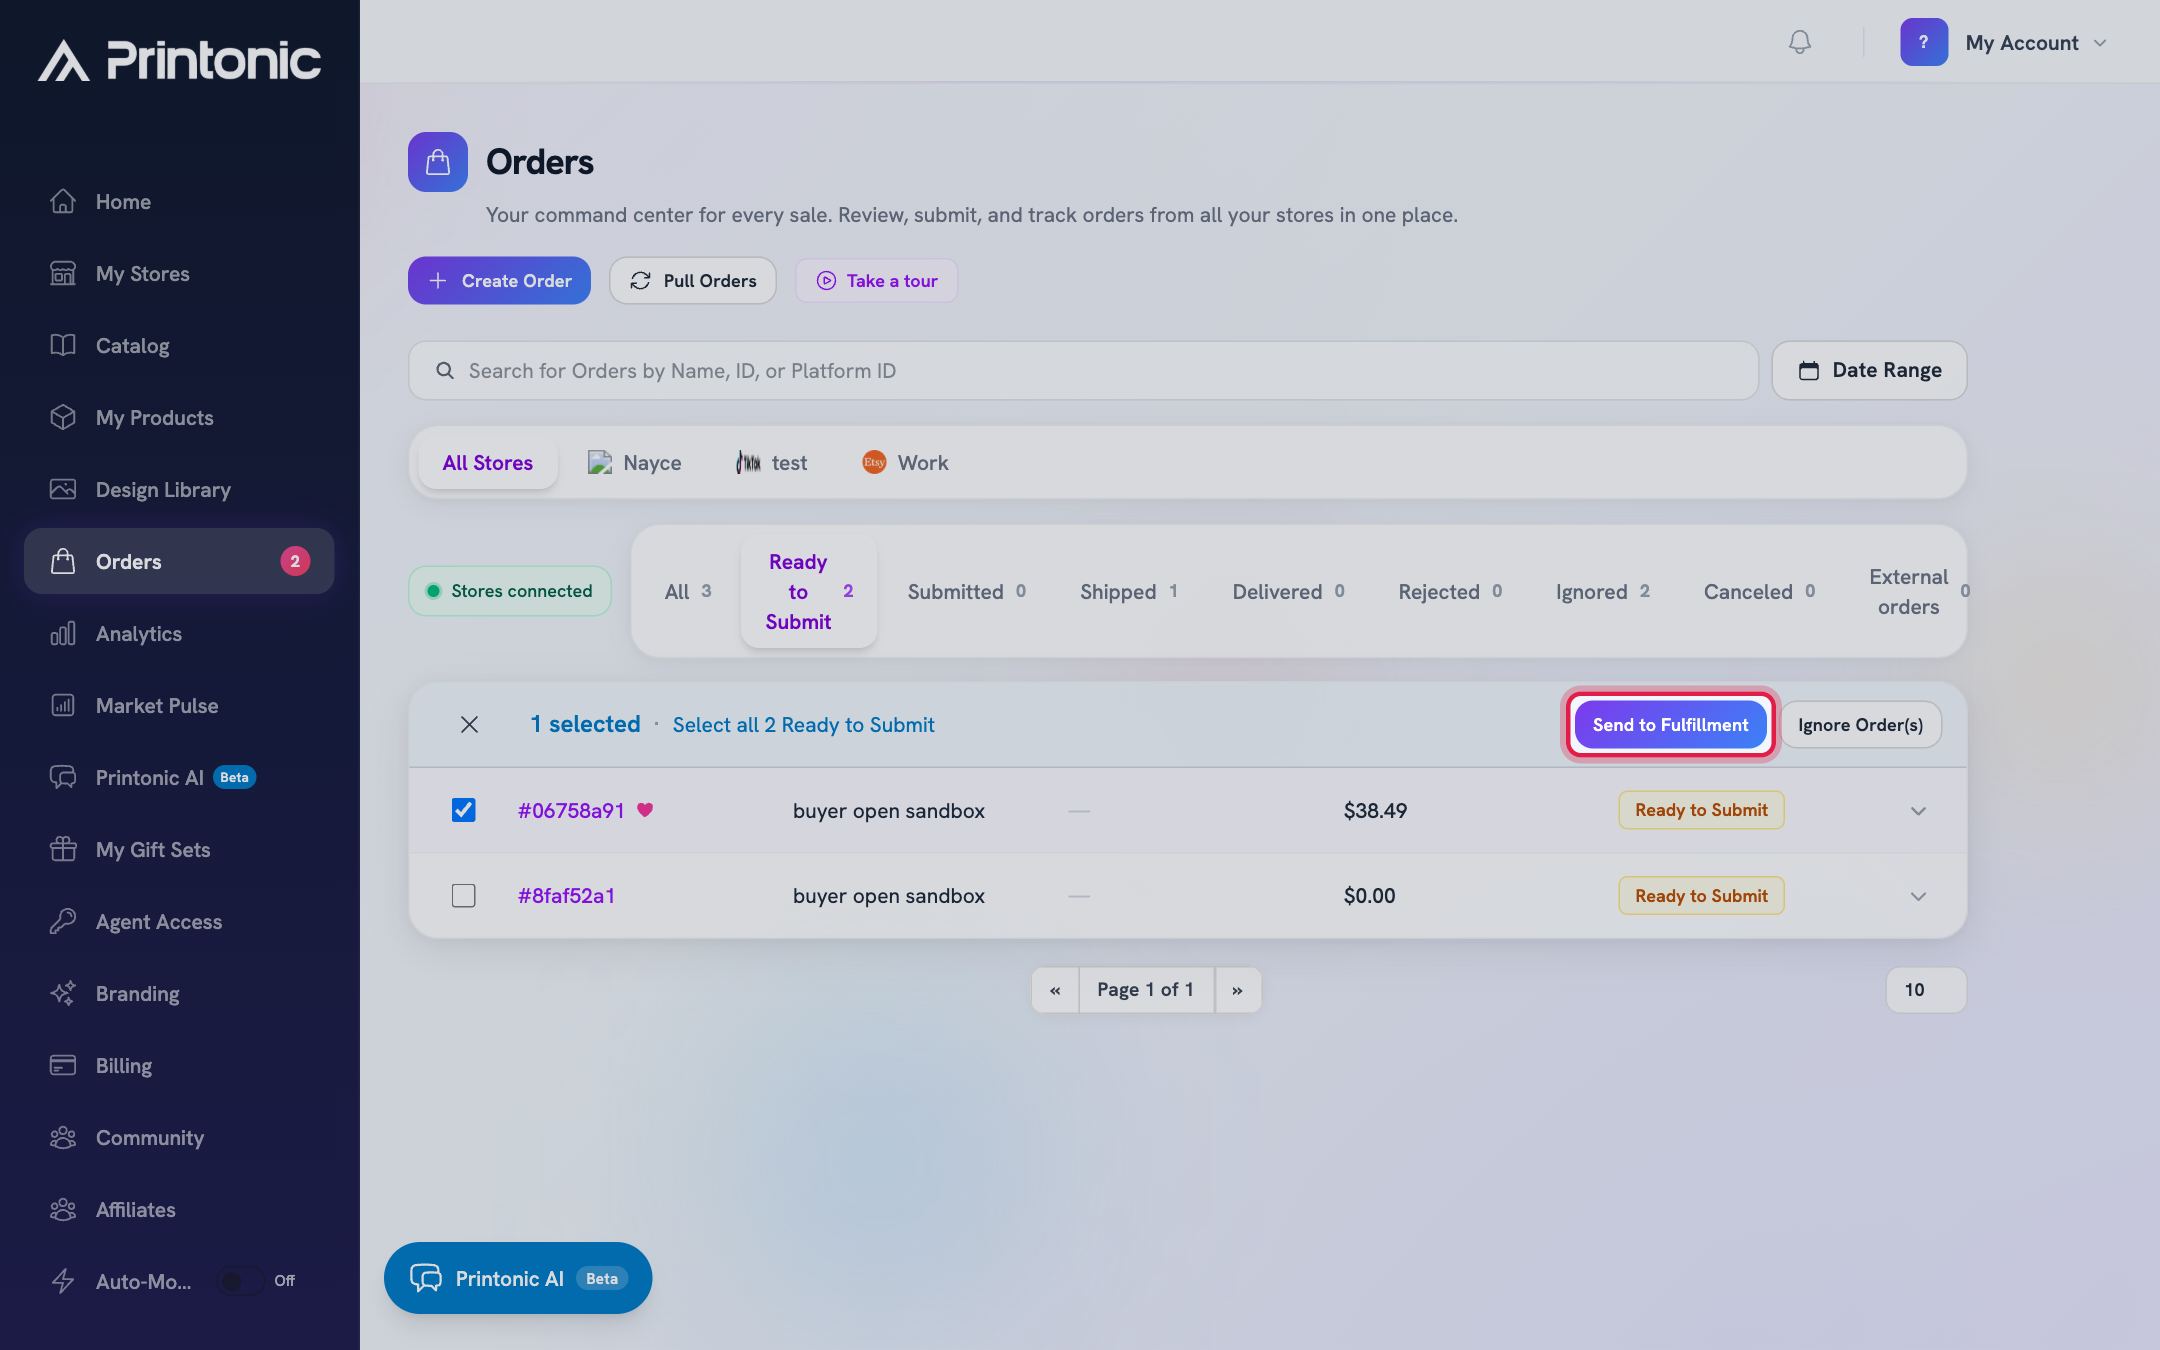
Good to know
- The prices in the wizard are your Printonic production and shipping costs, not the retail price your customer paid you. What you charged your buyer is between you and them.
- Manual orders are the easiest way to order samples. Ship a product to yourself to check print quality before you start selling it.
- Pro members see their product discount applied automatically in the wizard, with the standard price shown crossed out.
- If a listing has a greeting card enabled, the card is included with the manual order automatically, so gift orders arrive complete.
Common questions
Why can't I find my product in the Add Items list?
The list only shows products published to the store you picked in the Select Store step. If the product lives in a different store, click Select Store in the progress bar and switch stores. If it is not published anywhere yet, publish it first.
Am I charged when I click Create Order?
No. Creating the order just saves it in your Orders list under Ready to Submit. You pay when you select the order and click Send to Fulfillment.
Can I ship a manual order internationally?
Yes. Enter the destination's 2-letter country code in the Shipping Info step (for example GB for the United Kingdom or AU for Australia). Shipping costs recalculate for that destination before you confirm anything.
I made a mistake after creating the order. Can I fix it?
Manual orders cannot be edited after creation, but nothing happens until you send them to fulfillment. Select the incorrect order in Ready to Submit, click Ignore Order(s) to set it aside, and create a fresh order with the right details.
Related guides
Manage your orders
Every order from every connected store lands in one Orders tab. Learn what each status means, how to sync, and how to send, ignore, restore, or resubmit orders in bulk.
Send orders to fulfillment and pay
Submit one order or a whole batch for production. Covers the Send to Fulfillment button, the checkout cost breakdown, how your wallet balance applies automatically, paying the rest with a saved card, and adding funds mid-checkout.
Shipping options and upgrades
Every order ships with DHL SmartMail Parcel Expedited by default. Learn how to compare faster carriers on an order, what an upgrade costs, and why TikTok prepaid-label orders have no carrier choice.