Pro & Power Tools
Sell personalized products with buyer questions
Let buyers add their own names, dates, and photos on Etsy. Printonic asks the questions on your listing, renders the print file automatically when the order arrives, and holds it for your approval. Pro feature.
Personalization turns a design into a template buyers fill in. You mark which parts of your design the buyer controls (a name, a date, a photo, a font or color choice). When you publish, Printonic adds matching personalization questions to your Etsy listing. When a personalized order arrives, Printonic renders the finished print file from the buyer's answers automatically and places it in your Personalization Queue for review. Approving releases it to fulfillment.
You design once, the buyer personalizes, and you review the result instead of redrawing art for every order. Personalization is a Printonic Pro feature, starting with Etsy listings.
- 1
Dashboard > My Products > your product > design canvas
Open the designer and click Personalize
Open the product's design canvas and click the pink Personalize button in the toolbar. The personalization panel opens next to your layers. If you have not added any buyer fields yet, the toolbar also shows a hint: 'Make it personal, let buyers add their name or photo'.
Personalization is a Pro feature. Without Pro, the Personalize button shows a lock with a Pro badge and opens the upgrade path instead of the panel.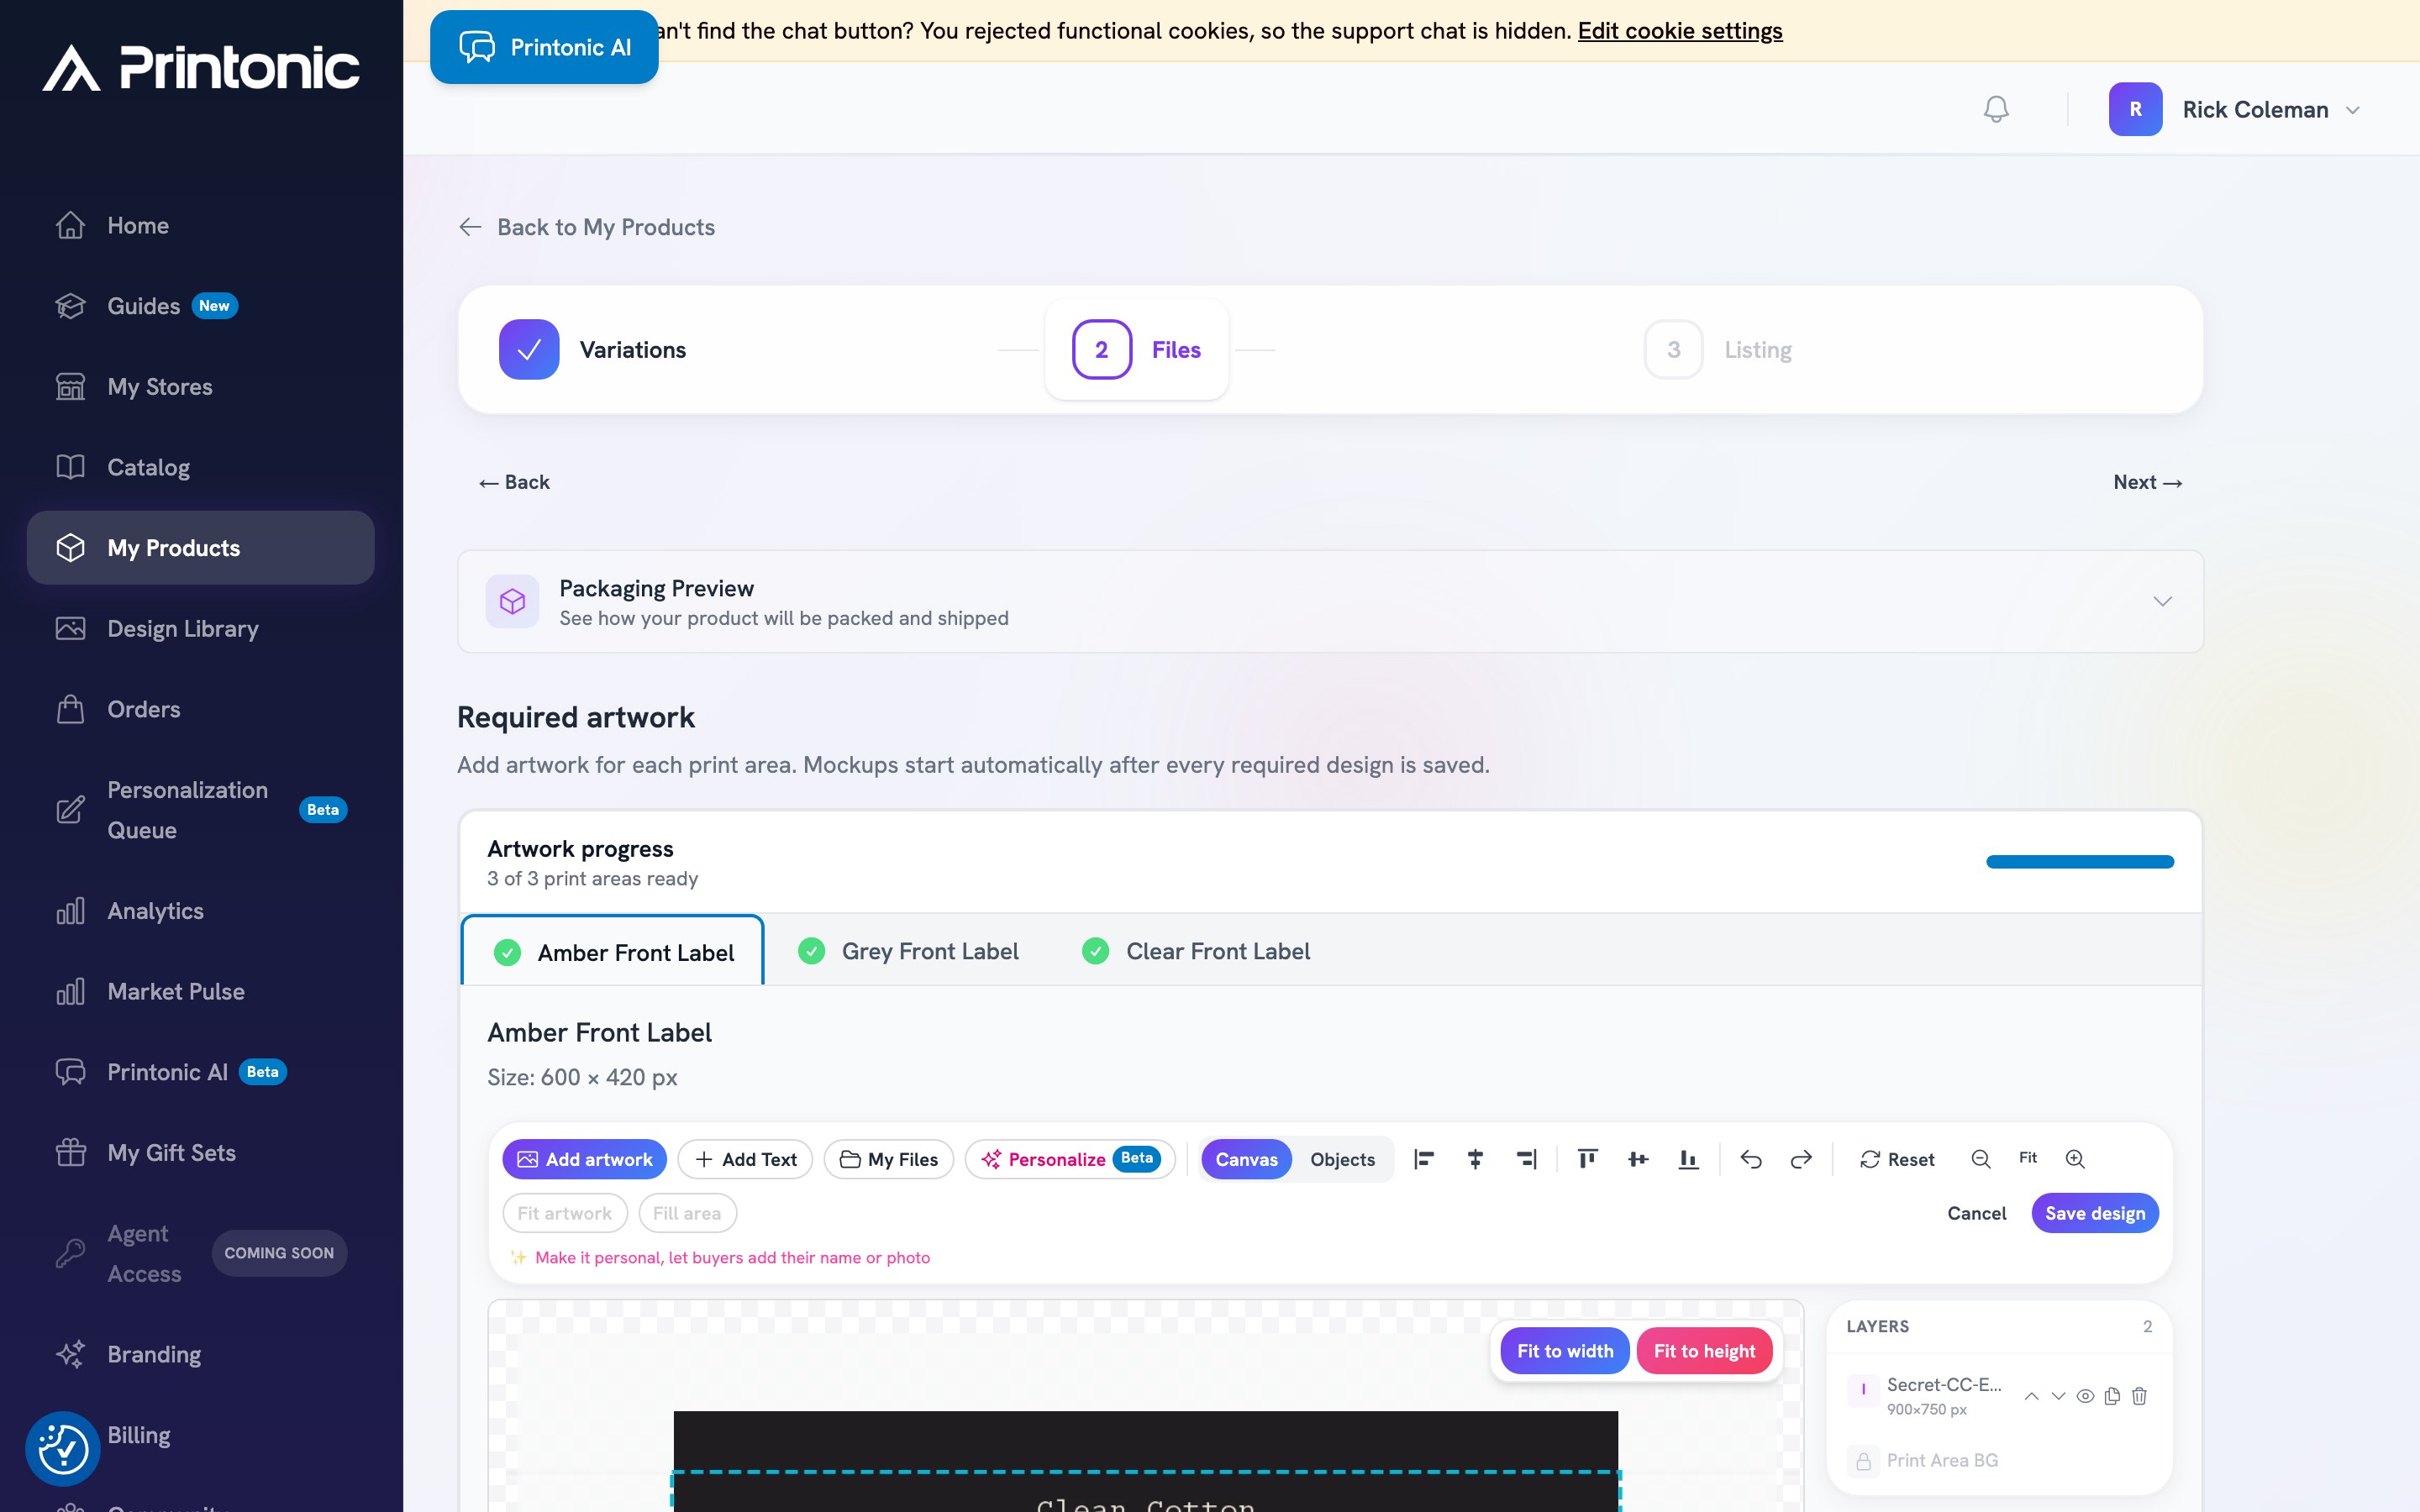
- 2
Personalize panel > Layers
Make a text layer buyer-editable
Select a text layer in the Layers list and turn on Personalizable. Give it a Buyer question, which is exactly what the buyer sees on Etsy (for example 'Customer Name'). Mark it Required if the order cannot be made without it, and set Max chars to keep answers from overflowing your design. Under 'If text is too long' choose Shrink text to fit so long names scale down instead of breaking the layout.
The Field key fills in automatically. It is the internal name that links the Etsy answer to this exact layer, so you never need to touch it.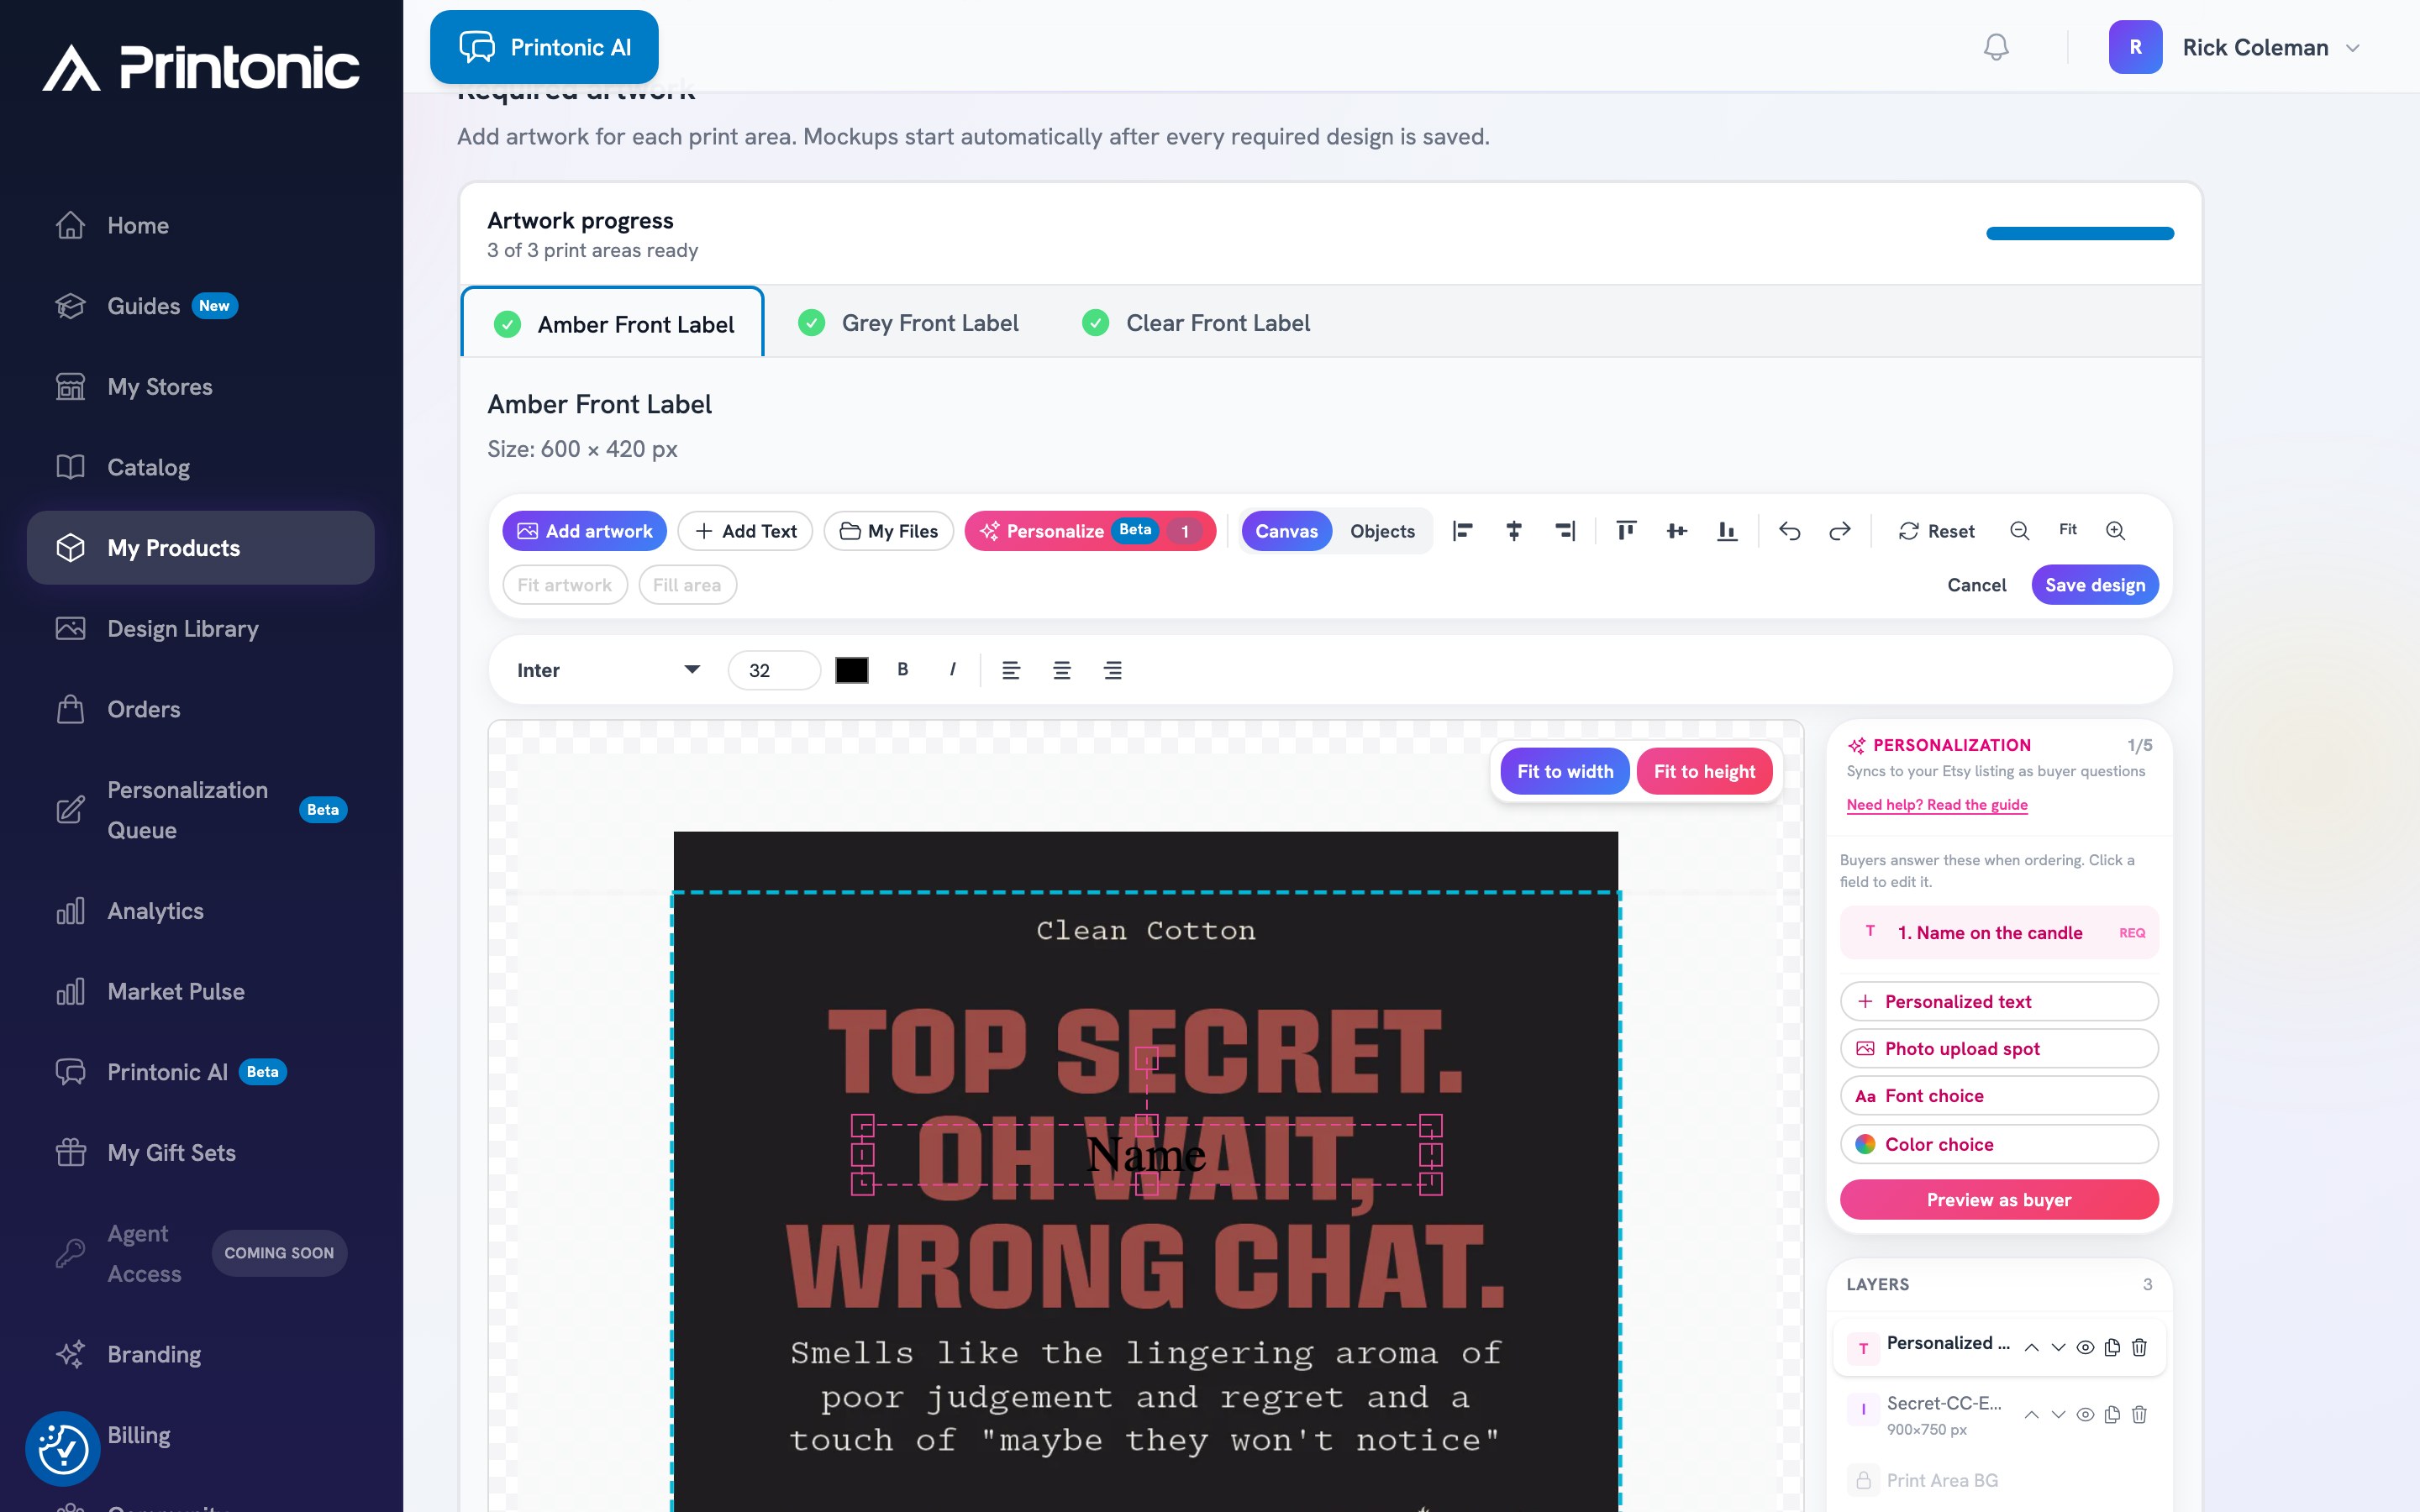
- 3
Personalize panel > image layer > Buyer uploads this image
Add a buyer photo spot (optional)
Select an image layer (for example the placeholder photo on a photo slate) and turn on 'Buyer uploads this image'. Give it a Buyer question such as 'Pet photo' and, if helpful, Extra instructions like 'Face clearly visible'. Buyer photos are placed automatically when orders arrive: the photo is fitted to fill the frame you drew, centered, with the aspect ratio preserved.
Etsy allows one photo upload question per listing, so a design can have at most one buyer photo spot. Text and choice questions are not affected by this limit.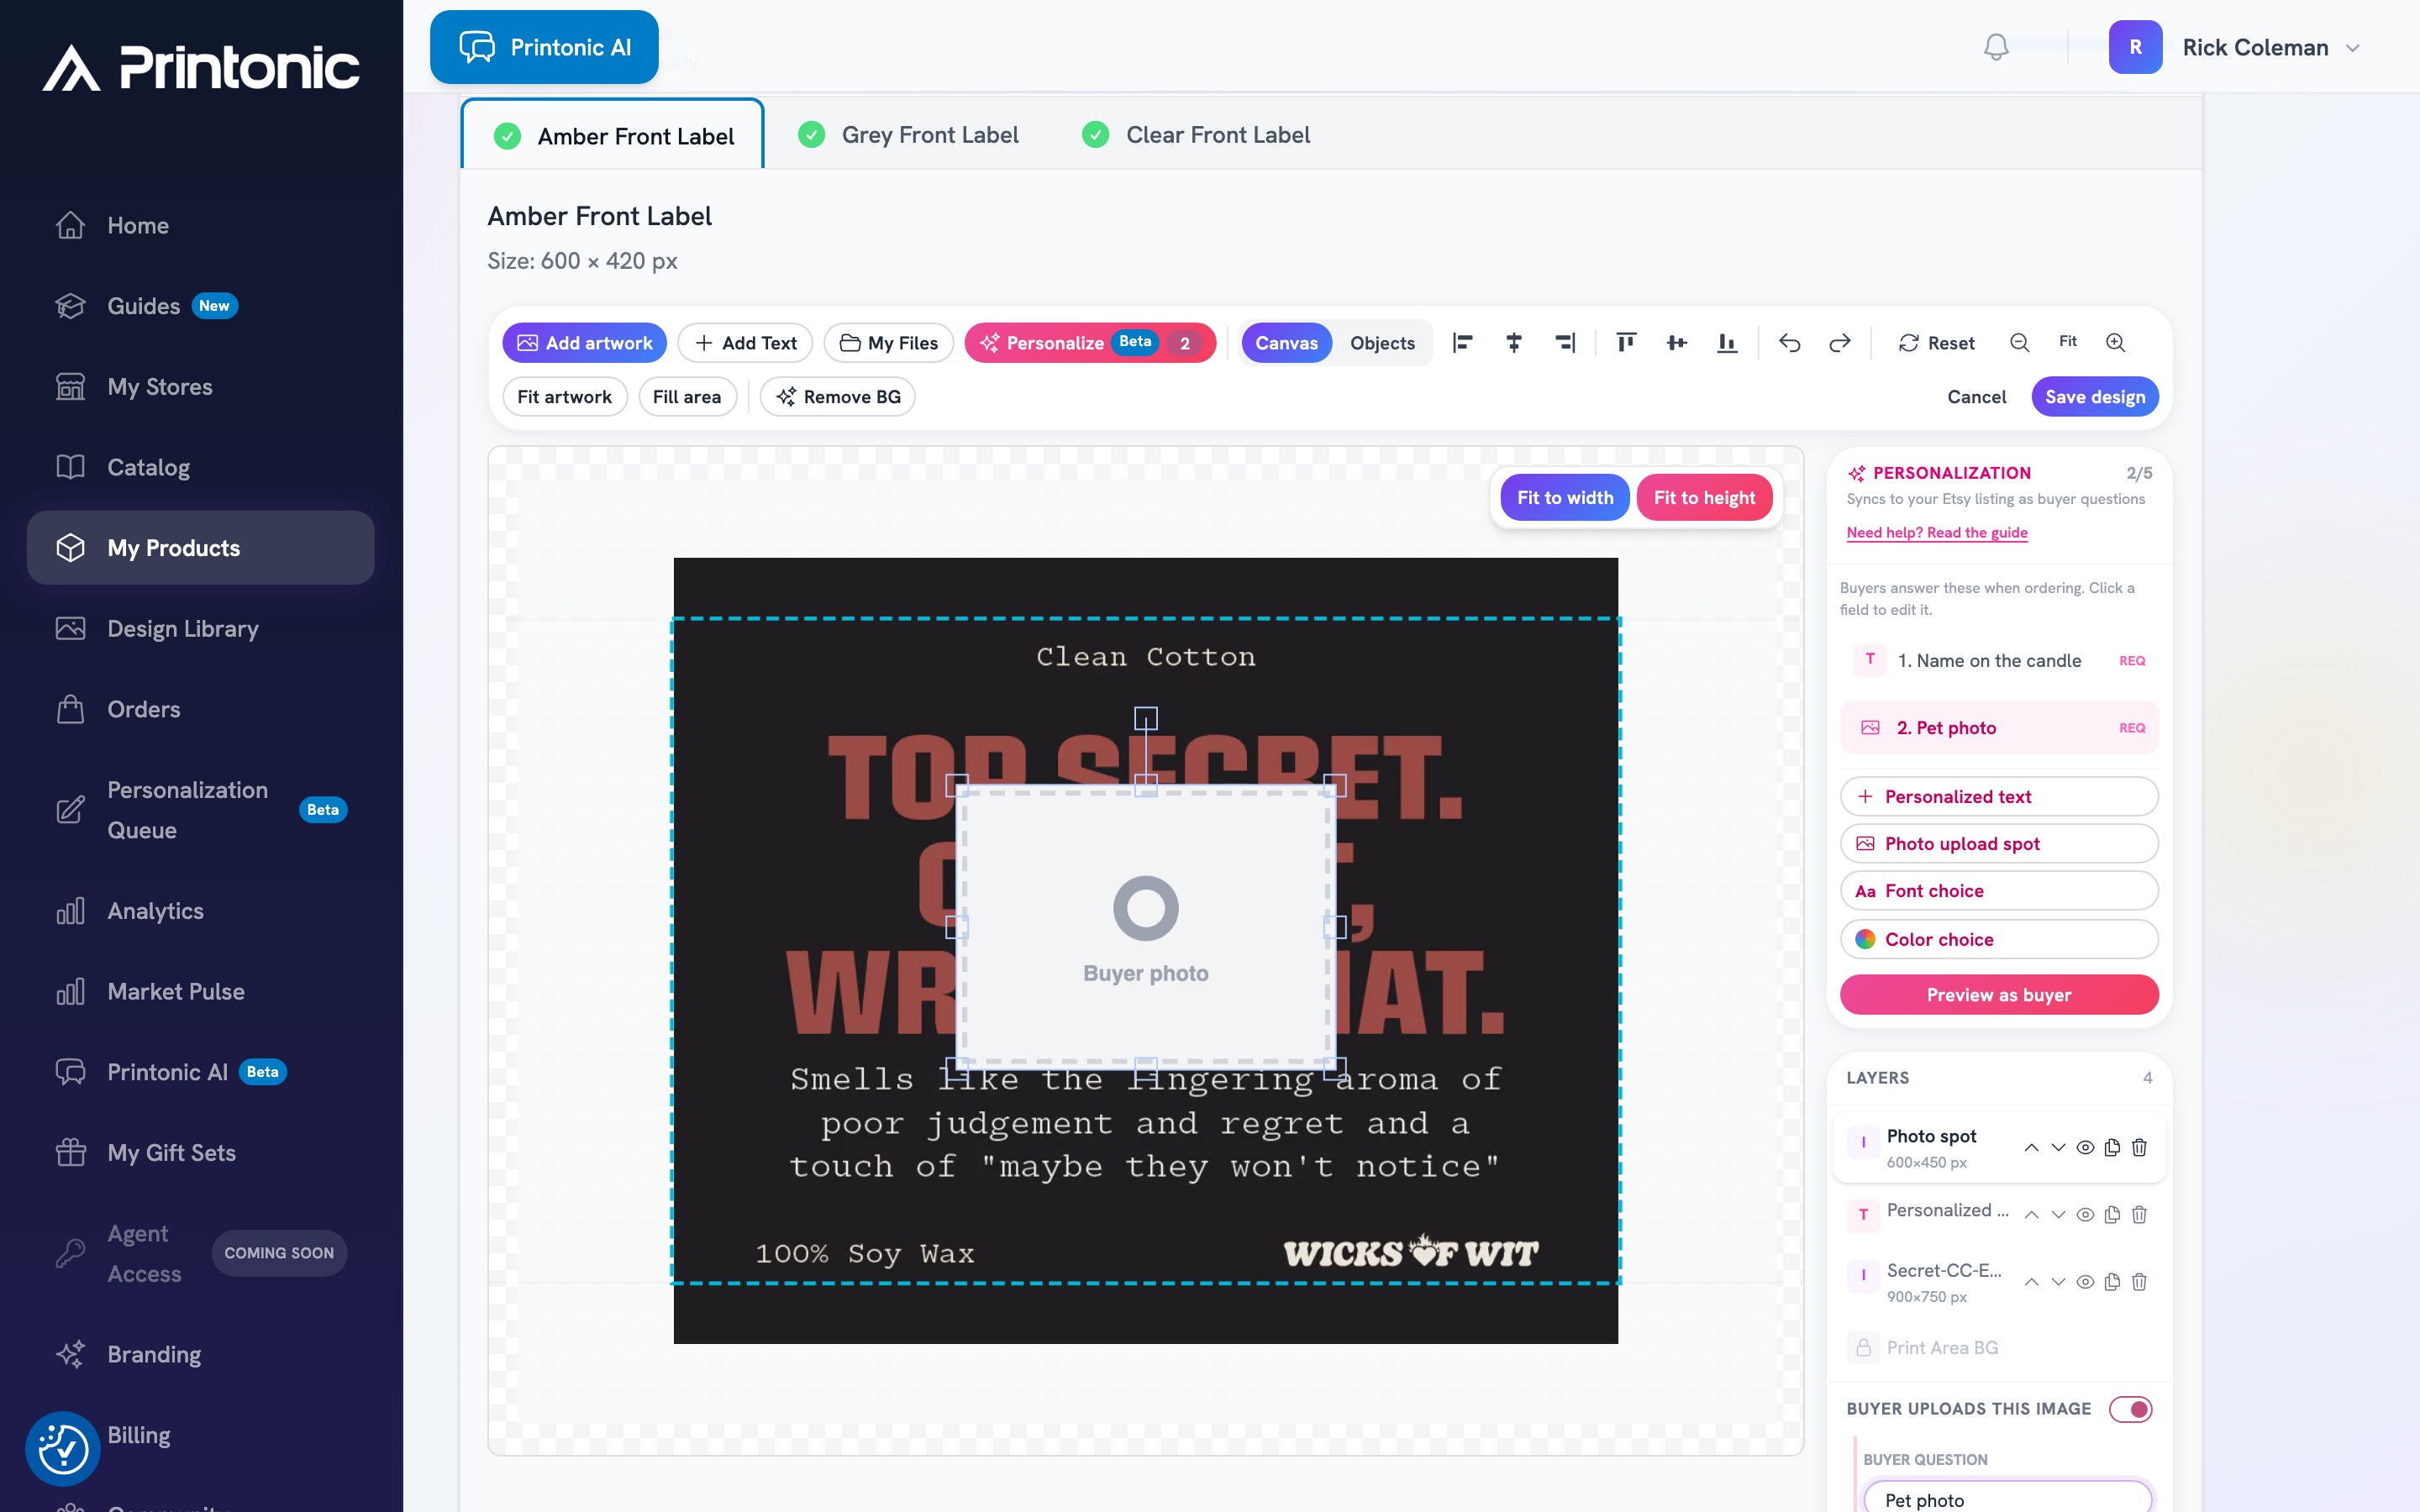
- 4
Personalize panel > style choices
Offer font and color choices (optional)
You can let the buyer pick the look as well as the words. Pick the fonts buyers may choose from the curated font list, and add color options with a buyer-friendly name for each (for example 'Gold'). Each style choice becomes a dropdown question on Etsy, and the render uses exactly what the buyer picked.
The font list is curated so that what you preview is exactly what prints. Every offered font is baked into the render pipeline, which is what prevents the classic 'preview looked different from the print' problem.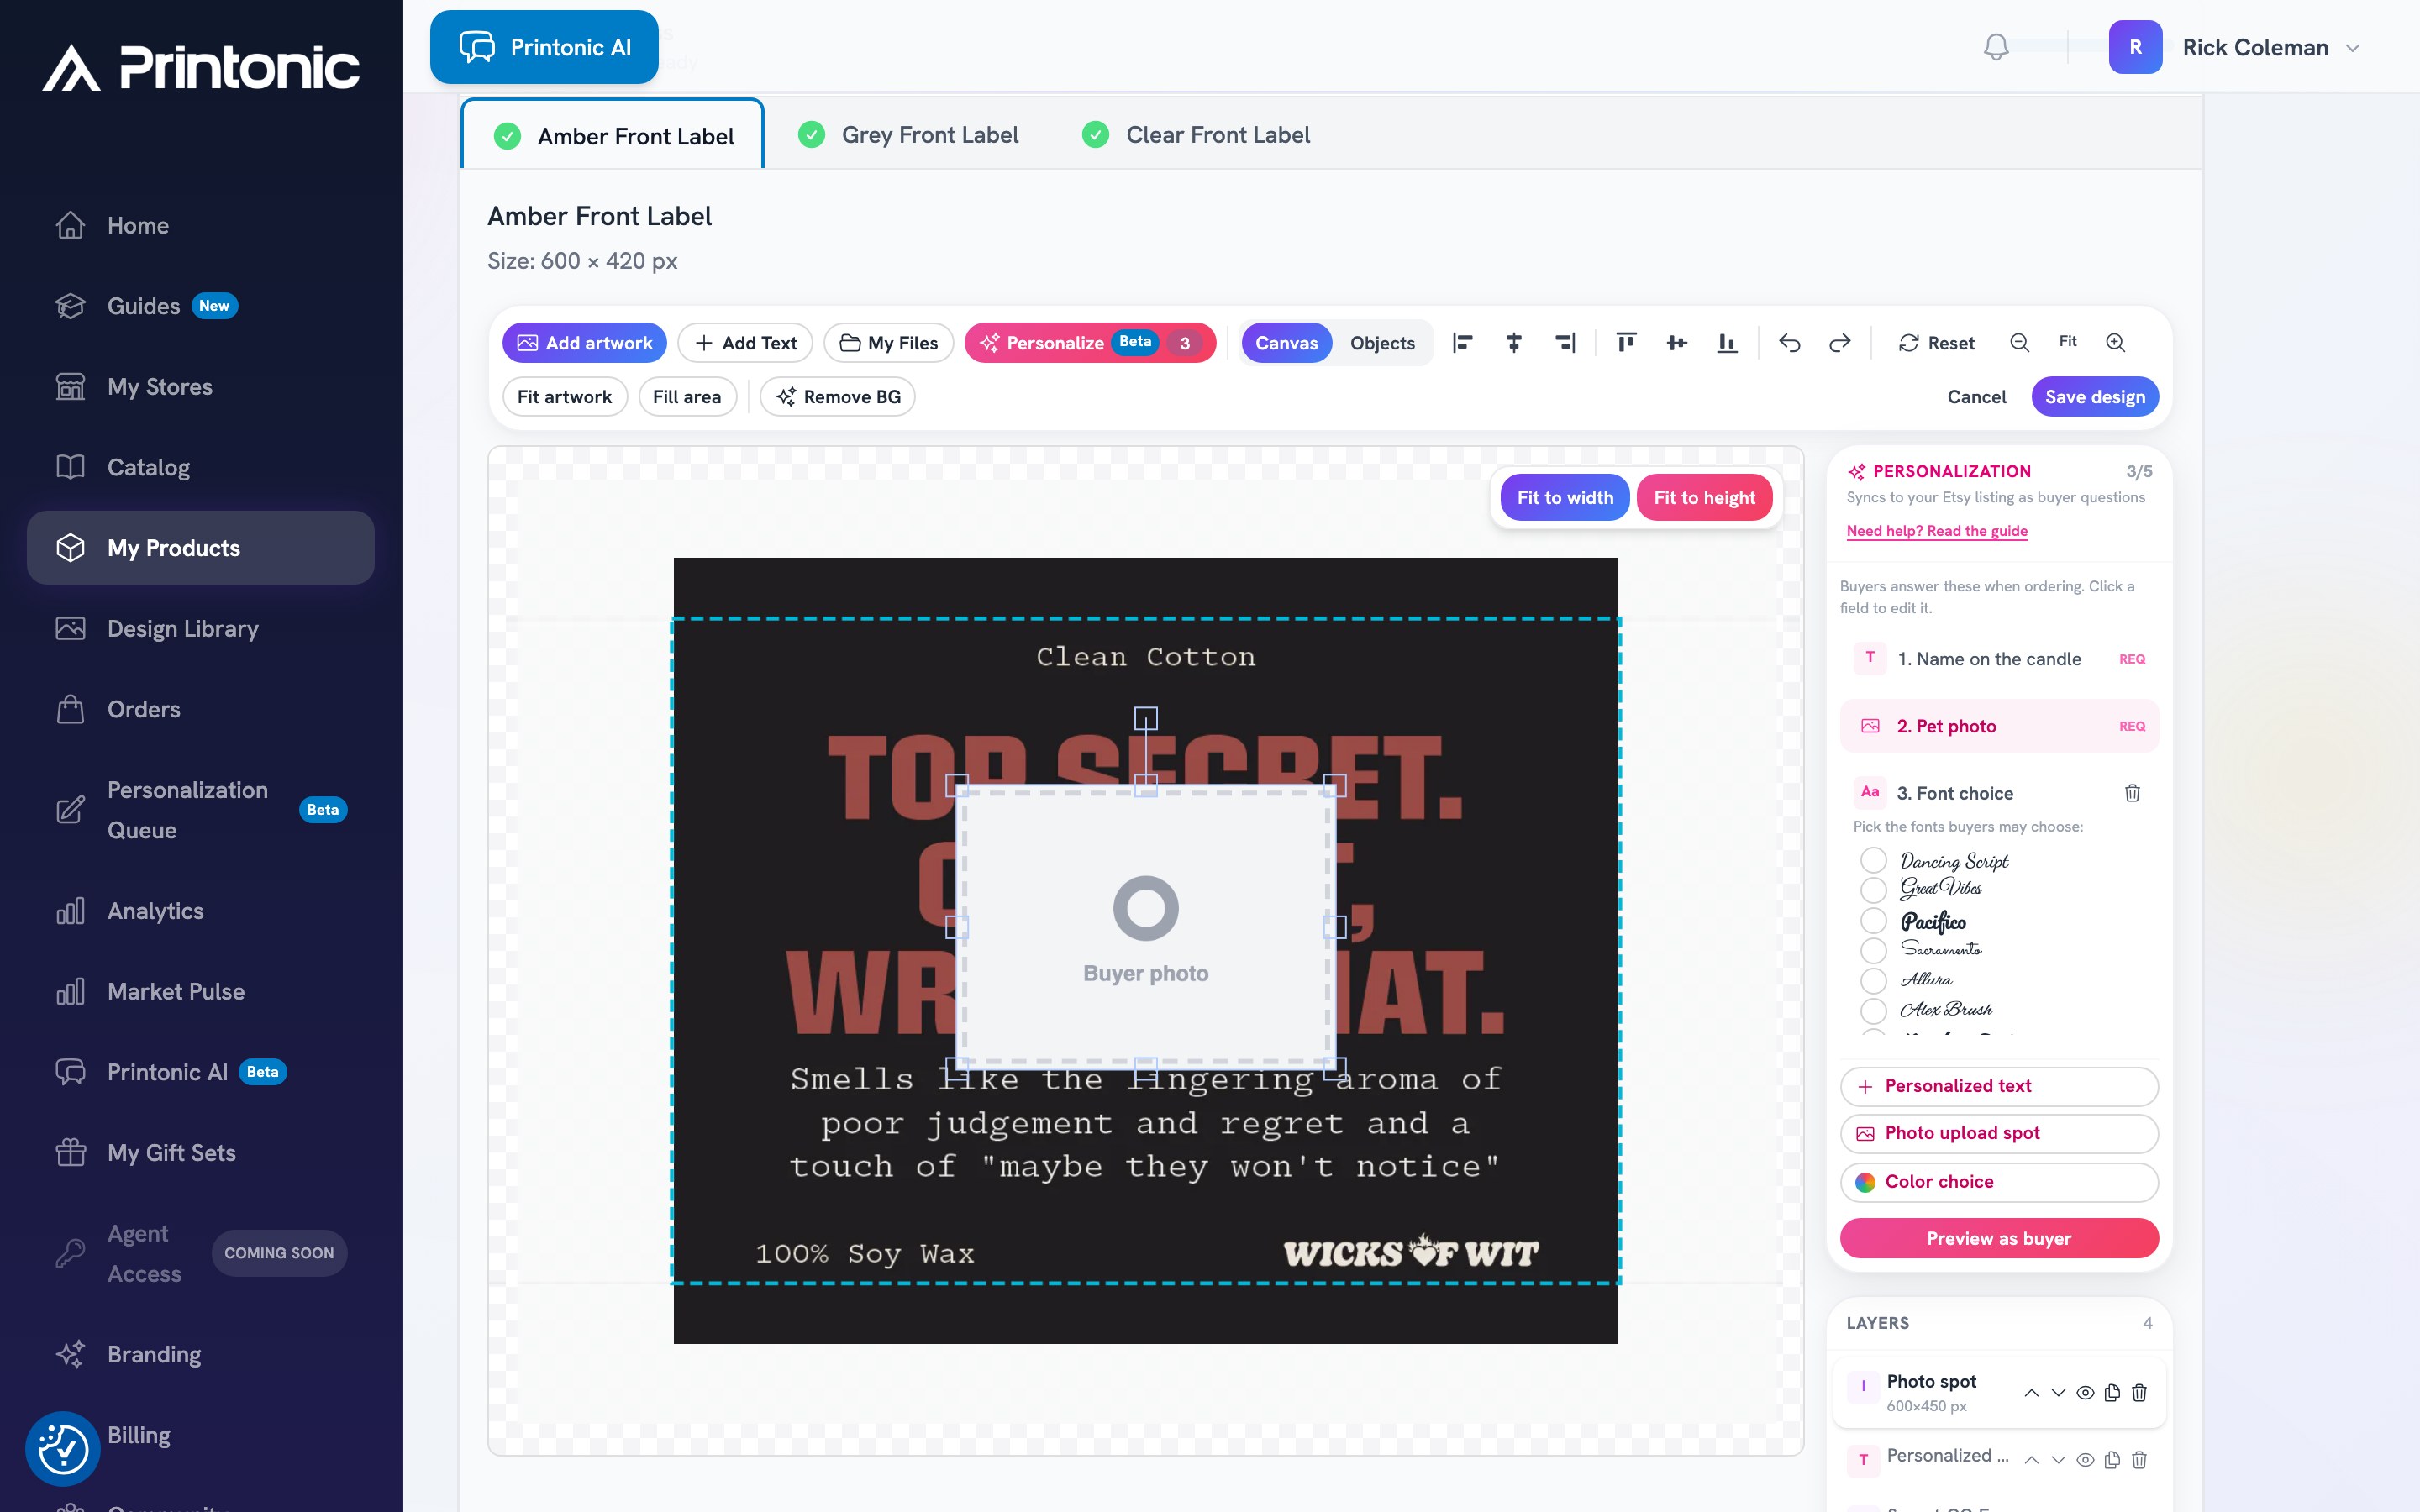
- 5
Personalize panel > Preview as buyer
Preview the listing like a buyer
Click 'Preview as buyer' at the bottom of the Personalization panel. A 'Type like a buyer' section opens where you can fill your own questions with test answers: type a sample name, try your longest realistic answer, switch fonts and colors. The canvas updates live exactly as the render pipeline will produce it. Click 'Done previewing' to return to editing.
This is the moment to catch layout problems. If a 24-character name looks cramped, lower Max chars or enable Shrink text to fit before you publish.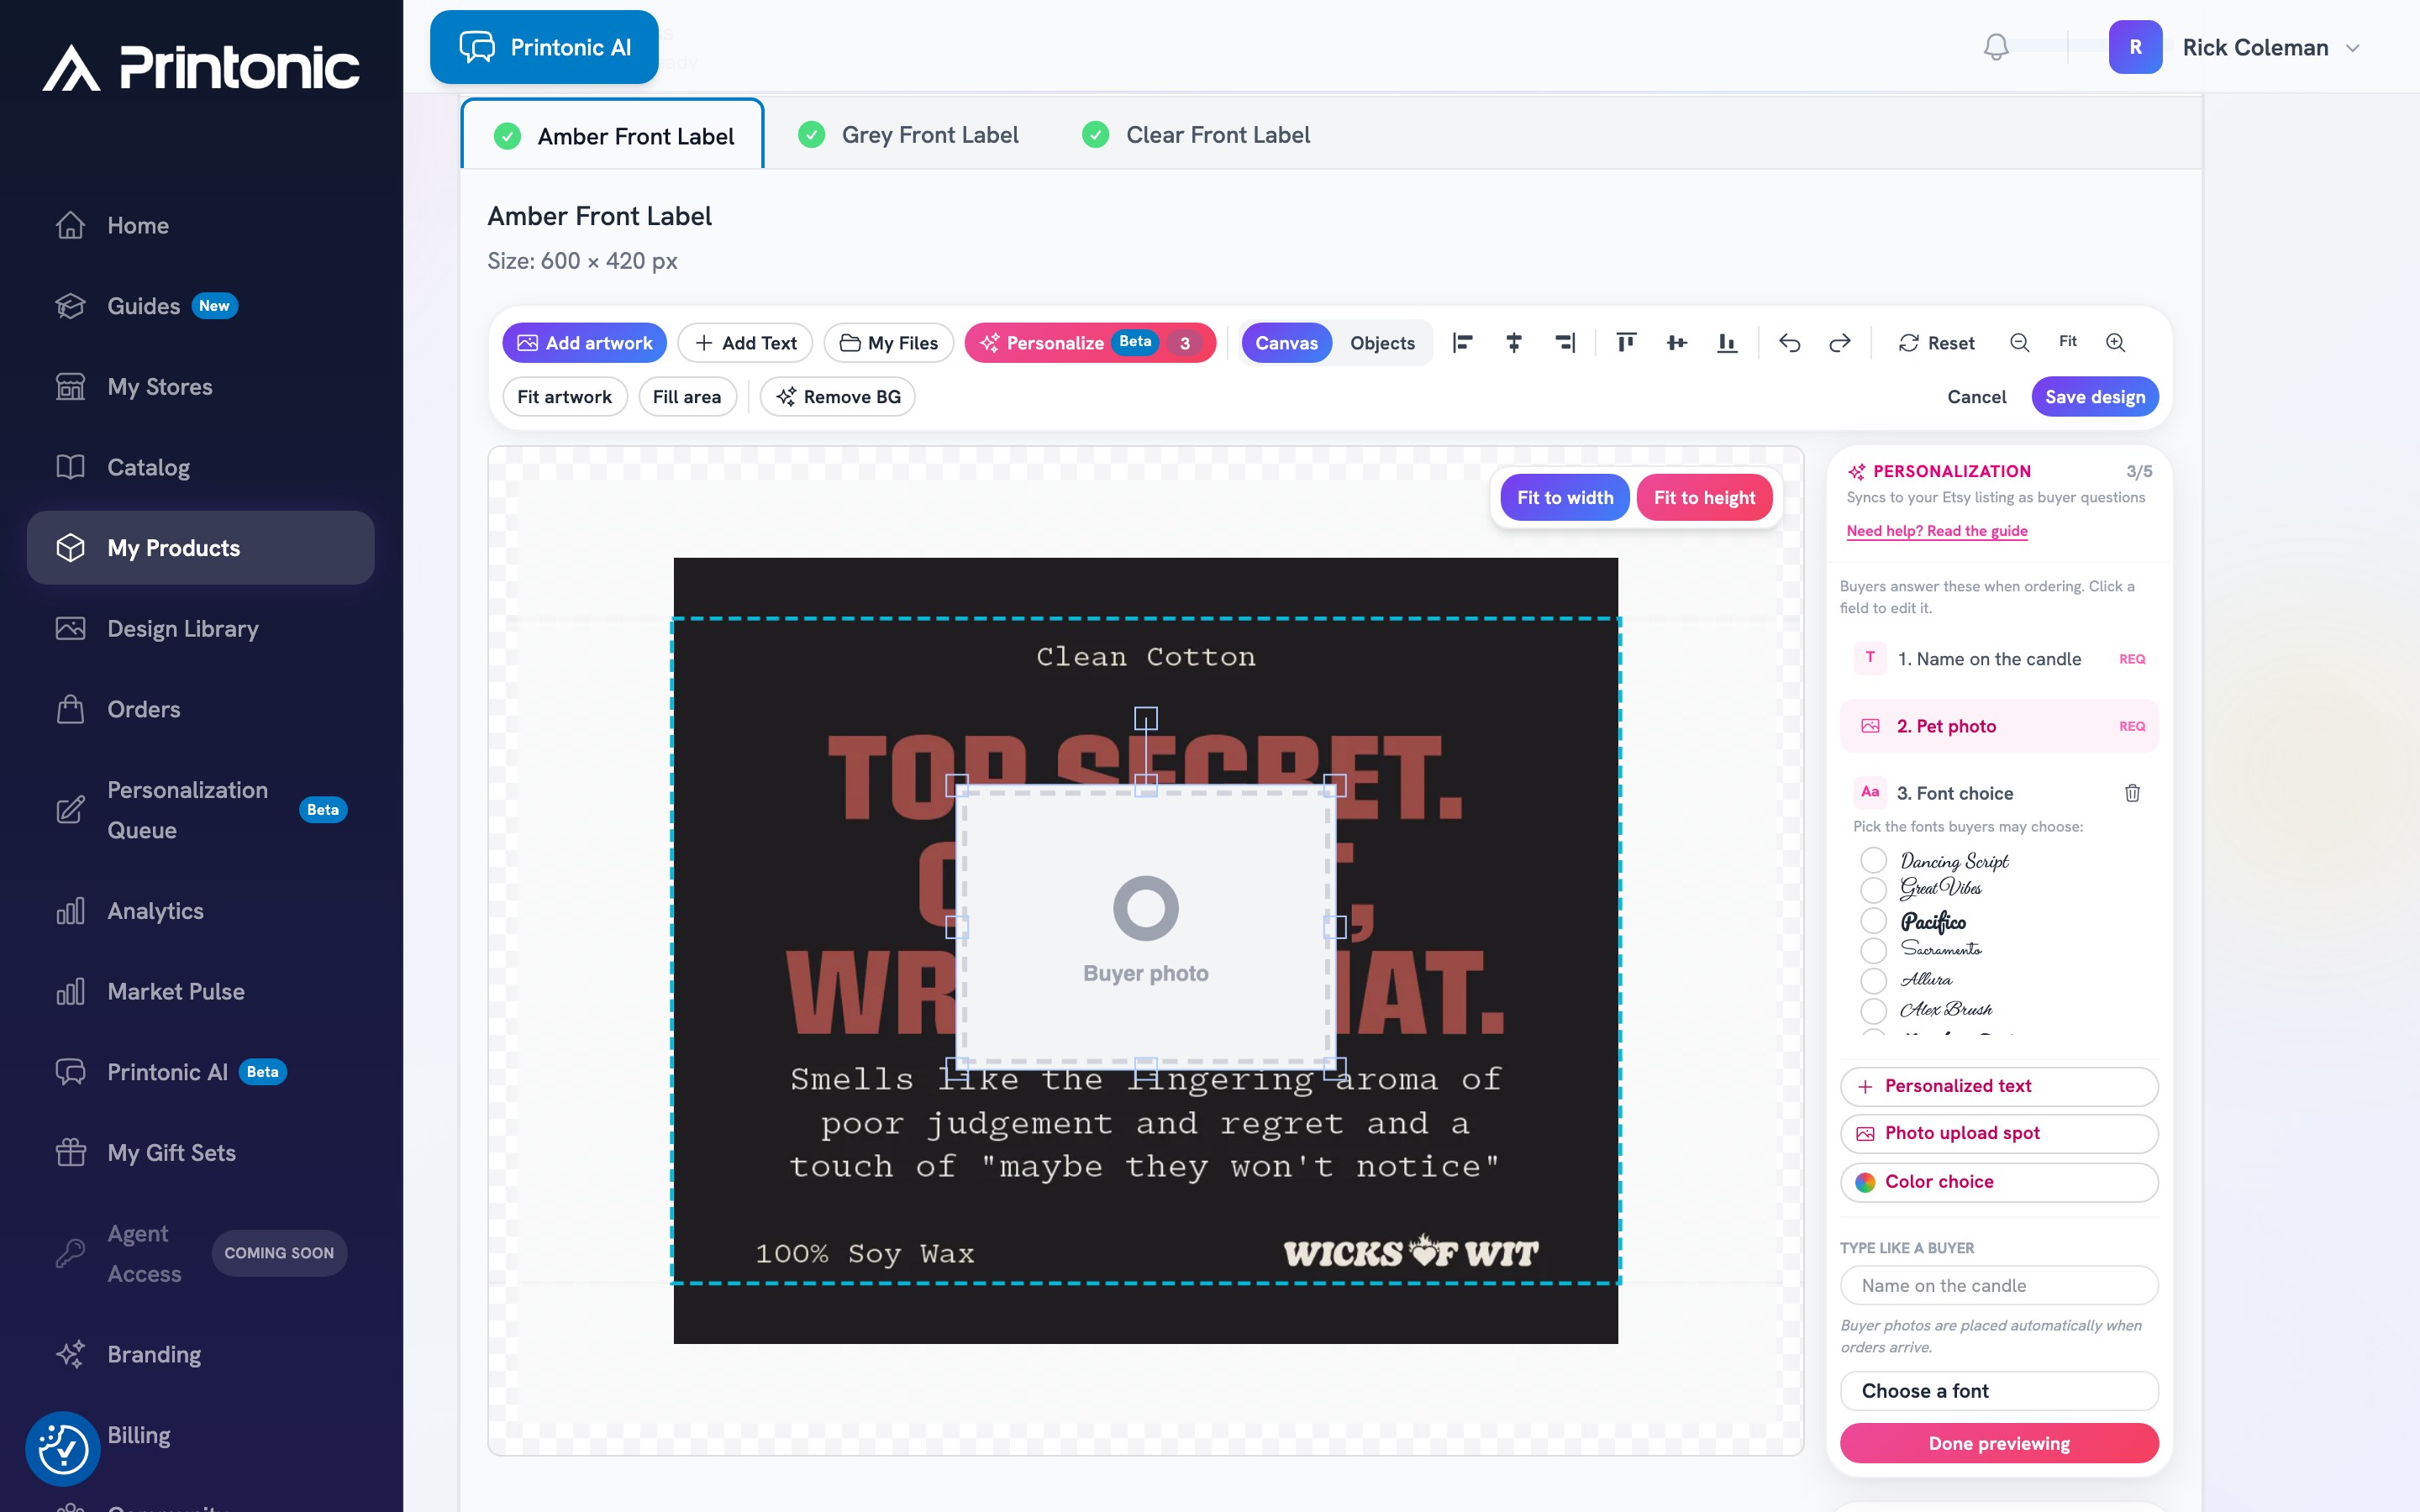
- 6
Product page > Publish
Save and publish, questions sync to Etsy automatically
Save your design and publish the listing as usual. Printonic writes your buyer questions onto the Etsy listing automatically, in the same order as your fields. Etsy allows up to 5 buyer questions per listing, and the Personalize button shows a count badge so you always know how many you are using.
Already published? Editing buyer fields re-syncs on the next publish, and the Publish section of the product page has a 'Personalization questions' card with a Re-sync personalization button to push question changes to Etsy on demand. - 7
Dashboard > Personalization Queue
Orders arrive, renders appear in your Personalization Queue
When a buyer orders with personalization, Printonic renders the finished print file automatically at the product's exact print size. Open Orders > Personalization in the left menu to see every job with a preview image, the buyer's answers, the order number, and a status badge. Jobs that are queued or rendering refresh live on the page.
Statuses you will see: queued and rendering (in progress), ready for review (waiting on you), needs attention or failed (something blocked the render, with a plain-language reason), and approved (released to fulfillment).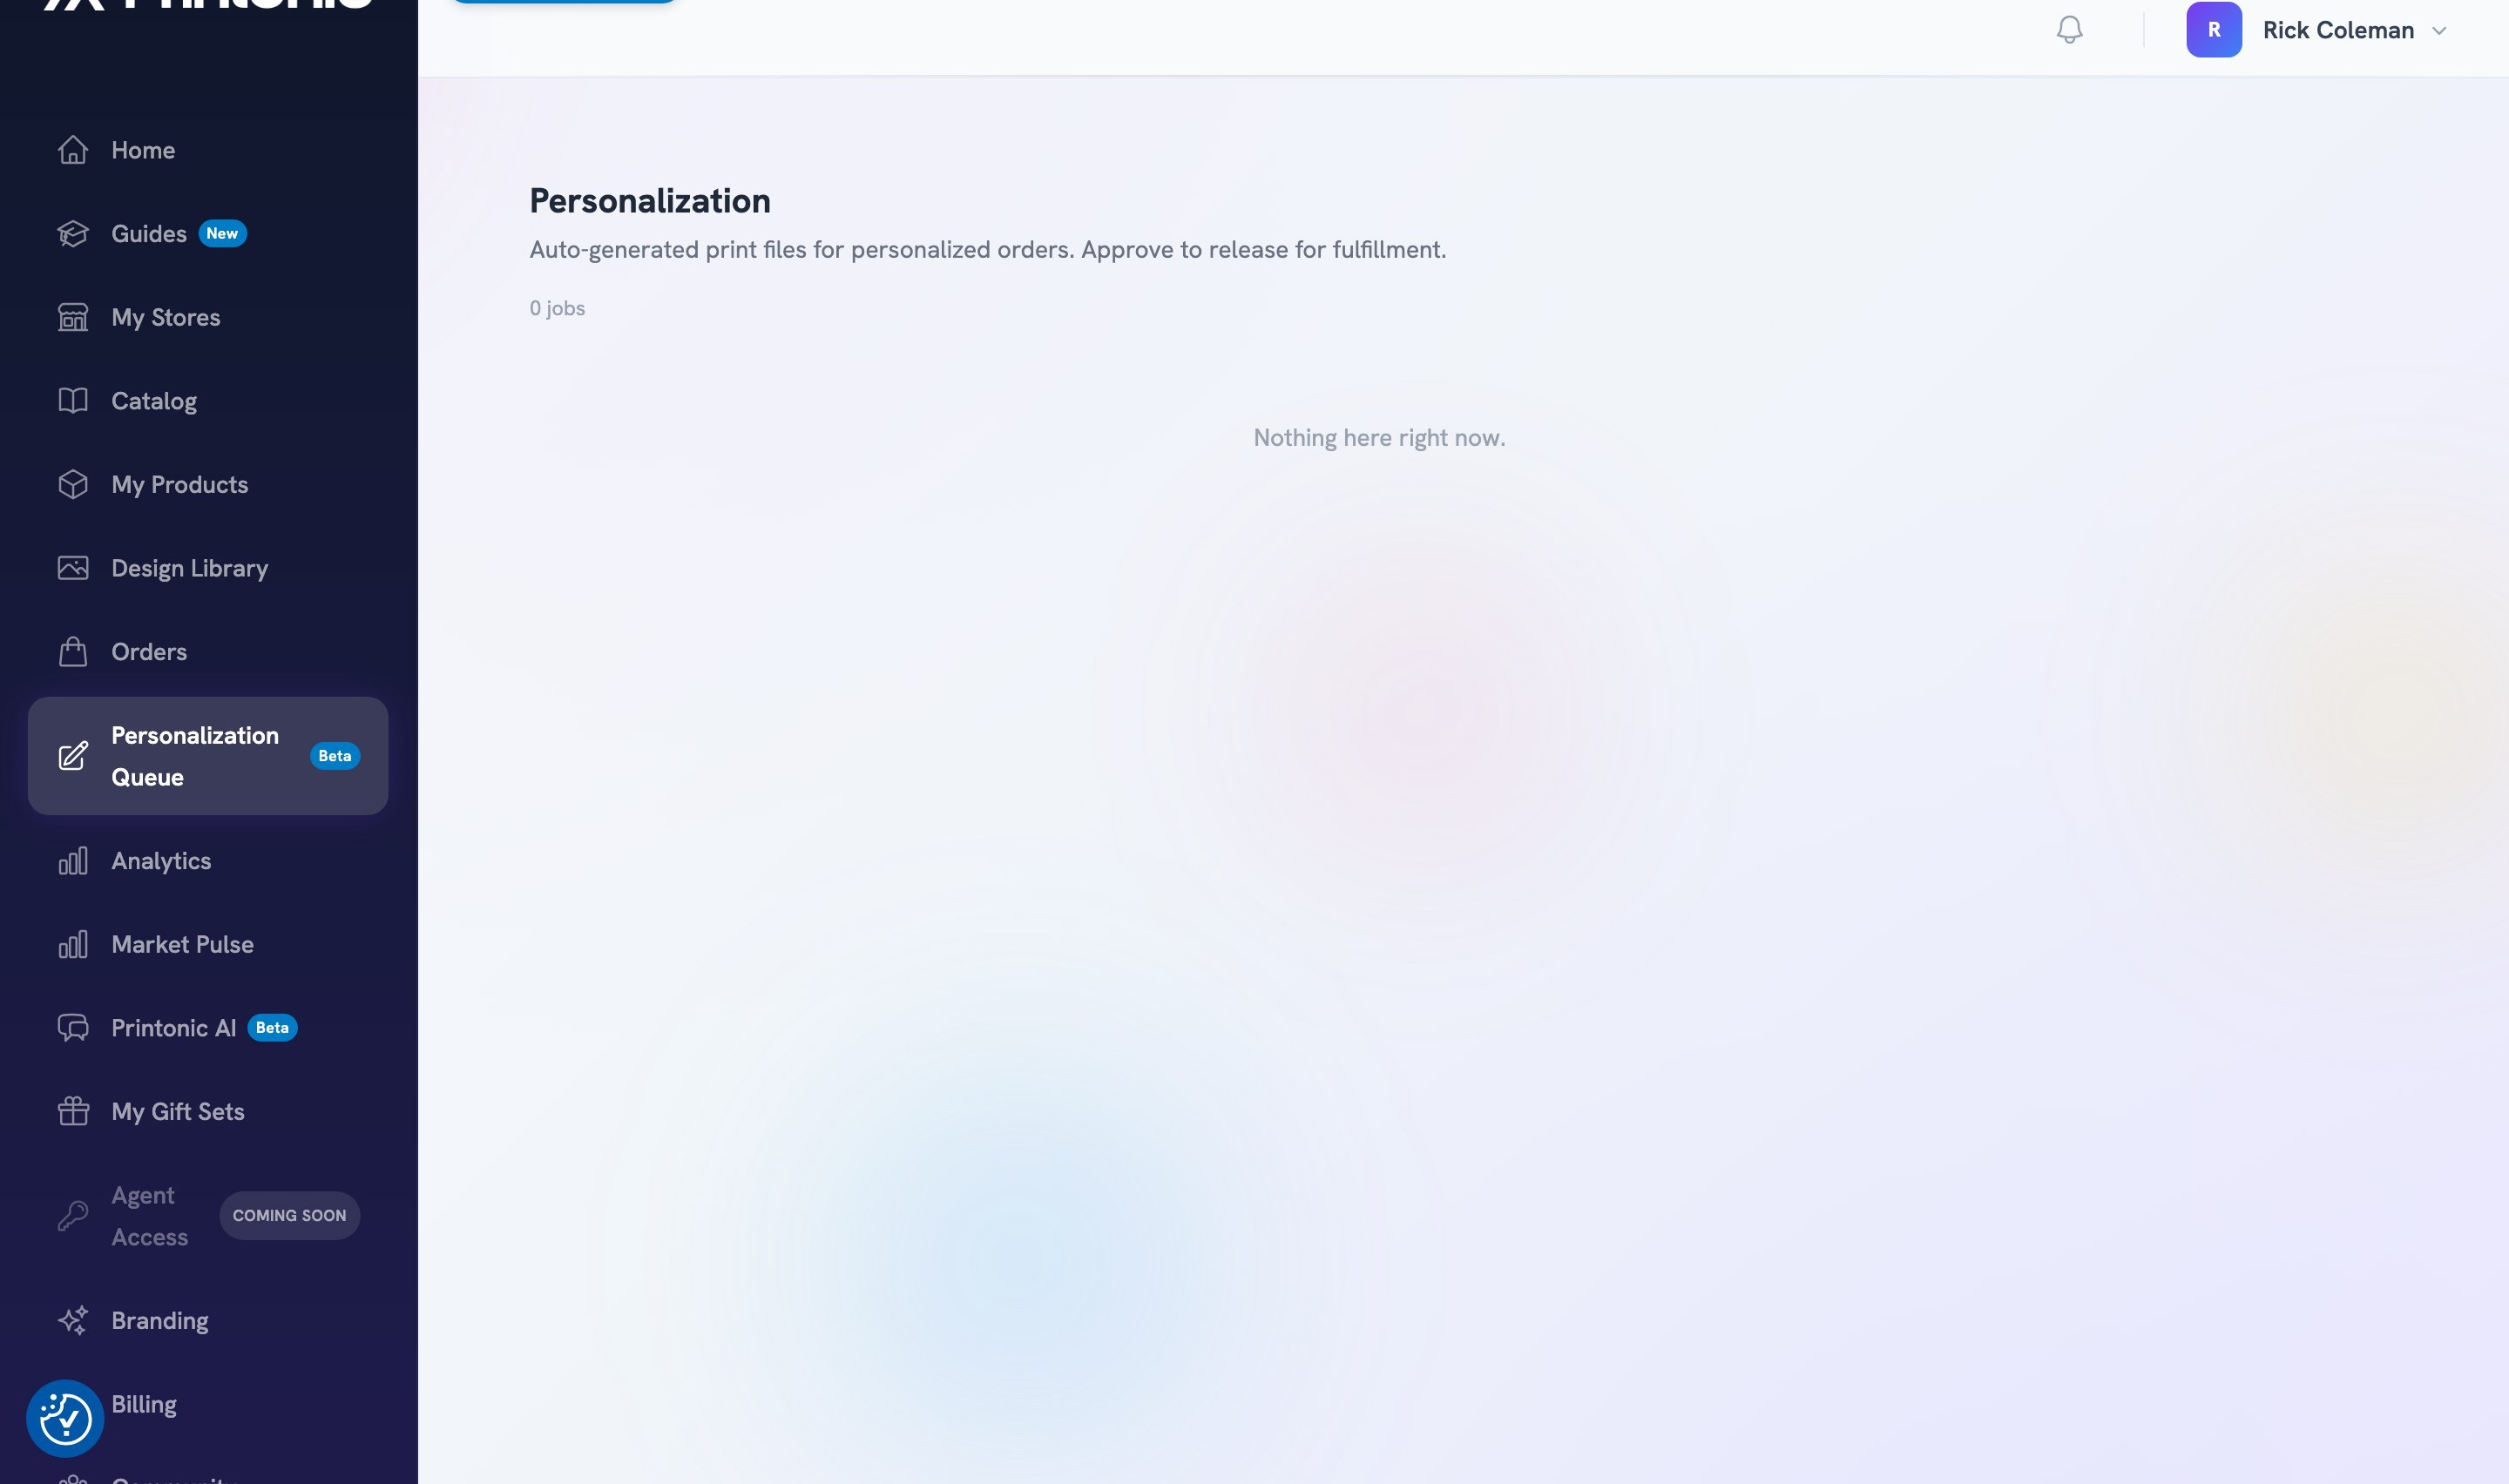
- 8
Personalization Queue > job card
Review the render and approve it
Check the preview against the buyer's answers, then click Approve to release the print file to fulfillment for that order item. Click 'Full-size file' to inspect the actual print file before approving. Nothing goes to production until you approve.
A yellow badge on the card flags anything worth a second look, for example a buyer photo whose resolution is lower than ideal. The render still completes so you can judge the result yourself instead of the order being stuck. - 9
Personalization Queue > Fix / Reposition photo / Regenerate
Fix a job without leaving the queue
If an answer is wrong or missing, click Fix to correct text (with a live character counter), pick a different dropdown option, or use Replace photo to swap the buyer's image. If the photo crop is not flattering, click Reposition photo and drag the image inside its frame. Then click Regenerate to render again with your changes. The card shows a 'photo position adjusted' badge so you know a manual adjustment is in play.
Etsy occasionally drops a buyer's typed answer from the order data. When that happens the job lands in needs attention with the reason spelled out; enter the answer from your Etsy order messages and regenerate. - 10
Personalization Queue > Auto-approve renders that pass validation
Turn on auto-approve when you trust a product
Every render waits for your approval by default. Once a product's template has proven itself, switch on 'Auto-approve renders that pass validation' on any of its cards. From then on, clean renders for that product release to fulfillment automatically, and only renders with warnings or failures wait for you.
Auto-approve is per product, not global, so a brand-new template never skips review just because an older one earned it. - 11
Dashboard > Personalization Queue > Personalize existing listings
Already published? Start from Personalize existing listings
Listings you published before buyer personalization existed (or published without it) do not need to be republished. The Personalize existing listings panel at the bottom of your Personalization Queue lists every published Etsy listing, grouped by what each one needs: Ready to sync (the design already has buyer fields, so one click finishes the job), Add fields in the designer (the design has no buyer fields yet), rows with a Re-save needed badge (the artwork was saved in an older format and needs one re-save first), and a collapsed Already personalized group for listings that are done. Every row links straight to the live Etsy listing so you can check the result.
The list is visible on every plan, but syncing is a Pro feature. Without Pro, the panel shows an upgrade button (with a free trial if you are eligible) instead of the action buttons. - 12
Personalize existing listings > Open designer / Sync now
Add buyer fields in the designer, or just click Sync now
For listings under Add fields in the designer, click Open designer to jump to the product's design canvas and mark buyer fields exactly as in steps 1 to 5 above, then save. The listing moves to Ready to sync. Listings already in Ready to sync need no design work at all: click Sync now and Printonic pushes the buyer questions onto the Etsy listing, no republishing. Rows flagged Re-save needed only need you to open the designer and re-save once (this converts the artwork to the current format); after that they sync like any other listing.
You can also do all of this from the product page. The Publish section of a published, not-yet-personalized product shows a short checklist around the Re-sync personalization button: add dynamic fields in the designer, sync personalization, done. - 13
Your Etsy listing
Sync replaces the questions on Etsy; past orders are unaffected
After a sync, the buyer questions appear on the Etsy listing within minutes, and new personalized orders render automatically and land in your Personalization Queue for review (steps 7 to 9 above). Two things to know before you click. First, sync is a full replace: the questions from your Printonic design become the listing's personalization, so anything you typed into Etsy's own personalization box is overwritten. Move any text you want to keep into a buyer question before you sync. Second, orders placed before the sync stay exactly as they are: they carry no buyer answers, so the render pipeline simply skips them and they fulfill as before.
Etsy's limits apply to synced listings too: up to 5 buyer questions per listing and at most one photo-upload question. The designer enforces both before you ever sync.
Good to know
- Test your longest realistic answer in 'Type like a buyer' before publishing. Max chars plus Shrink text to fit covers almost every layout surprise.
- Keep buyer questions short and concrete ('Name on the candle', 'Pet photo'). The question text is exactly what Etsy shows the buyer.
- One photo question per Etsy listing is an Etsy platform limit. If a design needs two photos, sell it as two listings or combine the photos into one upload instruction.
- Renders use only the curated fonts. If a job lands in needs attention over a font, re-save the design with a font from the picker instead of a custom one.
- Approve promptly. Personalized orders do not enter production until the print file is approved (or the product is on auto-approve).
- Retrofitting an older listing? Move any personalization text you added on Etsy into a buyer question first. Syncing fully replaces the questions on the listing with the ones from your design.
Common questions
Why is the Personalize button locked?
Personalization is a Printonic Pro feature. The button shows a Pro badge until you upgrade. If you cancel Pro, personalization stops working: the questions are removed from your Etsy listings and new orders are not auto-rendered, so keep Pro active while you sell personalized listings.
Which platforms does personalization work with?
Etsy, for now. Your buyer fields live on the Printonic design, so when more platforms are supported the same template will carry over.
Does the buyer see or edit my design?
No. The buyer only answers the questions you wrote, right on your Etsy listing. Printonic renders your design with their answers, and only you see the result in the review queue.
What happens if a render fails?
The job appears in your Personalization Queue as needs attention or failed, with the reason in plain language (missing answer, missing font, blank output). Use Fix, Replace photo, or Reposition photo to correct the input, then click Regenerate. Nothing is sent to production from a failed job.
The buyer's photo is low quality. Will it print?
The render completes and the card shows a warning badge instead of blocking the order. Open the preview and the Full-size file and judge it yourself. If it is not printable, message the buyer for a better photo, use Replace photo, and regenerate.
Do approved files reach production automatically?
Yes. Approve releases the rendered print file to fulfillment for that specific order item, replacing the listing's default art for that order only. Your original design and listing are untouched.
I published my listings before personalization existed. Do I need to republish them?
No. Open the Personalize existing listings panel at the bottom of your Personalization Queue. Add buyer fields in the designer if a listing needs them (or re-save once if it is flagged Re-save needed), then click Sync now. The buyer questions appear on the existing Etsy listing within minutes, with no republish.
Does syncing change orders buyers already placed?
No. Syncing only affects the listing going forward. Orders placed before the sync carry no buyer answers, so Printonic skips them and they fulfill exactly as before. Only new orders placed after the questions are live flow into your Personalization Queue.
I edited the personalization questions on Etsy directly. Are they safe?
No. Syncing from Printonic fully replaces the questions on the Etsy listing with the ones from your design, so direct Etsy edits are overwritten. Treat the designer as the source of truth: make changes there and re-sync, and move any Etsy-side text you want to keep into a buyer question first.
Related guides
Add personalization to listings you already published
Turn older Etsy listings into personalized products without republishing. Your listing history, reviews, and search ranking stay exactly as they are. Pro feature.
Use the Design Library
Upload your artwork once, save print-ready versions of it for different products, and reuse those versions when you build listings.
Publish a listing to your store
Finish your product's Listing step (store, title, description, pricing), publish it to your connected store, and find your SKU codes afterward.
Manage your orders
Every order from every connected store lands in one Orders tab. Learn what each status means, how to sync, how to send, ignore, restore, or resubmit orders in bulk, and how to change the recipient, switch an out-of-stock option, and read buyer answers.
Work with Printonic AI
Chat with the Printonic AI agent to research catalog products, plan listings, prepare your artwork, and create ready-to-review listing drafts. Pro feature.